Basic coding For kids, Coding in scratch 3.0
Basic coding for kids refers to learning to program easily and provides many tools to help you as parents or educators guide the children in this process.
This article introduces you to a basic lesson using Scratch. So we will teach you to move in the Scratch environment, and together we create your Scratch account and move into the Scratch environment. This article is the first of many lessons we will provide to teach basic coding for kids using a Scratch visual block-based language.
What is coding?
Coding is a term using in the computer world, and it refers to give instructions to a computer.
As you know very well computer doesn’t understand the human language. The language understood by computers is machine language, or in simple words, we can say that programming language. So using a programming language, we can communicate with the computer.
Coding means writing step-by-step instructions in a specific language, and the computer will follow all those instructions. Programming languages are composed of instructions in a specific syntax. For some programming languages, the syntax is just Simple English words.
There are many programming languages, most of them are text-based, and some are visual block base.
Text-based programming languages.
Look at the image below. The words written in this text are some of the most popular programming languages. These programming languages are text-based programming languages, which means the syntax of these programming languages is in text form. Therefore, you need to write code in the particular syntax of those languages.
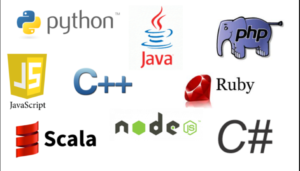
Text-based Programming Language
Visual block-based programming languages.
In computing, a visual block-based programming language is any programming language that lets users create programs by manipulating program elements graphically rather than by specifying their text. Similarly, we connect Lego blocks.
In the image below, we can see a four-block that represents instruction. As you can see, The blocks have a particular form that helps us connect in the correct order. So to make a program, we must determine the order in which you must execute it a put together.
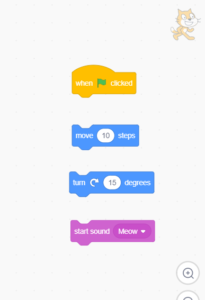
Instruction Block
Each block has specific characteristic :
- For example, some do not allow connect one block before.
- Others do not allow connect one block after.
- They are specific colors, and we will learn the meaning of each color.
What is Scratch?
Scratch is a programming language and code editor and is a project developed by the Lifelong Kindergarten research group at the MIT Media Lab in collaboration with the Kids research Group at the UCLA Graduate School of education & information studies.
Scratch Is a free programming tool, provides an environment that enables kids to created animated stories, interactive arts, or their own games and additionally allows us to share our creations over the internet with other Scratcher. Thus, we can enjoy the creation of them.
It builds on the tradition of Logo and Lego/Logo. The fundamentals of programming Scratch are putting blocks together and connecting them in a specific order which makes sense for what you are trying to do. By using these various block combinations, we can create absolutely incredible games/ animation/projects.
Let us begin our Journey with scratch 3.0
We are going to make a fun journey. And our two first steps will be
Exploring Scratch Site and creating our own Scratch account.
Exploring.
You can follow reading the steps by steps or watching the video.
Steps by steps
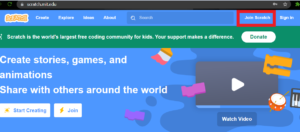
Visit http://scratch.mit.edu/. And you are going to be on the Scratch Home Page.
- Before we log in, we can explore the projects created by others.
- On the home page, Scratch selected some projects for us.
- Click any project that appears on the first page or search a specific keyword.
- We can write in a search text box and will obtain results according to our needs.
- Click on the project that we prefer. Then, scratch goes in the project.
- In the project, we can execute it or see insight.
- To execute, we must read the instructions the author has written for us.
- We can see the blocks and actors the author has used to get the goal in the insight.
Feel free to navigate on the site and discover many important things by yourself.
Creating an account in SCratch 3.0
Hi there, as you know very well, scratch is an application to learn to code, and it helps us build our logic by connecting instruction codes.
If you want, you can use scratch online; you must create an account so that all your projects will get saved there. First, let us explain how to create our own account step by step, and then you need to answer some questions.
Follow the below steps to create an account in scratch3.0:
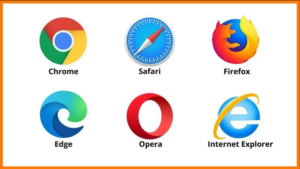
1. open a web browser like (google chrome, Mozilla Firefox, or Safari).
2.type “scratch.mit.edu” in the URL bar.

3. scratch website will get open, look at the right top corner and click on “Join Scratch.”
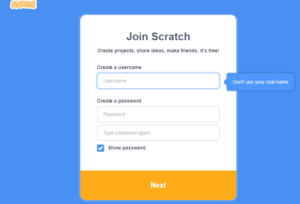
4. A form will get open, now, fill in the username of your choice, but it must be unique.
5.Type a good password which you will remember. And retype the password once again.
6. Click on “next.”
7.Select your country and click “next.”

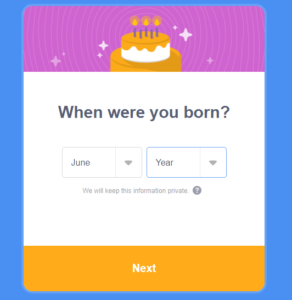
8..Select your birth month and year. Then, click on “next.”
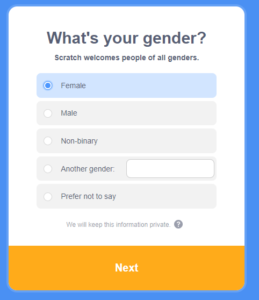
9.Now, select your gender (male/female/other) and click “Next.”
10.at last, enter your mail id and click “Create Your Account.”

And boom, your account is almost ready now.
You can refer to the below video.
- The scratch community will send you a mail. First, you need to open your mailbox. Then, open the mail from the scratch community. Then, click the link provided in that mail. after clicking on it, congratulations, your account is now confirmed, and you can use it.
Installing/Downloading scratch 3.0 on your pc.:
The advantage of using scratch is you can use it online via the main website of (“www.scratch.mit.edu”), or you can download the app directly to your pc or laptop.
To download the application, follow the steps mentioned below.
- Open your web browser. Make sure you are connected to the internet.
- Type “scratch.mit.edu/download” in the URL bar. and hit the enter key.
- (the scratch page will get open )now scroll down and click on the direct download.
- The download will start. You can see it in the bottom left corner of your browser.
- Once the download is complete, go to file explorer and click on downloads. You will see your downloaded file there. Open it. Click next. Again click next. Then click finish.
- And congratulations on your scratch 3.0 being installed successfully.
For more reference, watch the below video.
Downloading scratch 3.0
Let s understand scratch IDE/ Block Categories:
The image below shows us the bar with the block categories located at the left in the Scratch IDE. We will define some of them in this article.
Scratch introduction(1.1)
Motion: Motion blocks deal with the movement of sprites. They relate mainly to the x and y position and direction of the sprite. Their color is blue.
Looks: It looks blocks are related to the appearance of sprites and the stage.
Sound: Sound holds Purple color. Here we can set volume and other related settings to sound.
Events: Events blocks are related to various triggers in a project or when one part signals another to run. Their color is Yellow.
Control: Control blocks run the basic flow of a project. And its color is Orange.
Sensing: for the intelligence purpose. Indicates in Sky blue color.
Operators: helps to perform arithmetic operations and logical operations, and relational operations. They are represented by Green color.
Variables: It helps us creating our own variables, which we can use throughout the program.
My Blocks: With the help of my blocks, we can create our own blocks for coding. Represented by Pink Color.
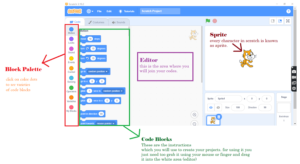
Code Blocks:
After Learning about Block pallets, we need to understand code blocks. As we mentioned before, scratch programming is all about connecting instruction(codes) in a meaningful sequence to form a good project. Now, look at the image (1.1). You can see some codes written in the English language. These sentences/words/commands/instructions are known as codes, as they are in a specific shape. They are called blocks. So we will call it code block.
Now, if you scroll down, you can see many varieties in codes, some in appearance, some in shape, some in color; as they vary in their properties, their uses also vary according to the Block Pallete.
For example, the blue-colored code blocks are for motion.
similarly, every pallet element holds different color. (read the information mentioned above)
Editor:
The most important thing in the whole scratch editor is the place where we can code, and that is known as the editor space available in the middle (center) of the scratch. Only here can you join your code blocks. (see image 1.1) . And for whatever sprite you are coding is visible at the top right side of the editor space.
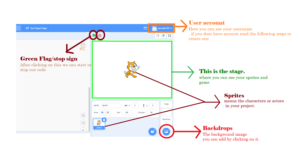
Sprite:
The character or actor we will use in the project or game is known as Sprite. Every character or actor in the scratch is known as a sprite. The default sprite after opening the scratch is a cat. Look at the image (1.2).
Scratch introduction(1.2)
Stage:
The stage is the area where you can preview your project. The sprites, background image, variables, motions, everything is visible in the stage area.
Backdrop:
In scratch, the background image is called a backdrop. For assigning backdrop, click on backdrop+, and scratch backdrop library will open. You can choose any backdrop of your choice. However, it appears only on the back layer of the stage.
Final Thought
In this lesson called “Basic Coding for kids,” we have learned
- What is coding
- What is Scratch?
- Explore a Project in Scratch.
- Create our Scratch Account.
- Know important tools in the Scratch environment.
- Do a basic project using blocks from different block palettes.
Don’t wait to continue this amazing journey we’ll see in our next parade:
Easy Scratch projects: Scratch environment and my first project.
Glossary:
Backdrop: is an image that we can see on the Stage. They are in the backdrop’s library.
Coding: is a step-by-step instruction that humans write to teach computers to do stuff.
Costume: is one out of possibly many “frames” or alternate appearances of a sprite. Sprites can change their look to any of their costumes. So we can be named them, edited them, created them, and deleted them.
Programming language: is a set of commands, instructions, and other syntax use to create a software program.
Scratch: is a visual block-based language, is any programming language.
The script is a collection or stack of blocks that all interlock with one another. The blocks and their order are fundamental, as they determine how sprites interact with each other and the backdrop.
Sprites
Are the objects that perform actions in a project. It can be user-created, uploaded, or found in the sprites.
Stage: is the project’s background but can have scripts, backdrops (costumes), and sounds, like a sprite. It is 480 pixels wide and 360 pixels tall.
Comments
4 responses to “Basic coding for kids: coding in scratch”
[…] you all know very well what coding means. As we explained in the previous post, click here to know what coding means if you didn’t read it. As referred to in the previous post, scratch programming is all about connecting blocks in a […]
[…] Basic coding for kids: coding in scratch […]
[…] Basic coding for kids: coding in scratch […]
[…] Basic coding for kids: coding in scratch […]