You’ve seen several of Scratch’s repetition structures before, but this blog covers them in greater detail. Next, it’s time to debate new blocks that make loops, nested loops, and recursion. By the top of this chapter, we’ll have explored the following programming concepts:
- Repetition structures to execute statements repeatedly.
- How to validate the user input.
- Counter-controlled and event-controlled loops.
- Procedures may call themselves recursion.
If you have previous knowledge, you can follow this chapter. If not, we recommend we try first our previous posts:
Then, let’s move on and learn new programming concepts.
Loops
Although the general public finds repetitive tasks boring, computers seem to like nothing more. Repetition structures, better referred to as loops, are programming commands that tell a computer to execute a press release or a sequence of statements repeatedly. The best good loop may be a definite loop, which repeats a sequence of statements several times. These loops are also called counter-controlled loops or counted loops. Other loops repeat until some condition becomes true, called condition-controlled loops or indefinite loops. Finally, another loop, called an infinite loop, repeats forever.
In this blog,
you’ll study the various repetition structures available in Scratch. I’ll explain both counter-controlled and condition-controlled loops very well, and we’ll introduce you to the stop block, which you can use to finish infinite loops. You’ll also find out how to use loops to validate user input.
The chapter also discusses nested loops (loops that contain others inside the loop) and shows several samples of their use. We’ll also speak about recursion—a procedure calling itself—as our way to realize repetition. Then, at last, we’ll develop various exciting applications that use both loops and conditionals, and we’ll observe incorporating loops into practical programs.
More Loop Blocks in Scratch:
As we saw in previous posts, loop blocks allow you to repeat a command or a group of commands in a program. Scratch supports the three repetition blocks shown in the image below.
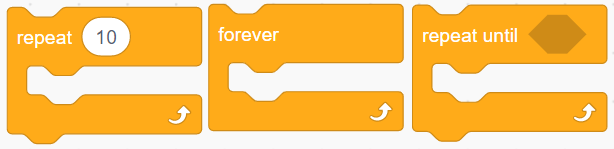
Figure: Scratch’s repeat blocks
This section will examine the third reason, the Repeat-Until-Block, and explain some of the technical terms related to loops.
Each loop repetition is named an iteration, and therefore the word count is often accustomed to describing the number of times a loop repeats. For example, the repeat block, which you’re very conversant in, could be a counter-controlled loop because it repeats its commands several times. We usually use this loop when we know the number of repetitions the loop will have to execute, as after we want to draw a polygon with a known number of sides.
On the opposite hand, the repeat until Block could be a condition-controlled loop. The statements inside this Block are repeated to support the reality or falsity of its test expression. We use this Block after we don’t know how many times the loop will repeat and need the repetition to continue until some condition is met. you’ll say, as an example, “Repeat the ask command until the user enters a positive number.” Or, “Repeat firing missiles until the player’s energy state drops below a particular value.” the subsequent sections explain condition-controlled loops in additional detail.
The Repeat-Until Block
Let’s say you’re developing a game that presents the player with an elementary math question. If the player’s answer is wrong, the game asks the identical question again to show the player another chance. In other words, the sport asks the exact question until the player enters the proper answer. The repeat block is inappropriate for this task because you don’t know the percentage of times it’ll take the player to enter the correct answer; the primary try may be a winner, or it will take 100 attempts. The repeat until Block can facilitate you in scenarios like this one. The structure of the Repeat-Until the Block is illustrated in the figure below.

The above Block,
contains a Boolean expression whose value is tested at the loop’s entry. If the expression is not valid, the commands inside the loop are executed. When the last command is completed, the loop starts over, and the expression is tested again. If the expression continues to be false, the commands inside the loop are executed again. This cycle repeats until the test expression (an expression to be checked) becomes true. When that happens, the commands inside the loop are skipped; therefore, the program moves to the command that immediately follows the loop.
If the test condition is true before the program runs the loop, the primary means the commands within the loop won’t be executed the first time. Also, the repeat until Block will not terminate unless a command (either inside the loop or in another active part of the program) causes the test condition to become true. If the test condition results never become true, we get into an infinite loop.
The figure below shows a practical example of using the repeat until Block. In this example, as soon as the Player sprite is quite more than 100 steps away from the Guard sprite, the Guard sprite will still move in its current direction (horizontally during this case), bouncing when it touches the left or the right fringe of the Stage. However, if the space (distance) between the two sprites becomes less than 100, then the repeat until Block will terminate, and therefore the Guard sprite will start to chase the player sprite. The code for the chase isn’t shown in the figure. The gap to block is present Sensing palette.
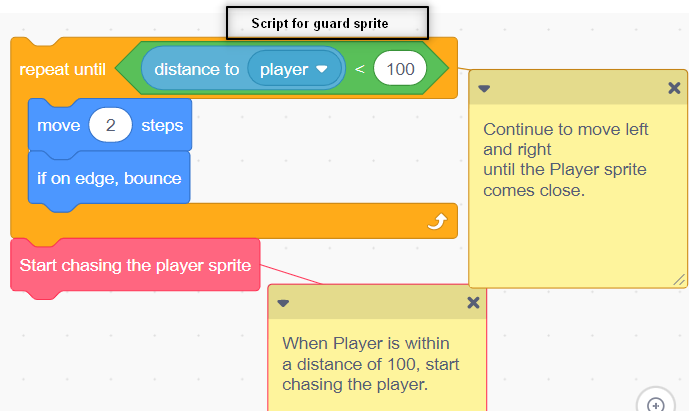
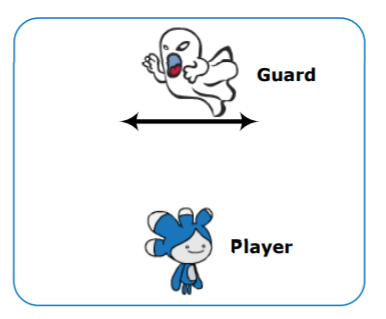
A simple example showing the repeat until the Block in action
Building a forever if Block
Infinite loops are helpful during a lot of programming situations. In the previous chapters, as an example, you have used the forever block to play background music and also animated sprites by changing their costumes continuously. The forever block is an unconditional, infinite loop, as it does not have a test condition that controls the execution of the commands inside it.
However, as shown in the figure below, you can easily change that by nesting an if condition block inside a forever block to make a conditional infinite loop. The test condition of the if Block is tested at the start of each iteration, and its commands only execute when the test condition is true. Note that since the forever block is meant to run forever, you can not snap command blocks after it.

You can create a forever/if loop by combining a forever block with an if block.
The combined forever/if the structure is usually accustomed to controlling sprite motion movement with the keyboard arrow keys, as demonstrated in the figure below.
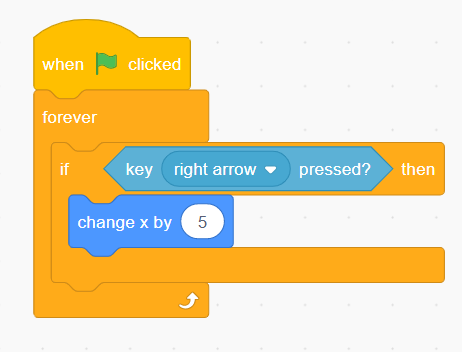
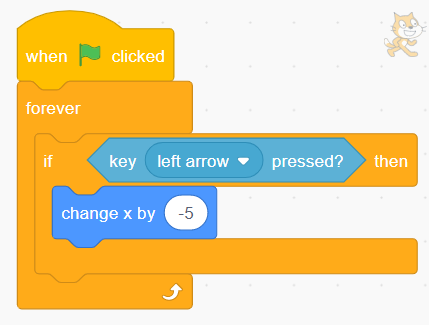
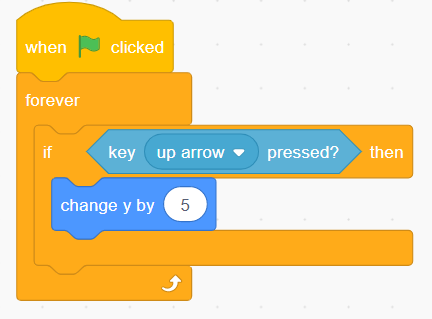
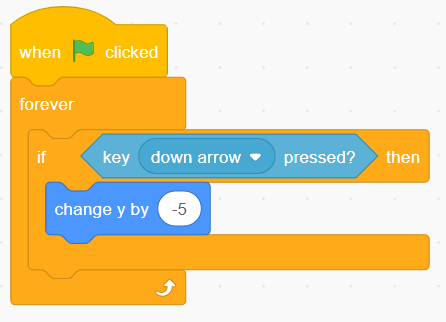
Figure: These scripts allow you to move a sprite using the keyboard arrow keys. Each script responds to one of the four keys.
When the green flag is pressed, the four keyboard arrow keys mean left, right, up, and down are monitored in the four independent infinite loops. When any of those keys is pressed, the corresponding loop causes a change within the x- or y-coordinate.
Create these scripts in Scratch and run the program. Observe that if you simultaneously press the up and right arrow keys, the sprite will move diagonally in the northeast direction. Try other combinations of the arrow keys to determine how the appliance responds.
Stop Commands
Let’s say you’re writing a program to search out the primary integer but 1,000 that is evenly divisible by 3, 5, and 7. you’ll write a script that checks the numbers 999, 998, 997, and so on, one by one, in a loop. You wish to stop the search once you find the amount you’re searching for (945 during this example).
How can you tell Scratch to finish the loop and stop the script? You’ll be able to use the stop command (from the Control palette) to finish active scripts. The drop-down menu provides the three options shown in the figure below.
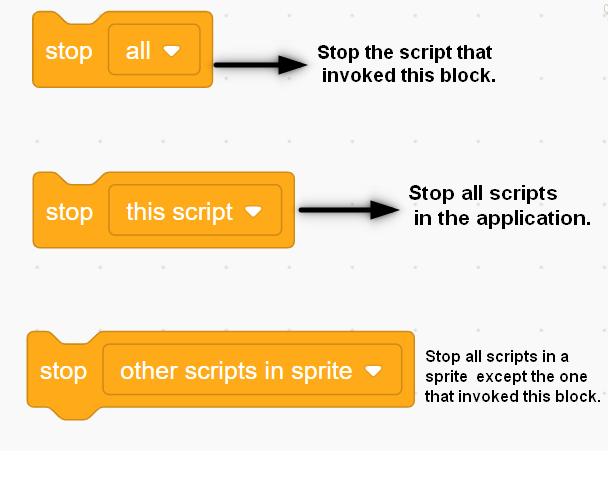
Figure: Using the stop command in Scratch
The first option instantly terminates the script that calls it. On the other hand, the second option stops all running scripts in your application; it’s similar to the red stop icon located at the highest of the Stage. Note that you can’t snap any commands after using either option after the stop block.
The third stop option allows a sprite or the Stage to finish all of its scripts except the one that is invoked the stop block. This command is a stacked block, so you’ll add blocks below it to execute after it suspends the sprite’s other scripts. Let’s see this command in a simple game,
illustrated in the figure below.
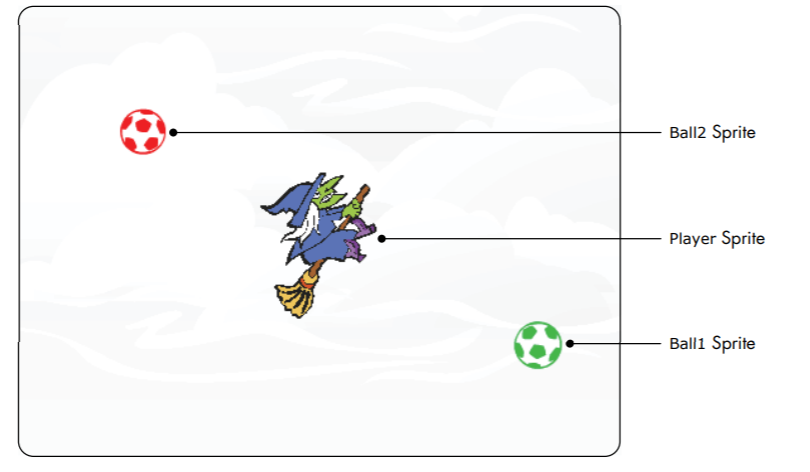
Figure: In this game, the player moves the witch on the Stage while avoiding the two balls.
The two balls in this figure move around the Stage and chase the witch. The player moves the witch sprite with the keyboard and avoids touching the two balls. The sport ends if the red ball touches the player at any time. If the green ball touches the player, it’ll stop chasing the player, but the red ball will start to mane over a touch faster—which
making escaping it a true challenge.
The scripts for moving the witch sprite are the same as those in the figure above, so I will not show them here. The scripts for the two balls are shown in the figure below—let’s glance at those.
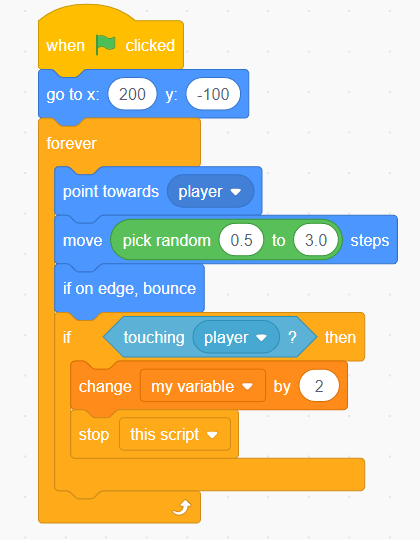
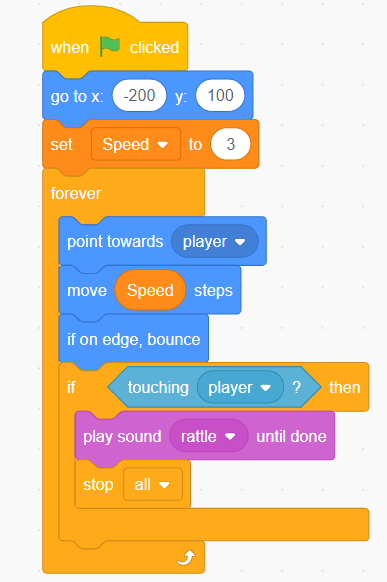
Figure: Scripts for the green ball (left) and red ball (right)
When the green ball touches the player and the condition becomes true, it increases the speed variable (which sets the movement speed of the red ball.) and invokes the stop this script command to terminate its script. All other scripts within the game should still run normally. Using the stop, this script command works well because we only want to hurry up the red ball once. However, if the red ball touches the player, it executes the stop all command, which causes all running scripts within the application to prevent.
You can also use the stop block, which is in the control category, to terminate a procedure and make it return to the caller at any point during its execution of the program. The following section shows this idea in action.
Ending a Computational Loop
We want to seek out the primary power of two(2) larger than 1,000. We will write a procedure that checks the numbers 21, 22, 23, 24, and so on in a loop. Once we find the quantity, we would like the program to mention the answer and stop the procedure. The figure below shows two ways to implement this approach.
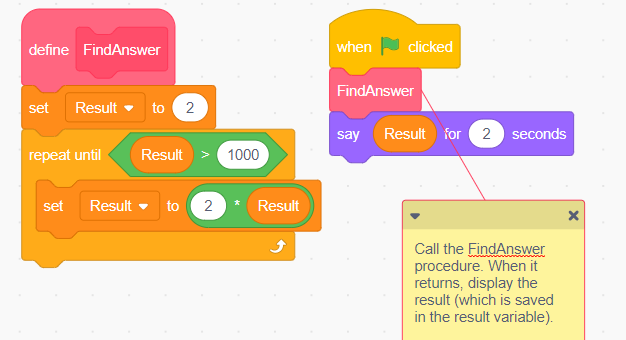
Figure: Two ways to find the first power of 2 larger than 1,000.
The procedure on the left in the figure below initializes the result variable to 2, the first power of two to be checked, and enters an infinite loop in rummaging around for the solution. It contains the worth of the end in each iteration of the loop. If the result’s more fantastic than 1,000, the procedure invokes the stop this script command to prevent and return to the caller. Otherwise, the command after the if Block (which multiplies the previous value of the result by two) executes, and the next iteration of the loop begins. If you trace through this procedure, you’ll see that the if-Block finds the result to be two within the first iteration, four within the second iteration, eight within the third iteration, and so on. This continues until the result exceeds 1,000; then, the procedure stops and returns to the caller, which displays the result using the say block, which is available in the looks category.
Figure (right) shows our way of implementing the procedure. Here, we used a repeat until the Block of controls loop until the result exceeds 1,000. Then, within the first implementation, the loop continues to double the worth of results until it exceeds 1,000. When this happens, the loop terminates naturally, and the procedure returns to the caller. Note that we didn’t just use the stop block during this case.
The stop block is also useful when you need to validate user input. You’ll see an example of this practical application next.
Validating User Input
When you write an application that reads some data from the user, this can be data entered by the user; you should always confirm the entered values are valid before processing the info. Repetition structures can facilitate you with this task. If the user’s
input is invalid; you’ll be able to use a loop to display an appropriate error message and ask the user to reenter the worth.
Let’s say that you are simply developing a game with two levels, and you would like to let the user select tier to play. The sole valid entries, in this case, are the numbers one and a pair of. However, if the user enters a variety apart from these two numbers, you’d prefer to offer another chance to enter a suitable value. A method to implement this check is shown in the figure below.
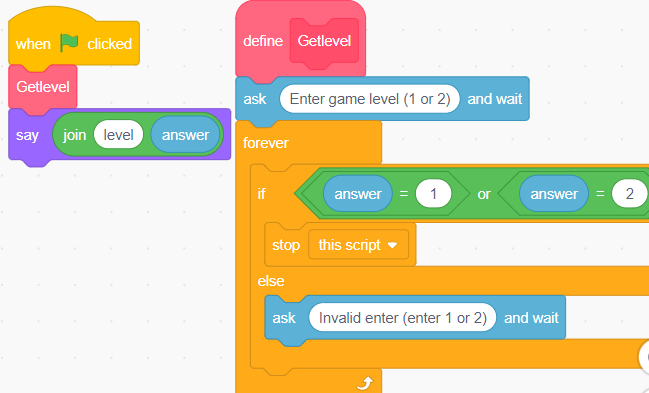
Figure: Input validation using the forever block.
The GetLevel procedure asks the user to enter a choice and checks the answer inside a forever loop. If the user’s response is invalid, the loop prompts the user to reenter the extent. On the other hand, if the user enters a legitimate number, the procedure calls stop this script from terminating the loop and ending the procedure. When this happens, most script, which has been patiently waiting for the GetLevel process to return, go on to execute the say command we have written a message in say block. The figure below shows how to achieve the identical task using the repeat until Block.
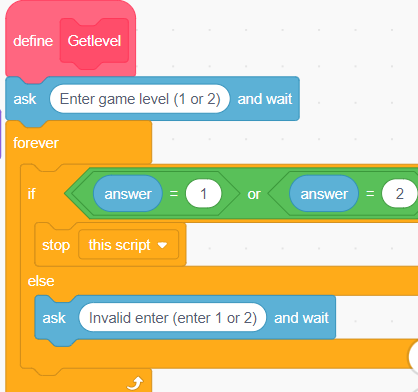
Figure: Input validation using the repeat until Block.
The procedure in the figure below asks the user to enter a choice and wait for the solution. If the user enters 1 or 2, the condition within the header of the repeat until Block evaluates to true result, which naturally terminates the loop and ends the procedure. Conversely, if the user enters anything other than 1 or 2, the loop’s condition evaluates to false, and the ask command inside the loop executes. This command waits for the user’s input again, and therefore the repeat until Block will continue requesting information until the user enters a sound choice. Once again, note that this implementation doesn’t require a stop block.
Counters
Sometimes, you’ll have to keep track of the number of iterations a loop performs. For example, if you wish to grant users only three chances to enter the correct password, you’ll count their attempts and lock them out after the third try. You can handle such programming scenarios by employing a variable (commonly cited because of the loop counter) that counts the number of loop iterations. So let’s together jump right in and explore some examples that demonstrate practical ways to use loop counters.
Check a Password
The program in the figure below asks the user to enter a password to unlock a laptop device. The Laptop sprite has two costumes: the off image(black) indicates that the laptop is locked, and therefore the on the image shows that the computer is unlocked. The user will be denied access to the computer if an invalid password is entered three times.
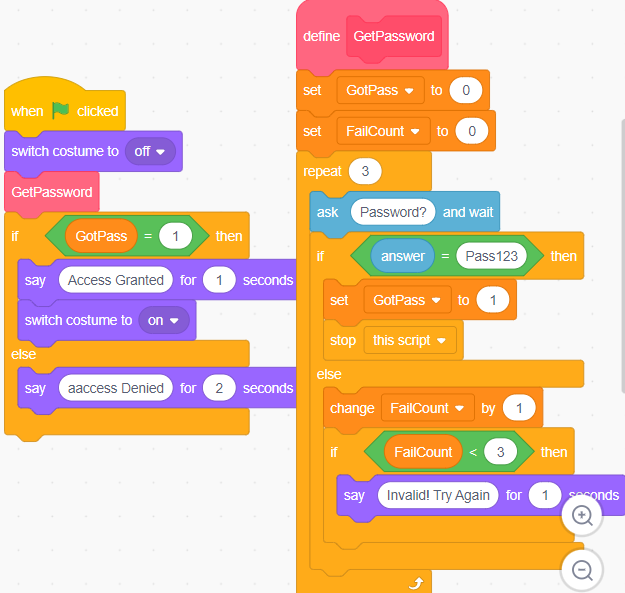
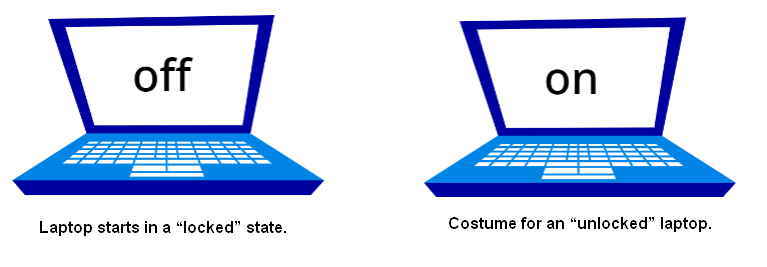
Figure: This script gives the user three chances to enter the correct password.
When the green flag is clicked, the Laptop sprite switches to the off costume and calls the GetPassword procedure to authenticate (recognize/allow) the user. This procedure is predicted to return the password check result to the most script using the gotPass flag. When the procedure returns, the if/else block checks the gotPass flag to decide whether or not the user should be allowed to access the system. For example, if gotPass was set to 1, meaning the user entered the correct password, Block executes a say command that displays access granted, which changes the laptop’s costume to the on the image. Otherwise, the script shows entry was denied! And also, the sprite continues to point out its initial off-costume.
The GetPassword procedure sets the gotPass flag to 0 to the point that it hasn’t received a legitimate password yet, and initializes the failCount variable (our loop counter) to 0. It then executes a repeat loop with a maximum repetition count of three. During each loop iteration, the user is prompted to enter a password. Suppose the user enters the correct password (Pass123 in this example). In that case, the gotPass flag is about to 1, the procedure stops itself by invoking the stop this script command, and execution returns to the caller. Otherwise, if the user hasn’t spent all three attempts, a mistake message is displayed, and therefore the user is given another chance. If the user fails three consecutive times, the repeat loop automatically terminates, and the procedure returns to the caller with the worth of the gotPass flag still set to 0.
Nested loop:
A nested loop is a loop within a loop, an inner loop within the body of an outer one. This works because the primary pass of the outer loop triggers the inner loop, which executes to completion. Then the second pass of the outer loop triggers the inner loop again. This repeats until the external loop finishes. Of course, a chance within the inner or outer loop would interrupt this process.
Let’s,
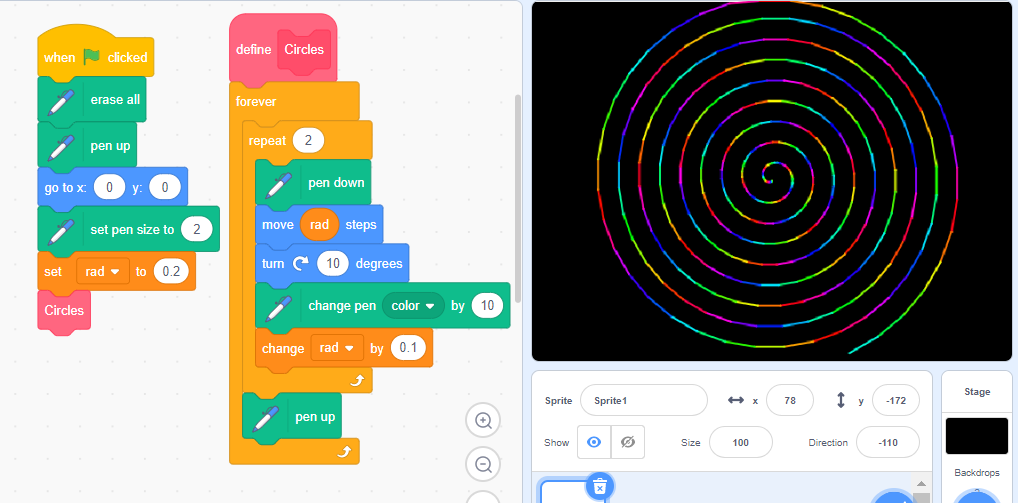
Take the example of the paint method for drawing a pattern using a circle shape, as shown in the figure below. We have added a pen extension, created a block, named it a “circle,” connected it to the flag event, and defined it using repetition inside forever repeat Block. So first, when the flag is clicked, whatever is painted on the screen will get erased, and the sprite will go to the center of the canvas. Next, we have taken a variable named num. We are initializing the variable with 0.2 numbers and setting the pen size to 2.
Then the forever loop we use for repeating the process an infinite number of times. For example, a repeat loop for making a circle and changing direction is 10 degrees. After every turn, the variable value increases, resulting in the size of the circle forming. So here, the repeat loop we are putting inside forever means once the repeat loop is made again, it will initialize to zero and start executing the program. This means the process is becoming continuous. And if you follow some steps, you will get the output like this.
Scratch Project:
Now, let’s make an easy game that uses most of the blocks introduced in this chapter. The player’s goal is to knock two birds out of the sky; you can see the computer program in the figure below.
The sport contains five sprites: Bird1, a dead ringer for Bird1, Bird2, a shooter, and a bullet. The player can move the shooter horizontally using the left and right keyboard arrows, and pressing the spacebar fires a bullet into the sky. The player gets a degree if the bullet hits Bird1 or its clone. Bird2 is a species the player isn’t allowed to shoot; if the bullet hits that sprite, the sport ends. The player has one minute to shoot as many birds as possible.
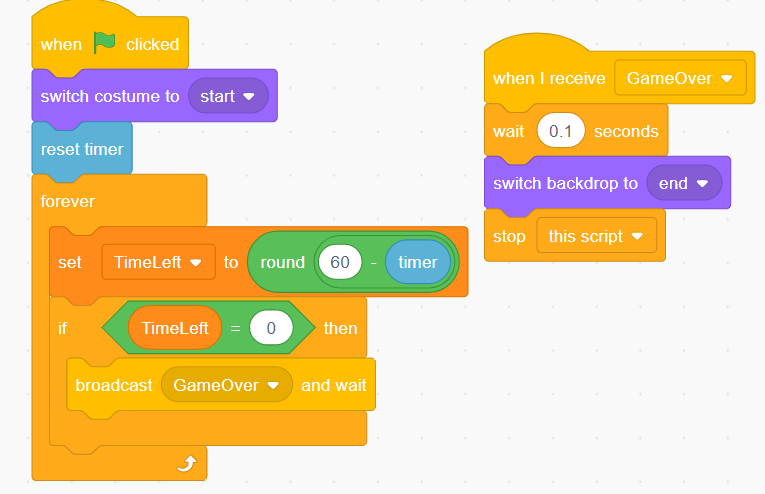
Each bird uses two costumes. When switching between these two costumes, the birds appear flapping their wings. The Stage has two backgrounds named start and end. The beginning background is shown in the figure above. The top background is identical, adding the words game Over to the middle of the image. The scripts that belong to the Stage are shown in the figure below.
After that,
When the green flag icon is pressed, the Stage switches to the start background resets the timer, and starts a loop that updates and checks the remaining game time, tracked by the TimeLeft variable. When TimeLeft reaches 0, or the Stage receives the GameOver broadcast message, it executes the GameOver handler. This script waits a brief time to permit the birds to hide, switches to the top backdrop, and calls stop to finish any running scripts. As you’ll see soon, the GameOver message will be sent by the Bullet sprite when it hits Bird2. Now glance at the script for the Shooter sprite, shown in the figure below.
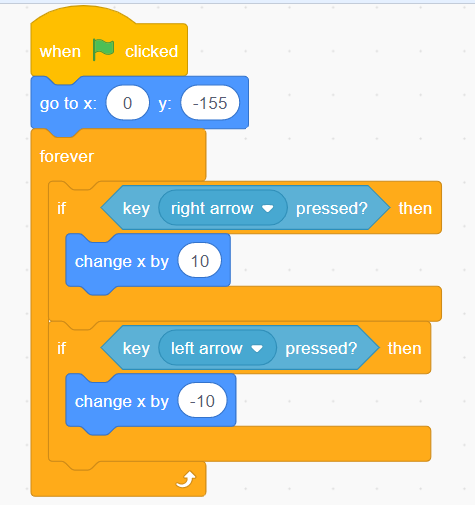
This script starts by positioning the shooter within the middle of the underside fringe of the Stage. The script then enters an infinite loop that detects whether the left or right arrow keys are pressed and moves the shooter in the corresponding direction. Now let’s travel to the scripts for Bird1, shown in the figure below.
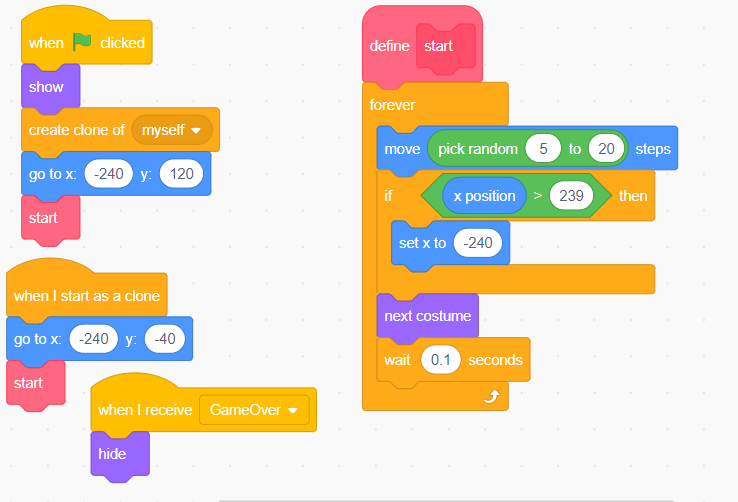
Figure: The scripts for the Bird1 sprite
As the game starts, Bird1 clones itself moves to the left fringe of the Stage, and calls the beginning procedure. The clone also begins at the left edge of the Stage (but at a unique height), and calls start. This procedure uses a forever loop to maneuver the bird and its clone horizontally across the Stage. From left to right with random steps. When the bird approaches the right edge of the Stage, it’s moved back to the left edge as if it wraps around and reappears. When the GameOver message is broadcast, the last script hides both birds.
The scripts for Bird2 are very similar
to those of Bird1, so we won’t show them
here. When the green flag is clicked, Bird2
moves to the proper fringe of the Stage at
a height of 40, so executes a loop
similar to that of the beginning procedure of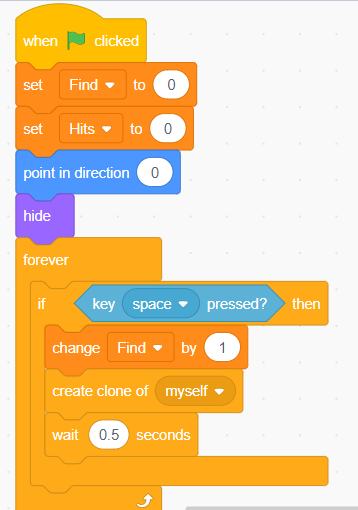
Figure 7-26. The bird moves from
left to right, wrapping around when it
reaches the proper fringe of the Stage. Bird2
also responds to the GameOver broadcast
by hiding itself.
Of course, the player can’t hit any
birds just by moving the shooter around,
and that’s where the Bullet sprite comes in.
The main script for this sprite is shown in
Figure below.
When the green flag is clicked, this script initializes the variables Fired (the number of bullets fired) and Hits (how many birds are hit) to 0. It then points the Bullet sprite up and hides it. After that, it enters an infinite loop to repeatedly check the spacebar key’s status. When the spacebar is pressed,
the script increments Fired by one and creates a twin of the Bullet sprite to move the bullet upward, as we’ll
see next. The script then waits some
time to stop the player from firing another bullet. Now we can study the script of the cloned bullet, shown in the figure below.
First, the bullet is moved to the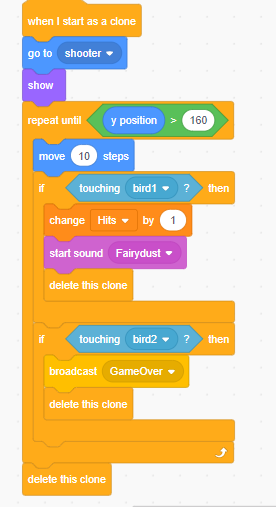
shooter’s center and created
visibly. The bullet is then moved
upward in increments of 10 steps
using a repeat until Block. If
the bullet’s y-coordinate exceeds
160, the bullet has reached the upper fringe of the Stage without touching any birds. During this case, the repeat until the block exits. Also, the clone is deleted. A success check, however, is performed the bullet moves anytime. If the bullet touches Bird1 (or its clone). The script increases the Hits variable and plays a sound to create the sport more exciting. Conversely, if the bullet touches Bird2, the script broadcasts GameOver to signal the end of the sport. In both cases, the clone is deleted since it’s finished its job.
The game is now fully functional, but you may add many features.
Here are two suggestions:
• Give the player a limited number of bullets and keep the score supported by the
number of missed shots.
• Add more birds and have them move at different speeds. Reward the player with more points for hitting faster birds.
You can find exciting projects on the official Scratch site.