Hello everyone, New to Scratch? Don’t know much about coding? Don’t worry; our site will help you out through the coding and doing better projects than the best one. Okay, so let’s start the tutorial of doing an easy Scratch project.
So, you all know very well what coding means. If not, click here to know what coding means in our previous post.
So, let’s start our very first project from scratch.
My First Project in Scratch 3.0.
This project will focus on understanding basic instructions like “wait,” using “looks block,” and making our sprite say something. But, first, let’s open your scratch application.
We tried to divide the process into steps to make it easy to understand. We can follow the step-by-step instructions or watch the video.
1. Adding the sprites for the story :
Click on the sprites area, which is located in the right bottom corner near the backdrop section. For example, here, I’m using Abby and Avery.
![]()
(Process of adding sprites 1.1)
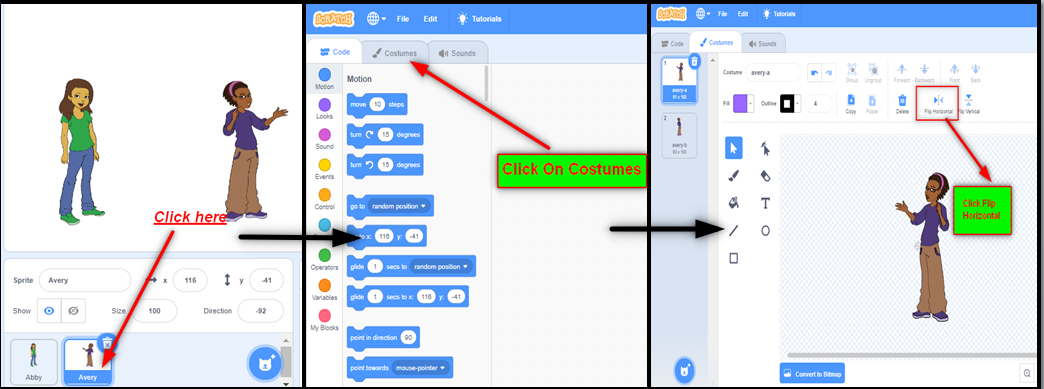
As the Conversation is in between these two sprites, they must look at each other so that we will flip Avery’s second sprite. For that,
i)Click on Avery from sprites pannel.
ii)Click on the costumes of Abby, which is available on the left top side of scratch after code pallet.
iii)After that, click on Flip horizontal. (that’s all you will see the sprite is flipped successfully.)
(Process of adding sprites1.2)
2. Adding a backdrop :
Ok, we are done with arranging our sprites. Now we need to add a backdrop, i.e., background wallpaper or background image. For adding backdrop,
Click backdrop extension. A backdrop gallery will get open; choose any one of your choices. Here, I’m adding a “blue sky” backdrop.
![]()
3. Make a story in scratch 3.0 :
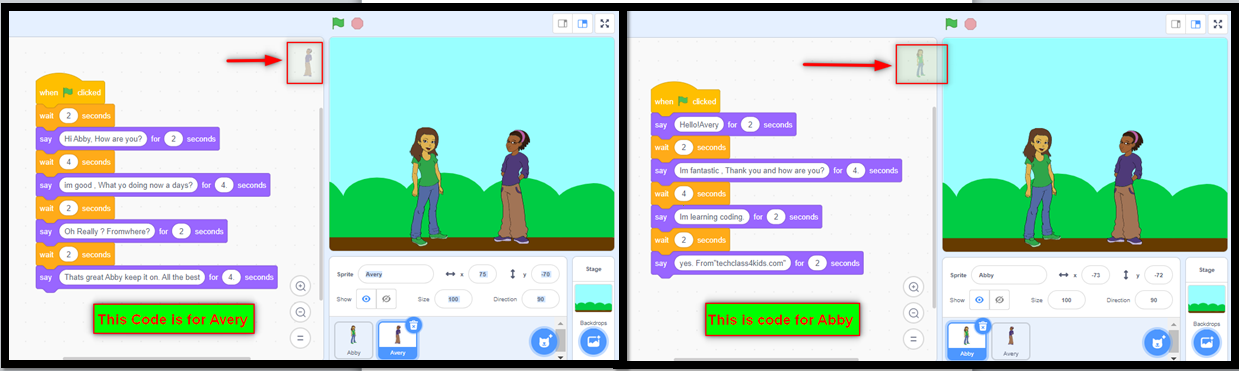
After fixing all the sprites and backdrops, let’s code for the conversation. First, we will code for Abby. for that, follow the steps given below.
- Take the event category “when flag clicked.”
- Go to the looks category. Grab first instruction, i.e., “say hello for 2 seconds”.(this instruction will say whatever is written in the text box for the assigned time)
- Click inside the text and change it to “hello Avery” for 2 seconds. (after 2 seconds, the dialogue box will disappear)
- connect the command to the event.
now the second dialogue must be of Avery, i.e., sprite2
Follow the same instructions only change the message inside the “say” instruction. for example, make it (“Hi, Abby How are you?) and connect it to the event.
If you try to run the program, both the characters will run their code simultaneously. Instead of it, we need to put the wait instruction for somebody. If the first dialogue is sprite one, sprite 2 must wait until sprite 1 completes its dialogue. Sprite 1, i.e., Abby is taking 2 seconds for her dialogue. Let’s wait 2 seconds for another sprite to wait, and then execution of the next instruction will start.
- Connect wait 2 seconds instruction.
- Then come to Abby’s code and put the “say instruction,” i.e., say ” I’m fine Avery Thank you and how are you?” for 2 seconds,
- then Come to Avery codes, and connect “wait” 2-second instruction for Avery then the Averys dialogue. And the sequence will go on.
Look at these images,
Here is one example for you. Watch the following video and try to do the same or similar easy SCratch project.
(Story making in scratch)
Easy Project in Scratch 3.0
1. Make my Sprite move Left, Right Up, and Down.
To make your sprite move in the left-right, up, and down directions, We need to use the arrow keys to change the sprite’s direction.
Because we want to check which arrow key is pressed, we can use the event category blocks, Which are represented in yellow color in the block pallet available on the left side of applications.
Follow the steps given below :
1. Choose the sprite you want.
2. Put the sprite in the center of the canvas. Get when the flag clicked event, use “Go-To” statement which is available in Motion category & Fix the X & y co-ordinates to (0,0)
For example: go to x:0 y:0
Now it’s time to teach the sprite to move around using our arrow keys. First, we’ll teach our sprite how to move right.
1. Bring Out a “when space keypresses” block. Then, use the dropdown to select “right arrow.”
2. Got to motion Category and picked “point in direction 90” command. Connect it to the Event.
3. Go to the Motion category, pick the “move 10 steps” command, and connect it to the previous instruction.
4. You can make changes in the steps, click inside it and change it to desired steps.
5. Run the code.
Now the sprite knows how to move right, it’s easy to teach it to move up, down, and left.
Let’s see the steps for
2. Making the sprite move up.
1. Bring Out a “when space keypresses” block. Then, use the dropdown to select “up arrow.”
2. Got to motion Category and picked “point in direction 90” command. Change the magnitude from 90 to 0. Then, connect it to the Event.
3. Go to the Motion category, pick the “move 10 steps” command, and connect it to the previous instruction.
4. You can make changes in the steps, click inside it and change it to desired steps.
5. Run the code.
Following the same instruction, you can code for left and down arrows. We need to change the direction of the sprite according to the direction of the arrow key.
Here is an image for you to understand more clearly.
![]()
There is one more way to make our sprite move.
Follow the steps to make the sprite change its position left, right up, down with the help of arrow keys. The canvas works on the X&Y axis, X-axis is horizontal, and the y-axis is vertical. So if we want to move our sprite right or left, we have to make changes in x co-ordinate as it is horizontal, for moving right side x co-ordinate will be positive, for moving left side x co-ordinate will be negative.
For moving sprite right side:
1. Bring Out a “when space keypresses” block. Then, use the dropdown to select “right arrow.”
2. Go to Motion block, scroll down, and pick the “Change x by 10 ” instruction. Then, connect it to the event.
For moving sprite left side:
1. Bring Out a “when space keypresses” block. Then, use the dropdown to select “left arrow.”
2. Go to Motion block, scroll down, pick “Change x by 10 ” instruction, and change the number, i.e., 10 to “-10” as on the left side its negative x-axis. Therefore, the instruction will be “change x by -10”. Then, connect it to the event.
For moving sprite upside:
As mentioned, the canvas works on the X&Y axis, X-axis is horizontal, and the y-axis is vertical.
If we want to move our sprite up and down, we have to change the sprite’s y coordinate. Forgoing up, y coordinate must be Positive, and for coming down, y co-ordinate must be negative.
1. Bring Out a “when space keypresses” block. Then, use the dropdown to select “up arrow.”
2. Go to Motion block, scroll down, and pick the “Change y by 10 ” instruction. Then, connect it to the event.
For moving sprite downside:
1. Bring Out a “when space keypresses” block. Then, use the dropdown to select “down arrow.”
2. Go to Motion block, scroll down, pick “Change y by -10 ” instruction, and change the number, i.e., 10 to “-10,” as on the downside is its negative y-axis. Therefore, the instruction will be “change y by -10”. Finally, connect it to the event.
The code will look like this:
![]()
You can find more projects on www.scratch.mit.edu. or try our next post: Scratch programming examples for beginners.
Comments
6 responses to “Easy Scratch Project: Let’s do it”
[…] Easy Scratch Project: Let’s do it […]
[…] If you have previous knowledge, you can follow this step-by-step guide. If not, we recommend we try first our previous posts: […]
[…] Easy Scratch Project: Let’s do it […]
[…] Easy Scratch Project: Let’s do it […]
[…] that you know your way around the interface, you’re able to use more of Scratch’s programming tools. During this blog you’ll learn about […]
[…] We can try our lessons, they have been designed especially for kids. They teach problem-solving, critical thinking and enforces math techniques while enjoying coding and creating essential projects. […]