Let’s continue our journey. On this occasion, we will guide you through Scratch, programming examples for beginners to construct an exciting game.
If you have previous knowledge, you can follow this step-by-step guide. If not, we recommend trying our previous post:
- Basic coding for kids: coding in scratch
- Easy Scratch Project: Let’s do it
- Easy Games to Make on Scratch
- Operators in Scratch
Then, let’s move on and learn new programming concepts.
Loops:
Sometimes, we must repeat an instruction block two, three, or thousands of times. But we don’t need to include these blocks N times. To get that, programming languages provide a tool called loop or iteration.
What exactly loop is? The loop is a sequence of instructions continually repeated until a certain condition is reached.
Where are the loops available in Scratch?
Open your Scratch and look at the left-hand side.
On the code palette, we can see a variety of code categories. The first is motion, the second is the looks category, and the fifth is control. In controls, we can see various loop types and conditional statements, so the first two sequences are a repeat loop and a forever loop.
Repeat loop:
Suppose you want to repeat the code block a fixed number of times. That time, we can use the repeat. Repeat Loop helps us to put limitations on the repetition of the instruction. By default, it is a reproduction of 10. So, the program will execute the ten repetitions. If you want a process to repeat only 3 to 4 times, we can change this 10 number to our number, 3 or 4, so we need to pick the instructions and place them in the code area. After clicking inside, you can change the number.
Instead of using a constant value, we have many options, like using a variable that stores a number, using a math operation, picking a random number between a range, etc. We’ll be explaining this in another post.
Forever loop:
Forever loop is the loop that repeats/runs the code inside it unlimited times. That’s why it is called forever, which means there will be no limit to the repetitions. It’s forever.
How to import the Sprite?
For importing the Sprite externally:
- Download the image which you want to use in our game. I am downloading chick and egg images from Google.
- Open the scratch application. We can see some options for Sprite and the backdrop on the right-hand side.
- For importing Sprite, we need to hover over the cursor on the Sprite, and there will be four options:
- Choose
- Paint
- Surprise
- Upload.
- Click on Upload. A file explorer window will open.
- Choose the Sprite you want to import or upload.
That’s all. You are now able to see your Sprite.
You must follow these steps to import the backdrop of your choice. Here is a reference video.
(Process of uploading Sprite and backdrop)
How to make a variable?
- Open Scratch.
- Variables are on the left-hand side, on the code palate penultimate option.
- Click on variables
- Click make a variable.
- Give a name to your variable
- Click ok.
You can see your variable on the stage.
Let’s make a jumping game in Scratch 3.0.
To make it simple to understand, let’s divide the game into some steps. First, follow these steps to make the game:
- First, choose a chick and egg sprite from the scratch gallery or upload it externally.
- Choose or upload the backdrop of your choice.
Let’s make the chick jump.
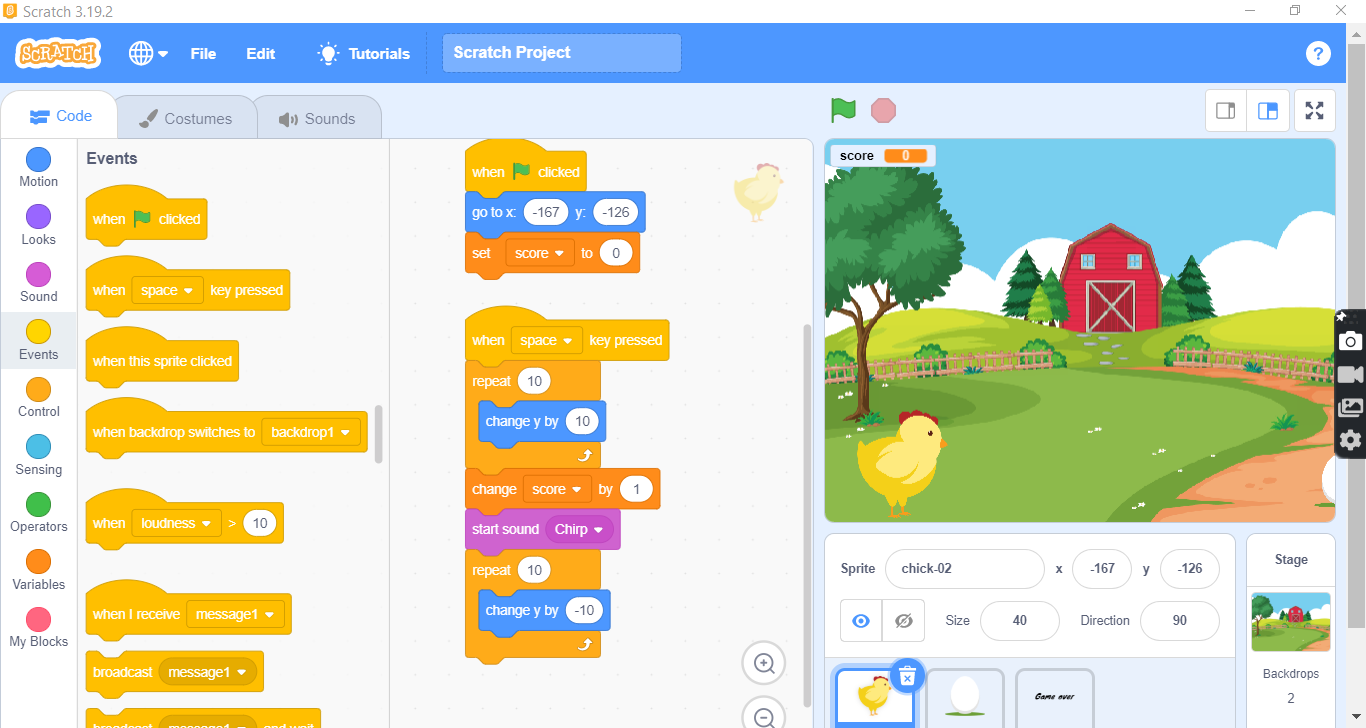
Section 1:
- 1. Take the flag event from the events category of the code Palette.
- Pick the “show” instruction from the Looks category and join it after the flag event.
- Use go-to x:0 y:0 instruction from the Motion category.
- Let’s make a variable that will show the score and name it Score.
- Pick the “set my variable to 0″ instruction. Next, click on the dropdown menu and select your variable name.
- It is connected to the go-to instruction. So, initially, the score will always be zero.
This coding is for fixing the variable and position of our Sprite.
Section 2:
- Get the when space key pressed event from the event category.
- Then, connect the repeat loop from the controls category to the event.
- Now we want to move our chick up. First, we need to change its y position. Pick the instruction change y by ten from the motion category.
- Connect it inside the repeat loop.
- Now our chick is changing y position upside. So we want the babe to come down for that.
- .Take another repeat loop and connect after the first repeat loop.
Get the change y by ten instruction from the Motion category and change y by -10 because it must come down. - Click on a Variable category and get change my variable by 1
- Connected after the second repeat loop.
- Next, click on the dropdown menu and select our variable name.
- That’s all. Now the chick can jump after pressing the space key.
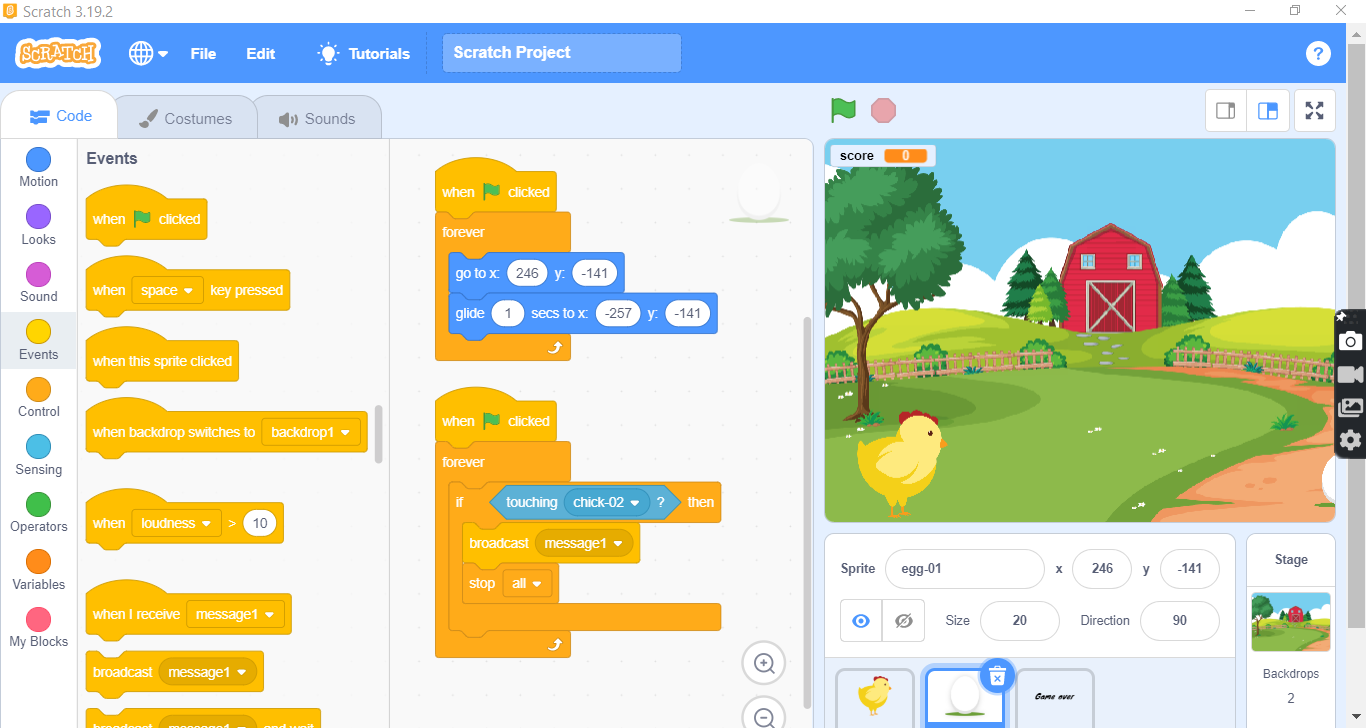
Let’s make our egg move toward the chick.
- Place the egg parallel to the position of the chick on the right side.
- Grab the flag event.
- Pick go to x: y: instruction. Be sure the egg is on the right side of the stage. Then, connect it to the event.
- Placing the chick on the left side means the final position while moving.
- Pick glide 1 sec to x, y instruction, and connect it to the previous education. You can change the timing inside the glide.
- Put this code inside the forever loop. Get a forever loop from controls, connect it to the flag event, and place the go-to and glide instructions inside it.
That’s all for making the egg glide.
Condition:
Now we need to check if the chick is touching the egg. If it feels, then the game should stop. So let’s check this condition. This condition comes in the sensing category. On the left side of Scratch. You can see the sensing block.
Again go on the egg’s code.
- We want to check this condition again and again throughout the game. So, pick the flag event from the Event category, and place it in the code area.
- Get a forever loop from the Control category and connect it to the Flag event.
- Get the if statement block from the Control category. Connect it inside the forever loop. This will check the condition.
- Go to the Sensing category, and pick Touching instruction, which is the first instruction. Place it inside the if statement.
- Click on the dropdown of this instruction and select the sprite name. So the condition will be like if touching a chick?
- Get broadcast message instructions and connect it inside If.
- Get stop all from control and click it after broadcast instruction inside the if statement.
- After touching chick to egg, We need a game over the Sprite. So the game will finish.
Create your Sprite:
We can create the sprites by painting on canvas.
1. Go to the sprite area and click on paint.
2. Select the text. Select the color of the text and text style. Click on the canvas and write “Game Over.”
3. That’s all game- over Sprite is ready. You can rename it.
For example:
As this is a game-over sprite, it must display when the game is over.
And it should not be visible while starting the game.
- Get Flag event.
- Connect Hideinstruction after the event.
- Get when I receive the broadcasted message instruction from control.
- Get show instructions from looks and connect them to the event.
Congratulations🎉, your game is ready.
Remember, you can find more exciting Scratch programming examples for beginners at https://scratch.mit.edu
Comments
6 responses to “Scratch programming examples for beginners.”
[…] You can find more projects on http://www.scratch.mit.edu. or try our next post: Scratch programming examples for beginners. […]
[…] Scratch programming examples for beginners. […]
[…] Scratch programming examples for beginners. […]
[…] you wrote within the last four chapters helped you learn essential Scratch programming skills and Scratch programming examples for beginners. However, they lacked many key elements of a large-scale application. In addition, more complex […]
[…] 3: Scratch Projects for kids: Condition, loop… […]
[…] Scratch programming examples for beginners. […]