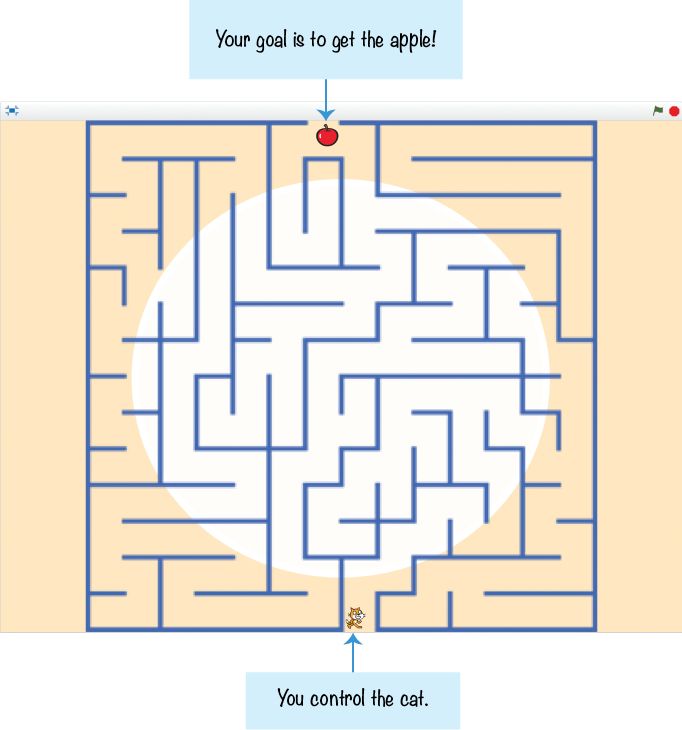
You’ve probably played a maze game before, but have you ever tried making one? Mazes can be tricky to complete, but they’re easy to program. In this chapter, you’ll create a game called “Maze Runner,” which lets the player guide a cat through a maze to reach its goal—a delicious apple! You’ll learn to move the cat with the keyboard and block its progress with walls.
Before you start coding, take a look at the final program. Go to https://www.nostarch.com/scratchplayground/ and play the game “Maze Runner.”
SKETCH OUT THE DESIGN MAZE RUNNER
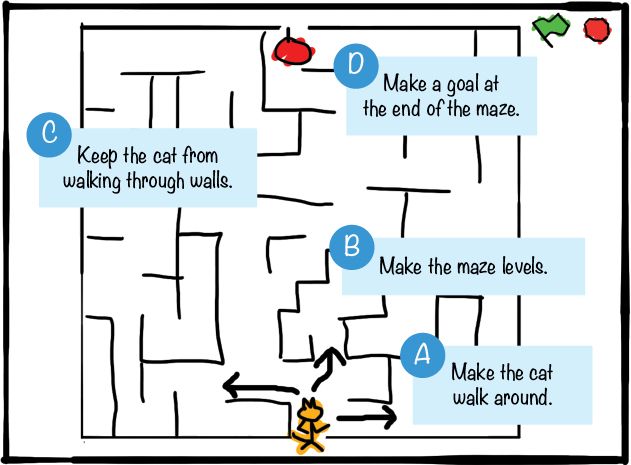
First, draw what you want the game to look like on paper. With some planning, you can make your maze game a-maze-ing. (I never apologize for my puns.) My sketch for the maze game looks like the following figure.
To save time, you can start from the skeleton project file, named maze-skeleton.sb3, in the resources ZIP file. This file already has parts of the project set up and only needs the code blocks added. Go to https://nostarch.com/scratch3playground/ and download the ZIP file to your computer by right-clicking the link and selecting Save link as or Save target as. Extract all the files from the ZIP file. The skeleton project file has all the sprites already loaded, so you’ll only need to drag the code blocks into each sprite. Click File ▶ Upload from your computer in the Scratch editor to load the maze-skeleton.sb3 file.
Even if you don’t use the skeleton project, you should download the ZIP file from the website. This file contains the maze images you’ll use in this chapter.
If you want to create everything on your own, click File ▶ New to start a new Scratch project. In the text field in the upper left, rename the project from Untitled to Maze Runner.
MAKE THE CAT TO WALK AROUND
In the Maze Runner game, the player will control the cat sprite. In Part A, you’ll set up the code to control the cat with the arrow keys on the keyboard.

EXPLORE: X- AND Y-COORDINATES IN THE GAME MAZE RUNNER
To make the cat move around the Stage, you need to use coordinates. Coordinates are numbers that represent an exact location. The xcoordinate (also called x position) is a number that represents how far left or right a sprite is on the Stage. In other words, x is the sprite’s horizontal position. The y-coordinate (also called y position) is a number that represents how far up or down a sprite is on the Stage. The y-coordinate is a sprite’s vertical position.
x- and y-coordinates
Used together, x- and y-coordinates indicate a sprite’s precise location on the Stage. When writing coordinates, the x-coordinate always comes first, and the coordinates are separated by a comma. For example, an x-coordinate of 42 and a y-coordinate of 100 would look like this: (42, 100).
In the very center of the Stage is a point marked (0, 0), which is called the origin. In the following figure, I’m using the xy-grid backdrop from the Scratch Backdrop Library. (To load the xy-grid backdrop, click the Choose backdrop from library button next to the New backdrop label and select the backdrop.) I’ve added several cat sprites who are all saying their x- and y-coordinates.
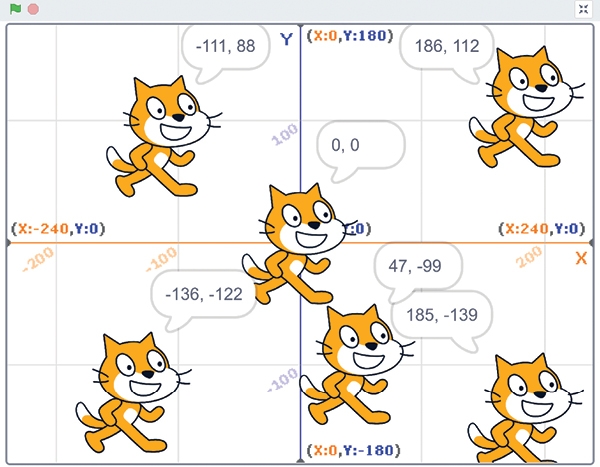
The rightmost side of the Stage has an x-coordinate of 240. The x-coordinates get smaller as you go left. In the center, the x-coordinate is 0. To the left of the center, the x-coordinates become negative numbers. The leftmost side of the Stage has an x-coordinate of −240. The y-coordinates work the same way: the top of the Stage has a y-coordinate of 180, the center is 0, and the bottom is −180.
The mouse cursor’s x- and y-coordinates are also given in the bottom-right corner of the Stage. In the previous figure, the mousecursor is at the coordinates (–182, –27), which means the x-coordinate is -182 and the y-coordinate is –27
Scratch displays the x- and y-coordinates of the currently selected sprite in the upper-right corner of the Sprite List. Sprites move around the Stage when you change their x- and y-coordinates, as shown here:
| To make a sprite go . . . | change its . . . | by a . . . |
| Right | x-coordinate | positive number |
| Left | x-coordinate | negative number |
| Up | y-coordinate | positive number |
| Down | y-coordinate | negative number |
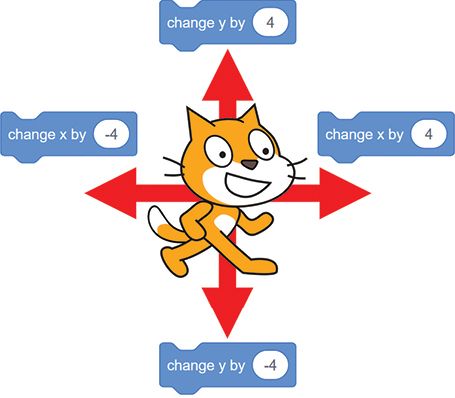
Many of the blocks in the dark blue Motion category will change a sprite’s x and y position, such as the change x by and change y by blocks. Note that changing a coordinate by a negative number is the same as subtracting a positive number from it.
1. ADD MOVEMENT CODE TO THE PLAYER SPRITE game “Maze Runner.”
The first bit of code you’ll add will make the arrow keys move the cat sprite, which is named Sprite1. But first, click and rename this sprite. (Cat). Then add the following code. These blocks are in the Events, Control, Sensing, and Motion categories.
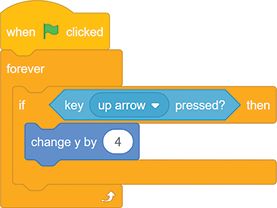
This code repeatedly checks whether the key is being pressed. The code reads, “for forever, check if the up arrow key is pressed, and if it is, then change y by 4.” If the up arrow key is not being pressed, Scratch skips the code inside the if then block.
Pressing the up arrow key makes the cat sprite move up. The forever loop block means Scratch will check over and over again whether the up arrow key is being pressed. This continues until you click the red stop sign.
The forever the block is needed for this program to work. Without it, Scratch would check only once if the up arrow key was pressed. Then the program would end. But you want Scratch to check if the up arrow key is pressed so the game doesn’t end, and the cat can get the apple. If your program seems to be doing nothing, ensure you didn’t forget to add the forever block.
When you code this on your own, be sure you use the change y by code block instead of the change x by or set y to code block. If your program isn’t working correctly, check that your code is the same as in this book.
SAVE POINT
Click the green flag and try moving the cat by pressing the up arrow key. Then click the red stop sign and save your program.
2. DUPLICATE THE MOVEMENT CODE FOR THE CAT SPRITE IN THE GAME MAZE RUNNER
Now you’ll add code for the other three arrow keys: down, left, and right. This code is similar to the code to move the cat sprite up. To savetime, you can right-click on the yellow if then block and select duplicate to create a copy of the blocks. These blocks will be identical, so all you’ll need to change are the dark blue Motion blocks for the other directions. Duplicating blocks can often be faster than dragging new
ones from the Blocks Area.
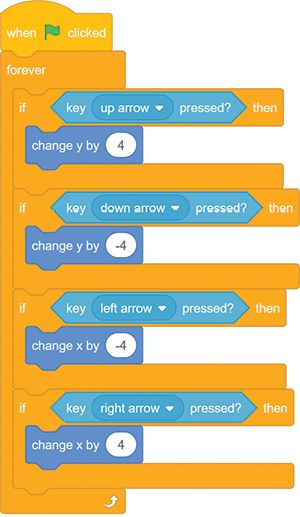
Scratch will now check if the four arrow keys are held down, one after another. After checking the right arrow key, Scratch starts back at the top of the loop and checks the up arrow key again. The computer checks them so fast that to human eyes, it looks like all of the arrow keys are being checked at the same time!
SAVE POINT
Click the green flag to test the code so far. The cat should walk up, down, left, and right when you press the arrow keys. Notice that Orange Cat is small enough to fit in the maze you’ll create next. Click the red stop sign and save your program.
If your program doesn’t work and you don’t know how to fix it, you can start over by using the maze-part-a.sb3 Scratch project file, which is in the resources ZIP file. Click File ▶ Upload from your computer in the Scratch editor to load the maze-part-a.sb3 file and then move on to Part B.
MAKE THE MAZE LEVELS
Next, we’ll create the maze sprite and set the backdrop. The maze game would quickly get boring if it had only one maze, so we’ll also add multiple levels to the game.
3. DOWNLOAD THE MAZE IMAGES IN THE GAME MAZE RUNNER
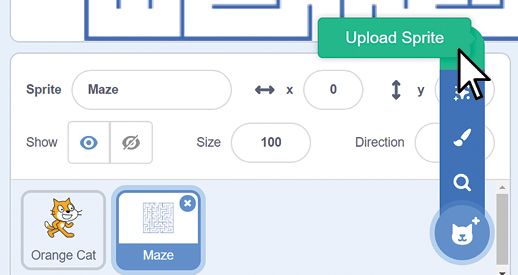
You could draw the maze sprite yourself, but let’s use images from the ZIP file instead. One of the maze images is the Maze.sprite2 file.
In the Scratch editor, click the Upload sprite from file button and select Maze.sprite2 to upload the file. This creates a new sprite named Maze with several maze costumes. Every sprite in Scratch can have multiple costumes to change the way it looks. These costumes, which you can see by clicking the Costumes tab, are often used to animate the sprite.
Your Sprite List should look like this:
4. CHANGE THE BACKDROP
Let’s add a little flair to the maze by placing some artwork in the background. You can use whichever background you like. Change the Stage’s backdrop by clicking the Choose backdrop from library button under New backdrop to open the Scratch Backdrop Library window. Choose a background (I chose light), and click OK.
5. START AT THE FIRST MAZE
Add the following code to the Maze sprite. You can find these blocks in the Events, Looks, and Motion categories.
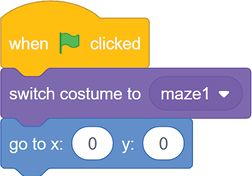
Each of the Maze sprite’s costumes will be a new level. When the player clicks the green flag to start the program, the game should begin with the first costume and make sure the maze is in the center of the Stage. We will add code to switch to the next level in Steps 8 and 9.
Note that the Scripts Area shows code blocks for the selected sprite. Be sure the Maze sprite is selected in the Sprite List; otherwise, you’ll add the maze’s code to a different sprite. Each sprite needs its own code to work correctly. If you don’t see maze1 in the switch costume to block, the Orange Cat sprite is most likely selected.
If your Scratch program doesn’t work and you don’t know how to fix it, you can start over by using the maze-part-b.sb2 Scratch project file, which is in the resources ZIP file. Click File Upload from your computer in the Scratch editor to load the maze-part-b.sb2 file, and then move on to Part C.
MAZE RUNNER KEEP THE CAT FROM WALKING THROUGH WALLS IN THE GAME MAZE RUNNER
When you click the green flag now, you’ll be able to move the cat through the maze. But you’ll also be able to move the cat through the walls of the maze, because nothing in the program prevents this from happening. The code only states, “When the right arrow key is pressed, move the cat right.” The cat moves, whether or not a wall is there.
6. CHECK WHETHER THE CAT IS TOUCHING THE WALLS
Let’s add code that checks whether the cat is touching the blue walls. If it is, the cat should move backward. So if the cat moves to the right and is touching a wall, it should automatically move left. This will undo the player’s move and prevent the cat from moving through walls.
Click the Orange Cat sprite in the Sprite List, and modify the code to look like the following. Notice that we’re using the touching? block, not the touching color? block.
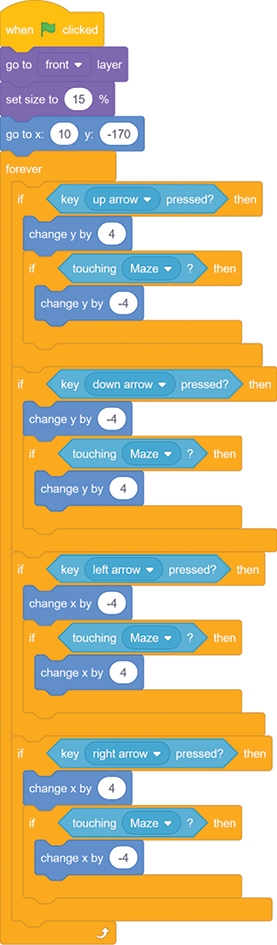
Also, you might have noticed that the Orange Cat sprite is Godzilla-sized compared to the maze, making the cat look unrealistic. Add a set size block from the Looks category to make the Orange Cat sprite smaller. You also want the Orange Cat sprite to always be shown on top of the maze, so you’ll add the go to front block. These two code blocks are at the top of the script.
SAVE POINT
Click the green flag to test the code so far. Make sure the Orange Cat sprite cannot walk through the maze walls. Test this for all four directions. Then click the red stop sign and save your program.
If your Scratch program doesn’t work and you don’t know how to fix it, you can start over by using the maze-part-c.sb3 Scratch project file, which is in the resources ZIP file. Click File Upload from your computer in the Scratch editor to load the maze-part-c.sb3 file and then move on to Part D.
MAZE RUNNER MAKE A GOAL AT THE END OF THE MAZE.
Right now, it isn’t clear where the player is supposed to end up in the maze. Let’s add an apple at the other end of the maze to make the player’s goal more obvious.
7. CREATE THE APPLE SPRITE
Click the Choose sprite from library button (which looks like a face) next to New sprite. When the Sprite Library window appears, select Apple and click OK to add a new sprite named Apple to the Sprite List.
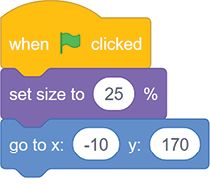
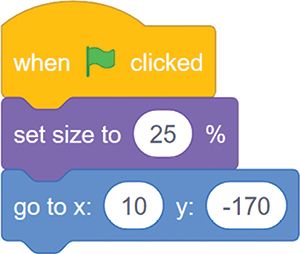
When the game starts, you want the Apple sprite to move to the end of the maze at the top of the Stage. The Apple sprite must also be small enough to fit in the maze. Add the following code to the Apple sprite:
8. DETECT WHEN THE PLAYER REACHES THE APPLE
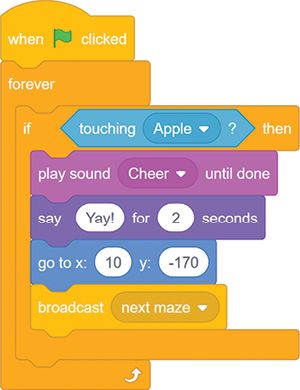
The Maze Runner game has a sprite for the player, the maze, and the apple at the end of the maze. Now it just needs the code to detect when the player reaches the end. When that happens, you’ll have Scratch play a sound and then swap costumes to the next level. But before you add the code, you need to load the cheer sound. Select Orange Cat in the Sprite List. Click the Sounds tab at the top of the Blocks Area, and then click the Choose sound from library button. This button looks like a speaker and is under New sound.
In the Sound Library window that appears, select cheer and then click OK to load the cheer sound. Now click the Scripts tab. Add this script to the Orange Cat sprite’s code:
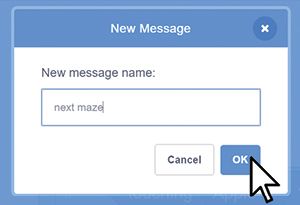
To make the broadcast block broadcast the next maze message, click the black triangle in the broadcast block and select new message.
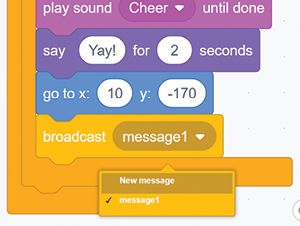
In the window that appears, type next maze as the message name and click OK.
9. ADD THE BROADCAST HANDLING CODE TO THE MAZE SPRITE
Click the Maze sprite in the Sprite List and add the following code to it:
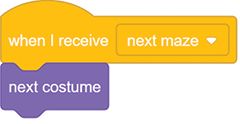
This code changes the maze level when it receives the next maze broadcast.
SAVE POINT
Click the green flag to test the code so far. Try playing the completed game. Make sure the level changes to the next maze when the cat touches the apple. Then click the red stop sign and save your program.
THE COMPLETE PROGRAM
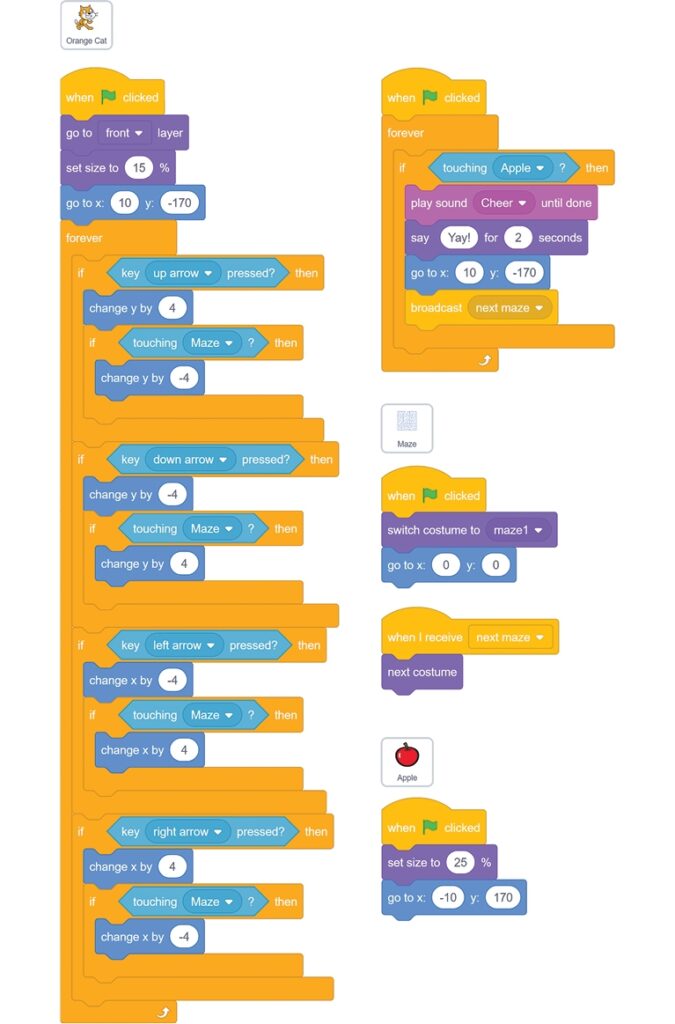
The following code shows the entire program. If your program isn’t working right, check your code against this complete code. The complete program is also in the resources ZIP file as the maze.sb3 file.
I hope the code for this maze program isn’t too labyrinthine.
VERSION 2.0: TWO-PLAYER MODE
Now that the basic maze game is working, you can do some iterative development and add small improvements one at a time. Iterative development helps you avoid making a game that is too large for you to finish.
In version 2.0 of Maze Runner, you’ll add a second player. The two players will race against one another. The first player starts at the bottom and races to the top; the second player races from the top to the bottom. Because they both must travel the same path, the distance for each is the same.
DUPLICATE THE APPLE SPRITE
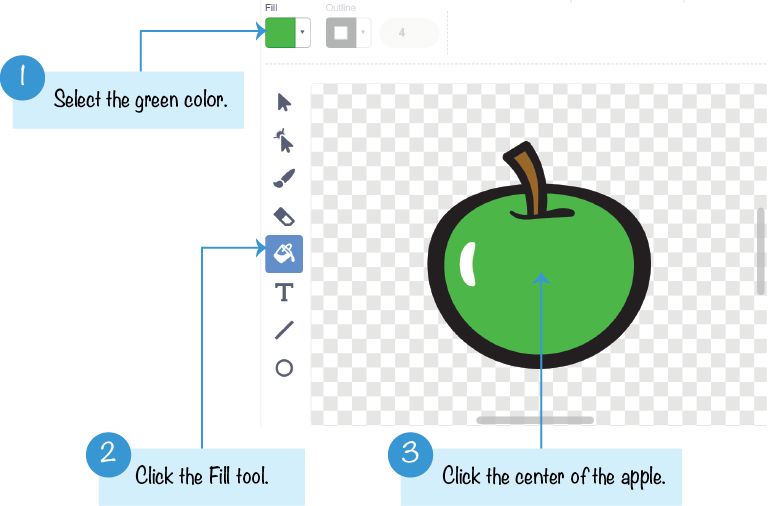
The second player needs a goal too. Right-click or long-press the Apple sprite and select Duplicate to make a copy of the Apple sprite and its code. The new sprite is automatically named Apple2. Select the Apple2 sprite and click the Costumes tab. Select a green fill color and then select the Fill tool to the right (it looks like a tipped cup). Then click the red part of the apple to change it to green. When you’re done, Apple2 it will look like the following figure.
MODIFY THE APPLE2 SPRITE’S CODE
You need to modify the Apple2 sprite’s code to look like the following code so that the green apple starts at the bottom of the maze rather than the top:
DUPLICATE THE ORANGE CAT SPRITE
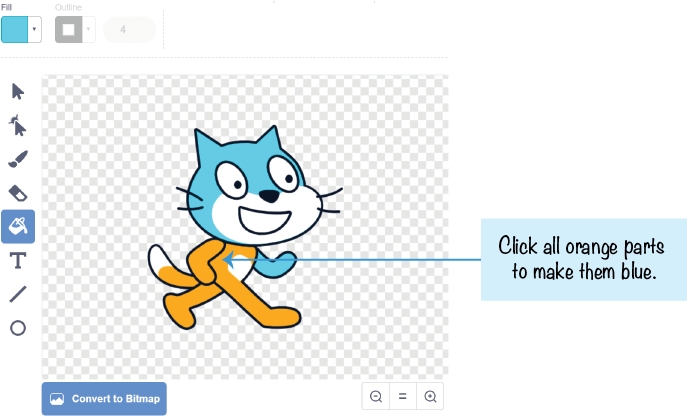
Now let’s add a second cat sprite. Right-click or long-press the Orange Cat sprite and select Duplicate from the menu to make a copy of Orange Cat and its code. The new sprite is automatically named. Orange Cat2. The Orange Cat and Orange Cat2 sprites need to look different enough that the players can tell them apart. Similar to what you did for Apple2, click the Costumes tab and change Orange Cat2 from orange to blue.
In the Sprite Pane, rename Orange Cat2 to Blue Cat.
MODIFY THE CODE FOR THE BLUE CAT SPRITE
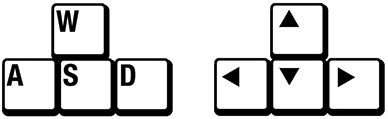
Right now the Blue Cat sprite has the same code as the Orange Cat sprite. You’ll need to change the code; otherwise, the arrow keys will control both player 1 and player 2. The second player will control the Blue Cat sprite using the WASD keys (pronounced whaz-dee). The W, A, S, and D keys are often used as a left-handed version of the up, left, down, and right arrow keys.
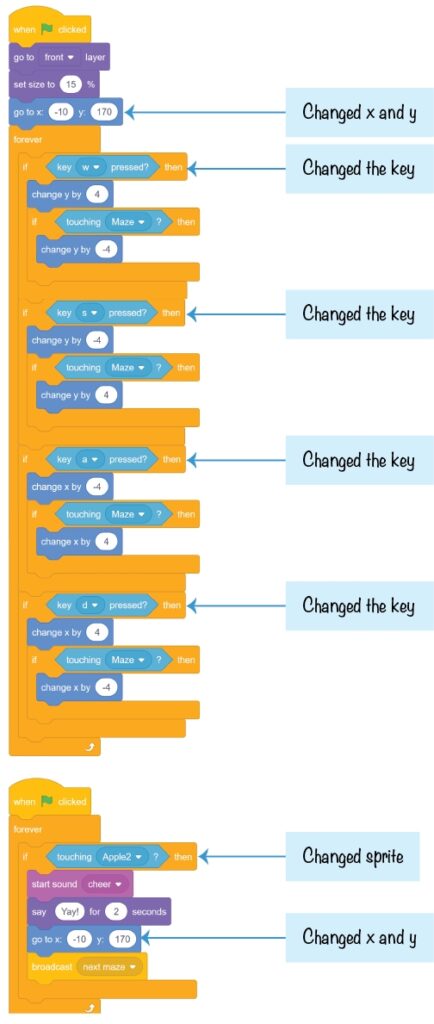
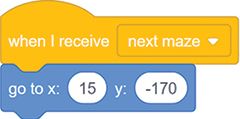
Change the two go to x y blocks and the key pressed? blocks for Blue Cat to look like the following code. Also, remember to change if touching Apple to if touching Apple2.
GO BACK TO THE STARTING POSITION
The sprites go back to their starting positions when they touch their apples, but they also need to go there when the other cat wins. Add the following script to the Orange Cat sprite:
Then add the following script to the Blue Cat sprite:
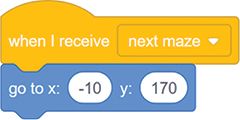
This way, when the other cat wins and broadcasts the next maze message, both cats will go back to their starting positions.
SAVE POINT
Click the green flag to test the code so far. Try moving both players using the arrow keys and the WASD keys. Make sure each of the eight keys moves the correct cat and only that cat. Try playing the full game. Make sure the level changes to the next maze when the second player touches the green apple. Make sure both players are sent to their starting points when the next level begins. Click the red stop sign and save your program.
You’ve just upgraded your maze game to support two players. Find a friend to race against. Player 1 uses the arrow keys, and player 2 uses the WASD keys.
VERSION 3.0: TRAPS
After you’ve played Maze Runner against another player a few times, running through the mazes can become too easy. Let’s make Maze Runner a bit more difficult by adding spike traps. The spike traps will shoot out spikes and then retract them. If a player touches the trap while the spikes are out, the player will slow down. This gives the other player time to race ahead!
Draw a New Sprite for the Traps
Click the Paint new sprite button next to New sprite to draw a new sprite. This sprite will have two different costumes that we draw: one costume with the spikes retracted and another with the spikes out. But don’t worry, the spike trap drawings are simple. Just click the Line tool and the color black to draw a simple line, which is what the spike trap looks like when the spikes are retracted. Rename this costume trap off.
Create a Second Costume for the Traps
The spike trap sprite needs a second costume to show what it looks like when the spikes are out. Right-click trap off (the single line you drew) and select duplicate to create trap off2. In trap off2, select a gray color and draw the spikes coming out of the single line. Rename this costume trap on.
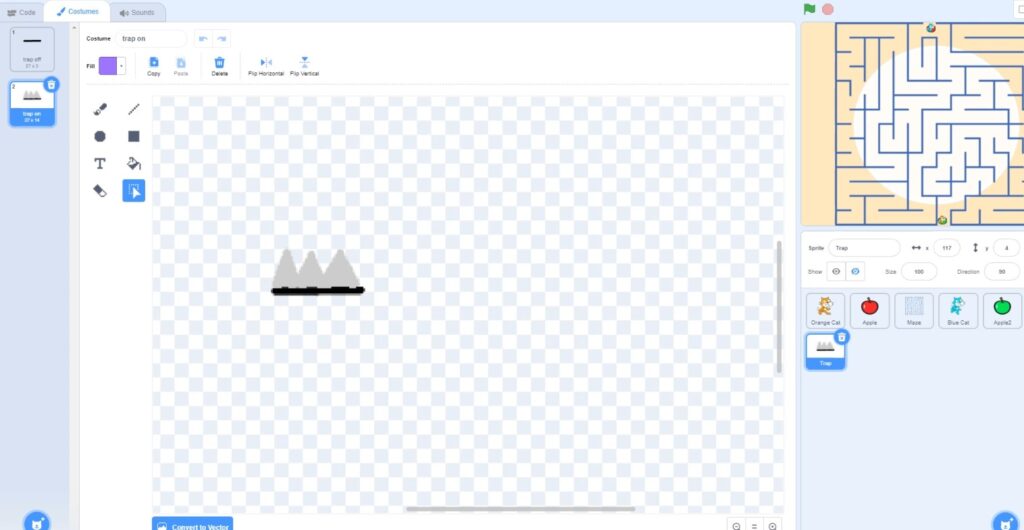
Make sure the spike trap is small enough to fit in the maze. To shrink it, click the Shrink tool (as shown in the following figure), and then click the sprite on the Stage. Click the Shrink tool as many times as necessary to shrink it to the right size.
Also, click the i button for the sprite to open its Info Area, and rename it Trap/
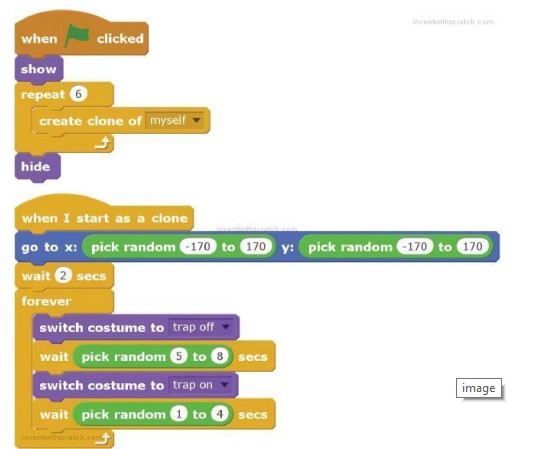
Add Cloning Code for the Traps
Because you’ll want several traps in the maze, you could duplicate the Trap sprite, but there’s a better way. You can use the clone blocks to make clones of the Trap sprite. Make the Trap sprite’s code look like this:
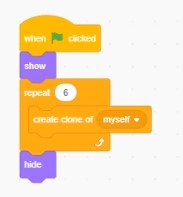
The repeat six loops will run the created clone of myself block six times to make six clones. These clones will then run the code the when I start as a clone block. This script first moves the Trap sprites to random positions in the maze. After the wait, 2 secs block pauses them for a bit, and the forever loop switches between the trap off and trap on costumes, which stick out and retract the spikes.
SAVE POINT
Click the green flag to test the code so far. Try moving both players using the arrow keys and the WASD keys. Make sure each of the eight keys moves the correct cat and only that cat. Try playing the full game. Make sure the level changes to the next maze when the second player touches the green apple. Make sure both players are sent to their starting points when the next level begins. Click the red stop sign and save your program.

Modify the Orange Cat Code IN THE GAME MAZE RUNNER
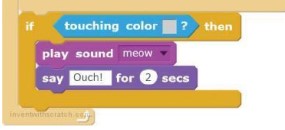
Right now, the cats aren’t programmed to do anything when they touch the spikes. Select Orange Cat in the Sprite List, and add the following code to the bottom of the existing code inside the forever block. To set the color in the touching color? block, click the color square in the block. The next color you click in the Scratch editor will become the selected color. Click the Trap sprite spikes in the Sprite List to set the touching color? block to gray. (If you don’t see the spikes, click the Trap sprite in the Sprite List, click the Costumes tab, and then select trap on. The costume with the spikes appears for the sprite in the Sprite List.) Add the following code to the script with the key pressed? blocks:
The cat can walk over the trap clones just fine when the spikes are retracted, because the gray color is not shown. But if the spikes are out, the cat will touch the gray color and pause to say “Ouch!” for 2 seconds.
SAVE POINT
Click the green flag to test the code so far. Try moving the orange cat over the traps when the spikes are in and out. The cat should only say “Ouch!” when the spikes are out. Click the red stop sign and save your program.
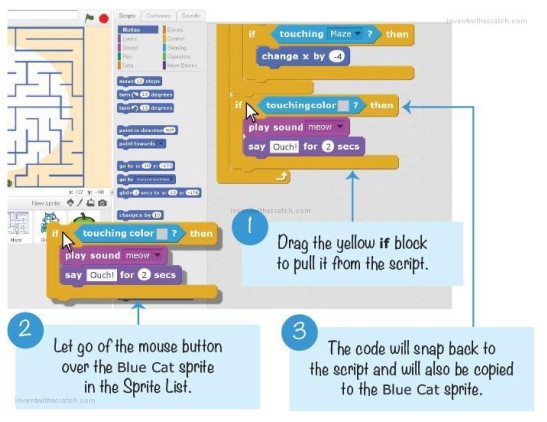
Copy the Code from Orange Cat to Blue Cat
The second player’s cat, Blue Cat, also needs the code for setting the color in the touching color? block. You can use this shortcut: click and drag the yellow part of the if touching color? then block in Orange Cat and drop it over Blue Cat in the Sprite List. The code block will move back to its original place in Orange Cat and will also be duplicated in Blue Cat. This duplicating technique is usually faster than dragging new blocks from the Blocks Area.
Select Blue Cat in the Sprite List. Move the duplicated code to the bottom of the forever loop. The code looks the same as the code in Orange Cat. The following figure shows how to drag and duplicate these code blocks.
You’ve finished version 3.0 of Maze Runner. With traps and two players, Maze Runner is now more interesting than the basic 1.0 version. You can always come up with new features you want to add on your own. But first, let’s add some secret cheats that players can use to hack the game.
CHEAT MODE: WALK THROUGH WALLS IN THE GAME MAZE RUNNER
Teleporting is a cool cheat, but players can’t control where they teleport to. Also, it’s too obvious that a player is cheating when they suddenly move across the Stage and through many walls. However, you can add a more subtle cheat that lets the cats move through walls when a special key is held down.
Add the Walk-Through-Walls Code to Orange Cat
For the Orange Cat sprite, modify the walking code so the touching Maze? blocks are replaced with the touching Maze? and not key l pressed? blocks. Only the code for the up arrow is shown here, but you’ll want to replace the touching Maze? blocks in all four of the if key pressed cases.
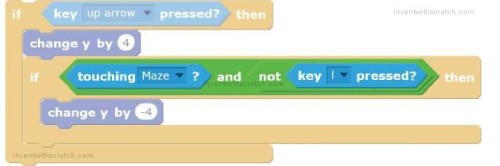
This enables the wall-blocking code only if the L key is not being pressed. If the L key is pressed, this wall-blocking code is skipped, and the player walks through the walls.
Add the Walk-Through-Walls Code to Blue Cat IN THE GAME MAZE RUNNER
Make the same walk-through-walls code changes to the Blue Cat sprite, except instead of key l pressed, make it key q pressed. The second player can walk through walls when the Q key is held down.
SAVE POINT
Click the green flag to test the code so far. Try walking through the walls by holding down the L or Q key. Make sure both cats can walk through walls but only when holding down the correct key. Click the red stop sign and save your program.
With this cheat code in the program, you can hack the game and make your cat walk through walls. The wall cheat shows you that anything is possible in your Scratch programs!
SUMMARY
In this chapter, you built a game that
- Has a cat sprite that can walk up, down, left, and right when the player presses certain keys
- Has walls that the sprites can’t walk through
- Broadcasts messages from one sprite that another sprite can receive
- Has a maze sprite with eight different costumes
- Supports two players using different keyboard keys
- Includes cheat modes that let the cats walk through walls
A two-player game is more exciting than a single-player game. Now, instead of just solving a maze, you are racing against another player! And you get to show off your Scratch game to someone else.
In Chapter 4, you’ll work with a basketball game. This game uses a side view, unlike the maze’s bird’s-eye view. But this means you’ll be able to add jumping and gravity, which are great techniques to use in many types of Scratch games!
REVIEW QUESTIONS
Try to answer the following practice questions to test what you’ve learned. You probably won’t know all the answers off the top of your head, but you can explore the Scratch editor to figure out the answers. (The answers are also online at https://nostarch.com/scratch3playground/.)
- Which block will change the size of a sprite?
- How can the code in one sprite send a message to another sprite to do something?
- How might you use the WASD keys on the keyboard?
- How can you duplicate some code blocks from one sprite to another sprite?
- What will happen if you accidentally use a
changeybycode block instead of achangexbycode block? - If you want a sprite to play the
Cheersound, how do you load this sound? - Look at the following code. It lets the player press the arrow keys to move the sprite left and right. It works, but what would you change to make the sprite walk faster?
Comments
One response to “MAZE RUNNER”
[…] enhancements. Exploring these diverse functionalities in your Drawing Game offers an excellent Scratch programming example for beginners, showcasing how to make a game in Scratch that engages creativity and fun!Unleash […]