Intro
 oday, by popular demand, we’re delving into the creation of “Health Bars!” Found in nearly all our favorite games, health bars are essential for indicating health levels and damage, offering players a clear sense of their status and where to focus to emerge victorious in a battle. Take our game, Lemonoids, for instance. Those hefty lemons soak up damage, but their health remains a mystery until they burst. So, in this tutorial, our goal is to craft a reusable sprite—a backpackable one—ready to drop into any Scratch project. This way, we can swiftly add health bars to any sprite or clone. Challenge accepted? Let’s go!
Welcome to the world of Scratch programming! Whether you’re exploring scratch programming examples for beginners or searching for scratch projects for beginners, this journey is an exciting one. In this tutorial, we’ll delve into how to make a game in Scratch, offering valuable insights and step-by-step guidance suitable for beginners, kids, or anyone eager to create their first Scratch project.
 Sample Game Testbed
This testbed aims to create a basic game setup to develop and refine health bars within a game environment.
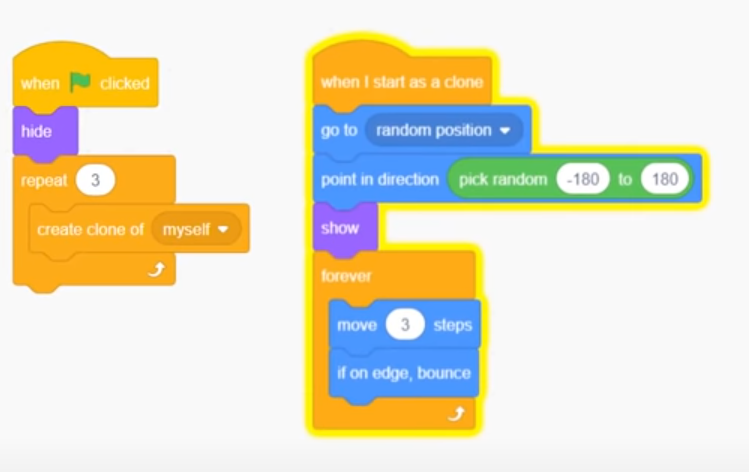
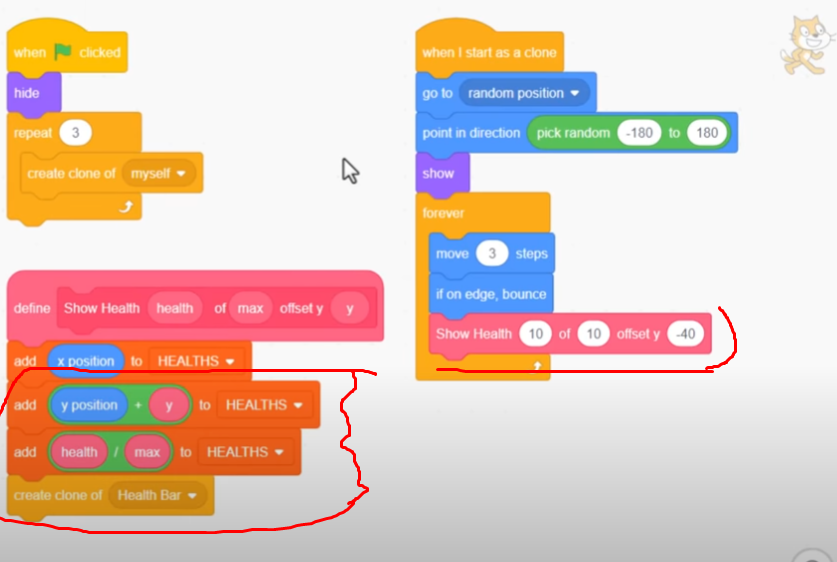
The process begins by initiating a new project and establishing a rudimentary game structure. Initially labeled as “Scratchy,” the primary role transforms into that of “Cat,” with three cat clones designated to roam the stage. Upon the flag click, these clones are concealed, following the concept of clone factories where the original sprite remains hidden.
Subsequently, three cat clones are generated, each prompted to undertake specific actions. As a clone is initiated, it is directed to a random position on the stage, ensuring each clone appears in a distinct location. Utilizing a ‘point in direction’ function, each clone faces a randomly assigned direction within a range of -180 to 180 degrees. Additionally, the sprite’s original hidden status necessitates a ‘show’ block to make it visible.
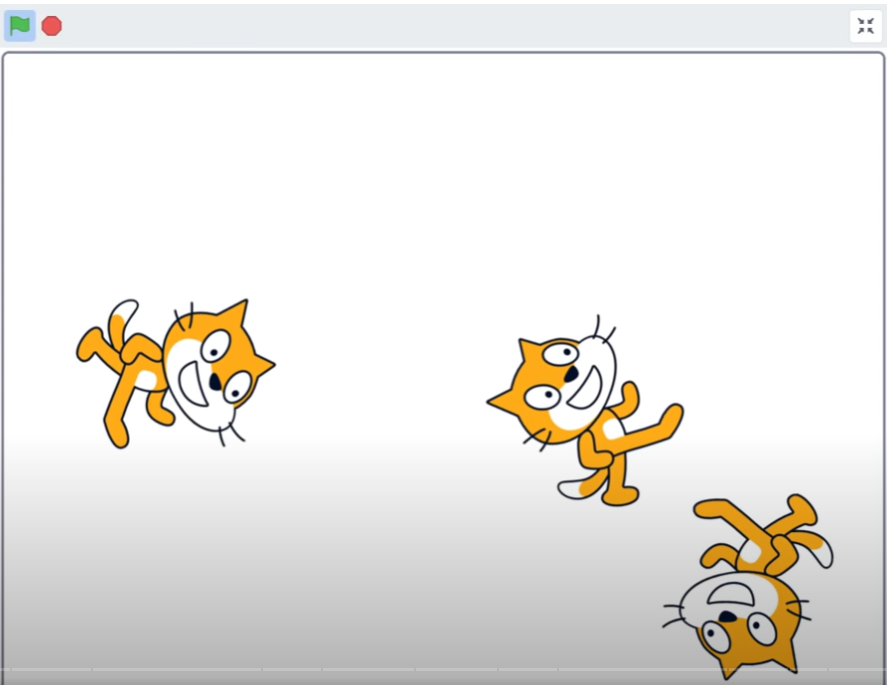
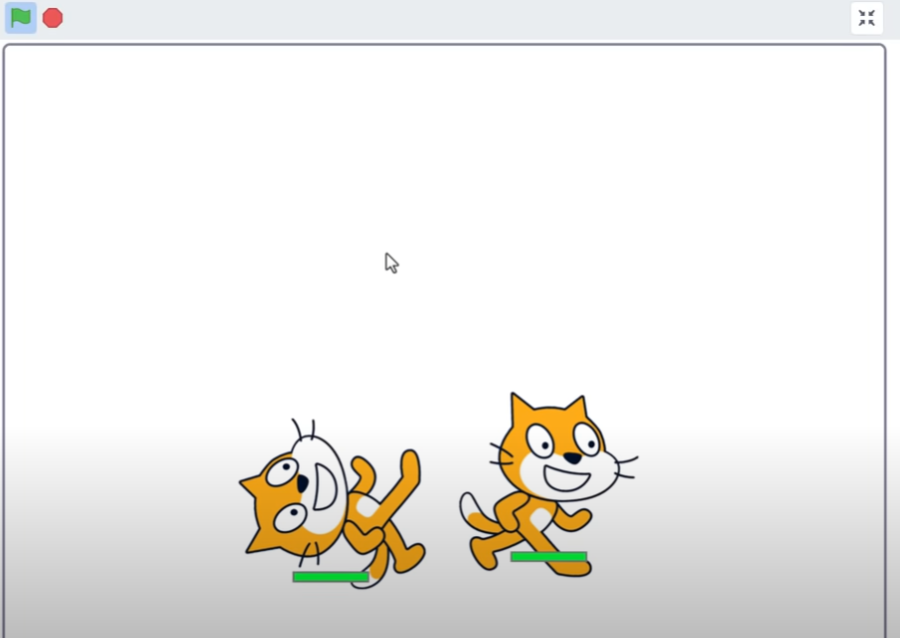
Testing the functionality reveals success as each click of the green flag results in the three cat clones scattered randomly across the screen, pointing in varying directions. To enhance the testbed’s efficacy, motion is introduced. A ‘forever loop‘ is integrated post the ‘show‘ block, facilitating continuous movement in steps, typically set at 3 steps. The addition of an ‘if on edge‘ bounce block ensures the sprites do not move beyond the stage boundaries, solidifying the testbed’s functionality for health bar assessment.
 The Health Bar Sprite
The creation of the Health Bar sprite begins with the goal of making it backpackable and easily adaptable. To initiate this process, select the “Paint a new sprite” button and assign the name “Health Bar” to this sprite.
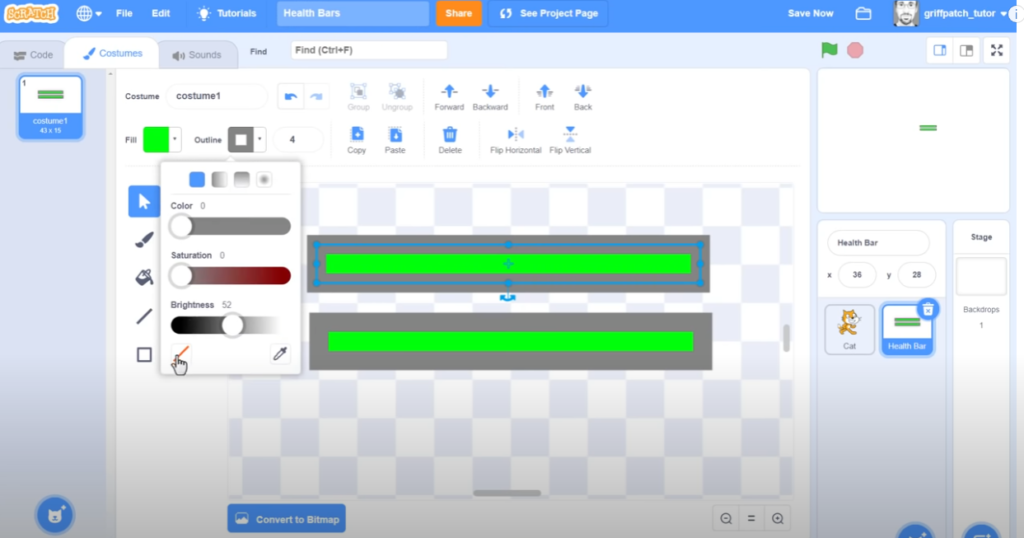
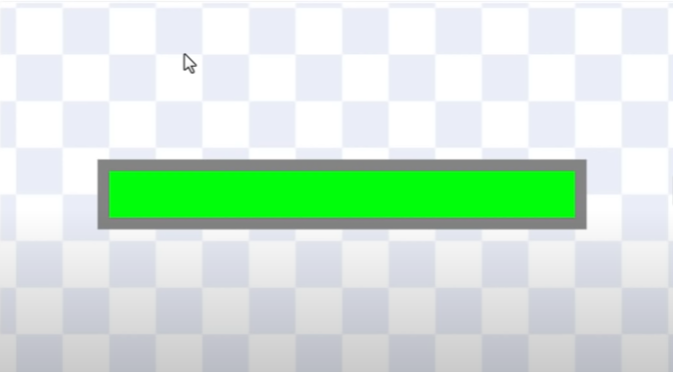
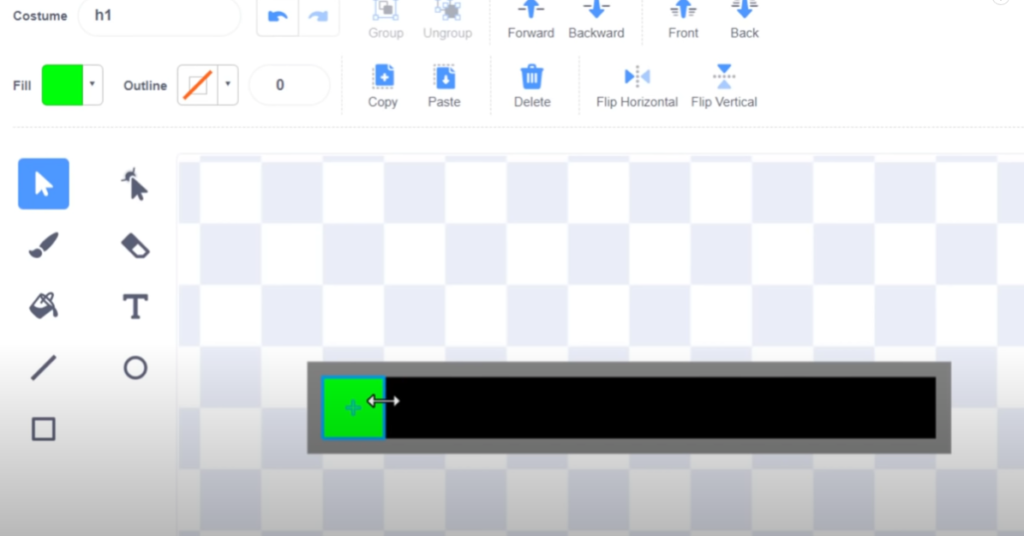
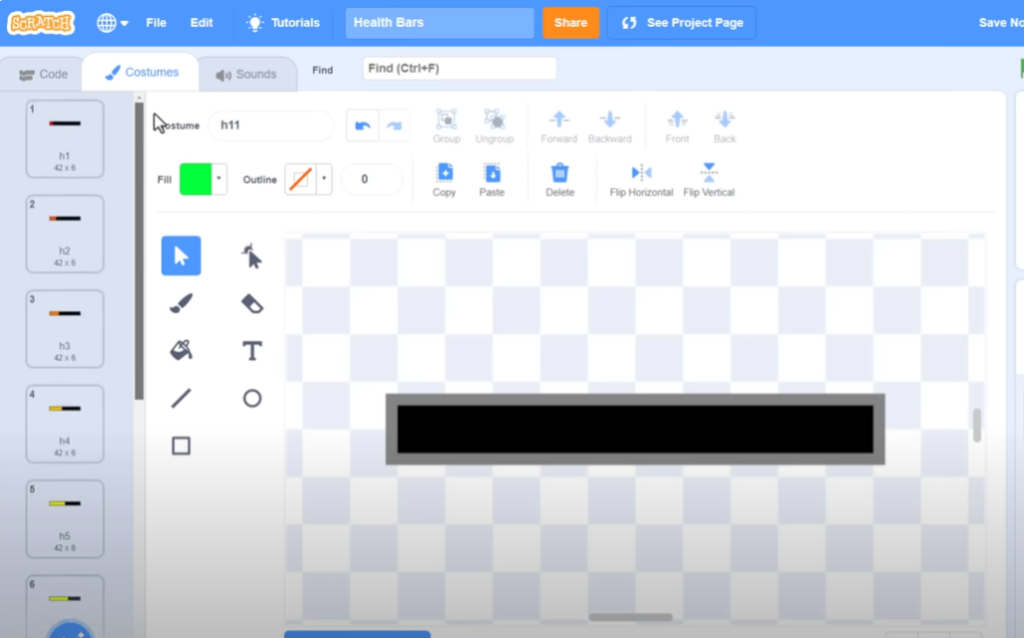
The initial design of the health bar entails a green-filled, outline-free rectangle. To ensure precision, zoom in and utilize the grid squares as a reference. Start drawing at a specific point: count 5 squares to the left and one square up from the canvas’s center. This marks the starting point for a rectangle spanning 10 squares across and 1 square high, resulting in a costume size of 40×4.
Using the selection tool, adjust the rectangle to align perfectly at the center of the canvas. With the shape selected, increase the outline width to 4, altering its color to grey. Replicate the shape by copying it and then pasting it immediately after. This action creates two identical shapes. Reset the outline of the second rectangle to transparent and position it back to align with the first rectangle’s center on the canvas.
Although this may appear meticulous, this approach ensures precise alignment, contributing to the visual aesthetics of the final project. While further adjustments might be necessary for these costumes, the current design serves as a sufficient starting point.
 Initial Coding
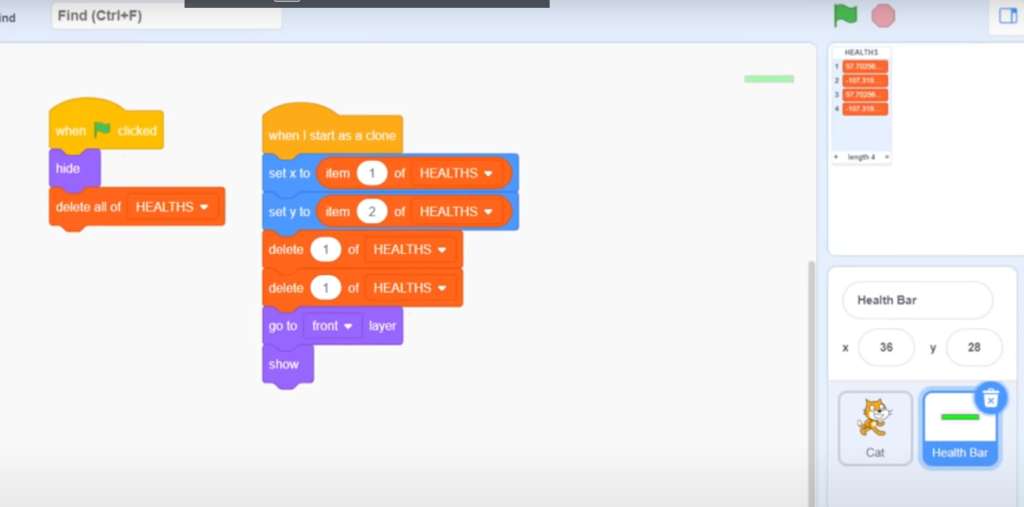
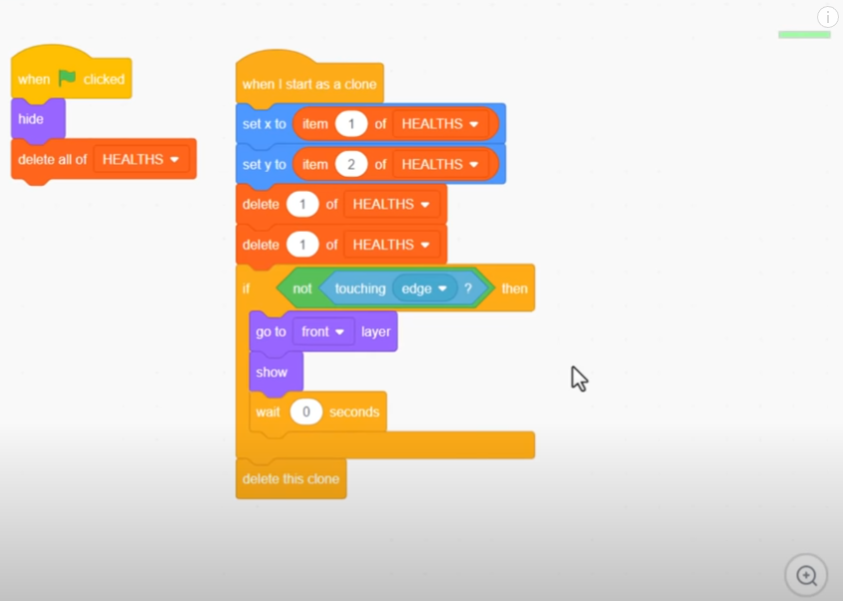
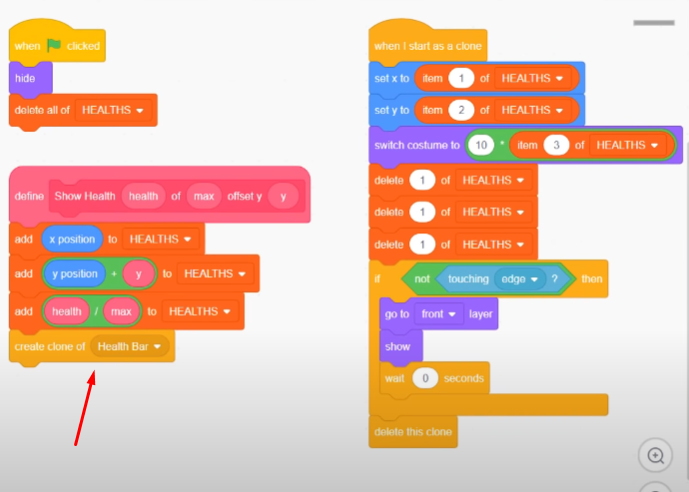
To kickstart our coding process, we’ll begin by setting up the initial steps. Upon navigating to the coding tab, our first task involves configuring the sprite’s functionalities. Upon clicking the flag, we’re working within a clone factory scenario, thus, the immediate action is to hide this particular sprite.
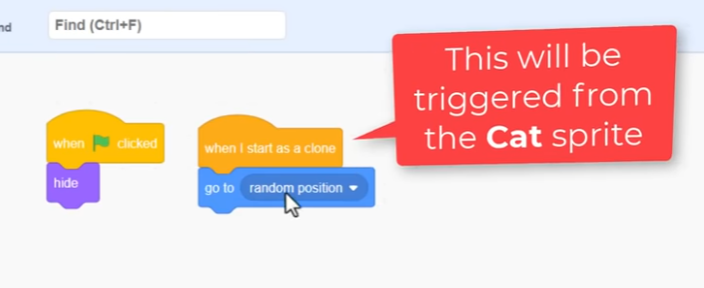
The objective is to have each cat sprite generate its health bar clone. To achieve this, we’ll utilize a “When I start as clone” trigger, ensuring each new health bar appears accordingly.
However, a challenge arises: determining the position of the cat that initiated the cloning process. Scratch presents limitations in directly selecting the desired cat among the multiple sprites. Consequently, we need an alternative approach, commonly involving a Scratch List. This list serves as a vital medium for transmitting various information bits between sprites—such as the x and y positions of each cat sprite.
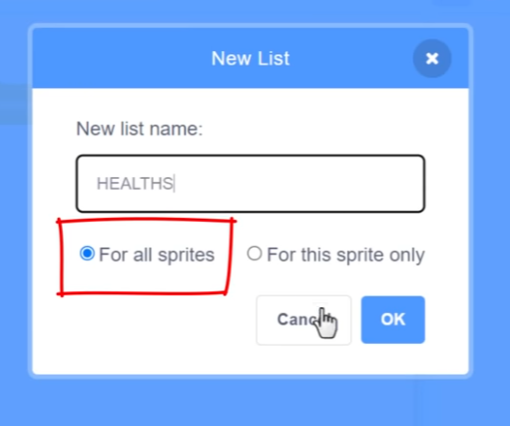
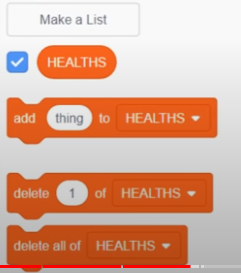
Hence, we’ll create a new list named “HEALTHS,” emphasizing its creation “for all sprites.” This ensures its shared accessibility among all sprites, enabling the health bar to retrieve values placed in the list by other sprites.
Before moving away from this sprite, it’s crucial to establish a foundational practice: initializing variables and lists at the project’s commencement. Therefore, inserting a “Delete all of HEALTHS” command under the green flag script becomes a necessary step. Neglecting this initialization might lead to unintended bugs down the line, as observed in projects prompting users to press the green flag twice to function properly.

 Using a List to Pass Data to a Clone
At the start-up, a common issue often arises.
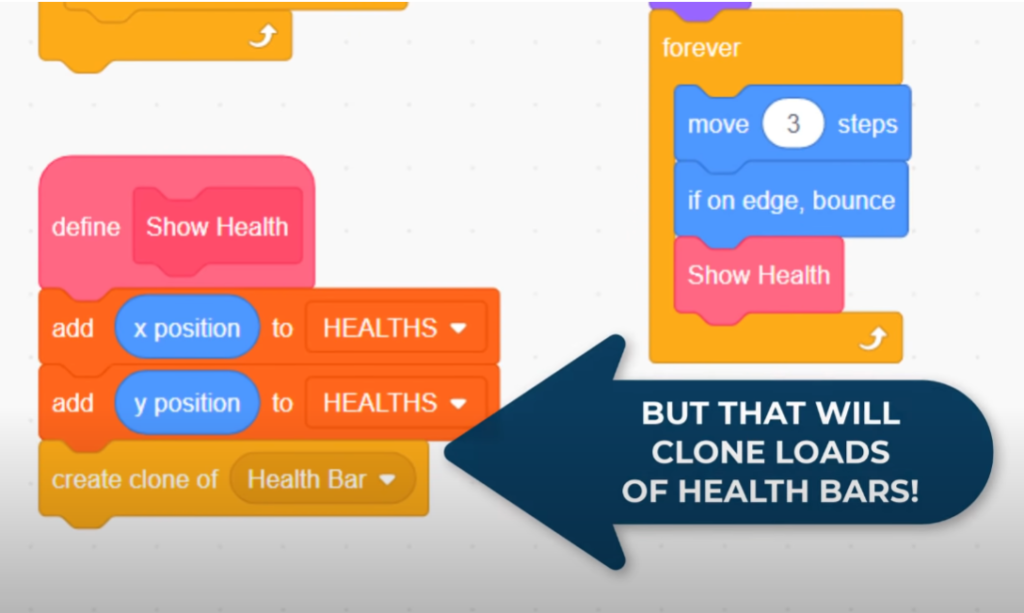
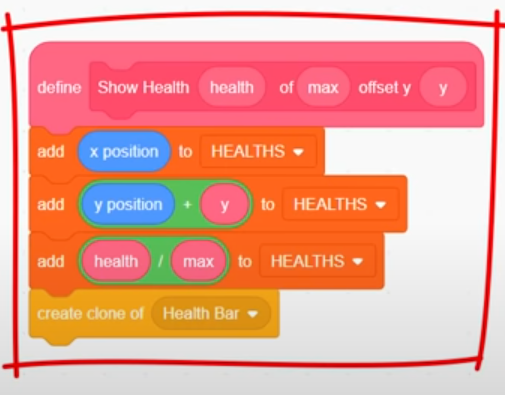
Great, let’s click back into our Cat sprite to begin. We’ll initiate the creation of health bar clones. In an available space, insert a “Create clone of” block, but this time, instead of cloning ourselves, we’ll clone a new sprite named “Health Bar.“
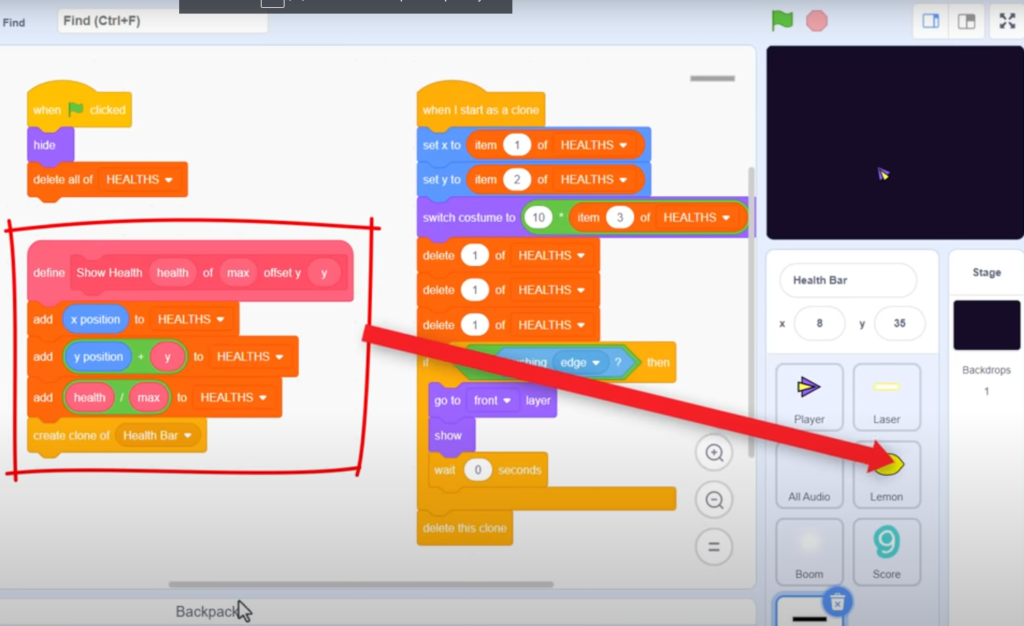
Now, we need to communicate the location of this cat to the clone. To achieve this, we’ll add this information to a new list. First, we’ll add the x position of the cat, followed by the y position. By executing the Add blocks, you’ll observe the x & y positions getting added to the empty list. This happens before creating the new health bar clone, ensuring the clone captures these values upon creation.
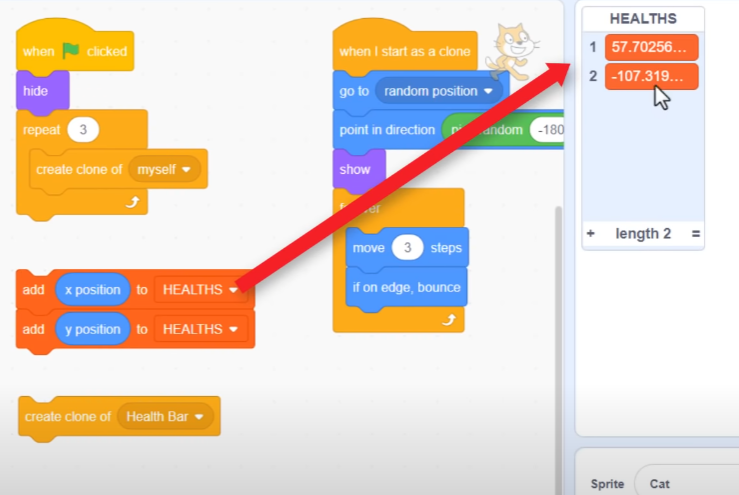
In the case of multiple health bar clones, executing the Add blocks again will append another set of x & y positions to the list, which is perfect.
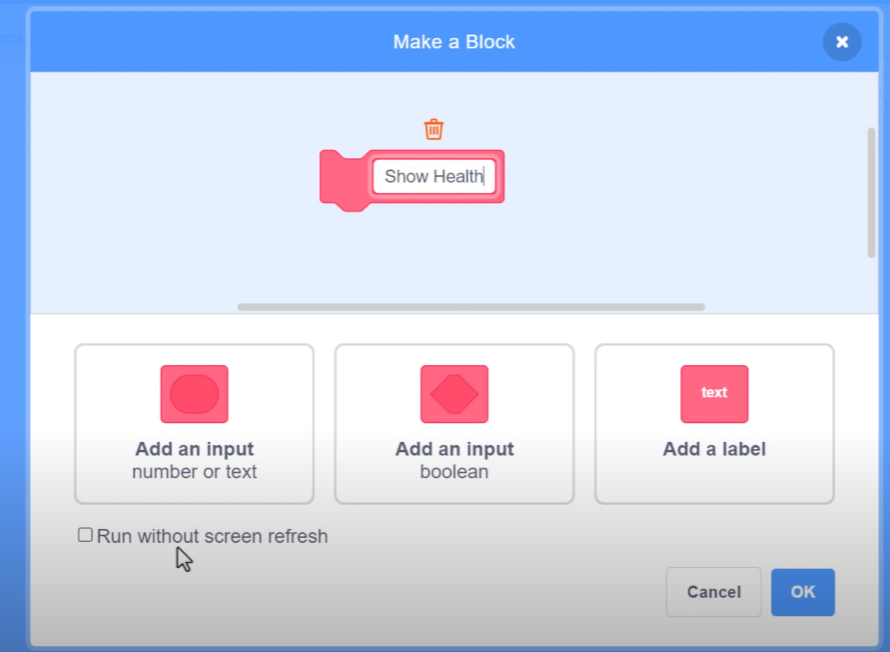
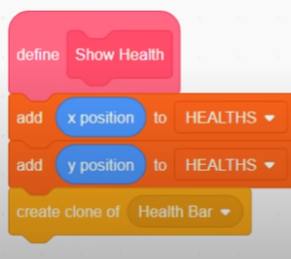
To organize these scripts, let’s encapsulate them in a custom block named “Show Health” or a more verbose “Show Health Bar.” To keep the Scratch code concise, run this block without a screen refresh, and attach the define block to the health bar spawning script.
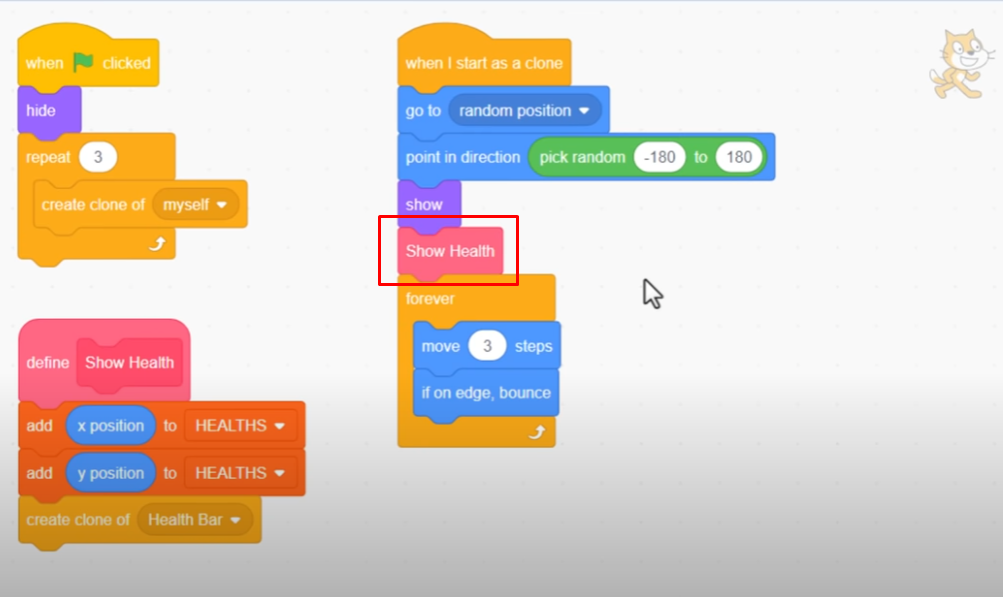
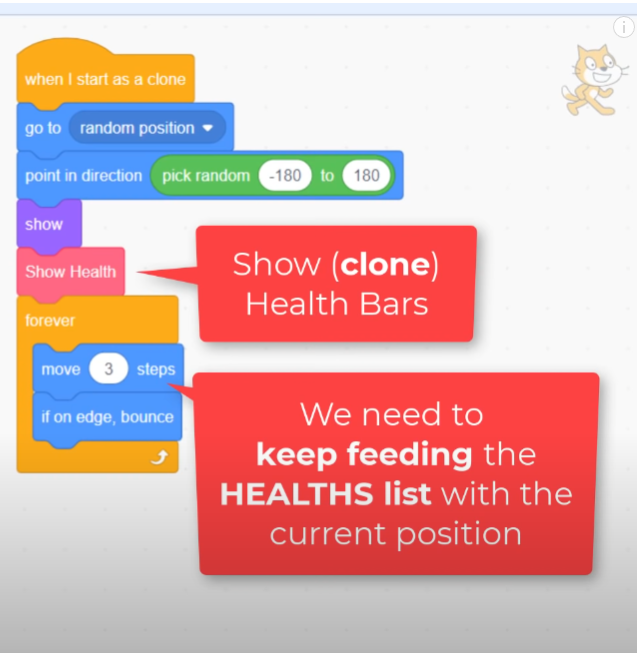
The next decision is determining where within the Cat sprite’s scripts to employ the new Show Health block. Since it clones a new health bar, placing it before the main movement forever loop seems reasonable. This approach ensures that each of the 3 cloned cats spawns its health bar.
However, upon revisiting the Health Bar sprite, using the x & y positions from the HEALTHS list becomes imperative to position each clone accurately. Replace the old “go to Cat” with “set x to” and “set y to” blocks, where the x position corresponds to the 1st item in the HEALTHS list and the y position corresponds to the 2nd item. Subsequently, delete these items from the list to maintain cleanliness. After positioning the new health bar, ensure it’s displayed by moving it to the front layer and showing it.
Upon testing the project, positive outcomes emerge. Each cat successfully clones one health bar, initially appearing at their spawn location. However, an issue surfaces where the health bars remain stationary while the cats move. There’s a need to establish a connection between these sprites’ positions, thus ensuring the health bars move alongside the cats.
 Continual Repositioning of Health Bars
In the realm of coding for sprites and their associated elements, the perpetual repositioning of health bars alongside their corresponding characters poses an intriguing challenge. Specifically focusing on the Cat sprite, a crucial juncture arises in the process: the display and cloning of the health bar come after the instantiation of the Cat sprite but before its motion commences.
The conundrum lies in maintaining the health bar’s synchronicity with the Cat’s movement. This necessitates consistently updating the “HEALTHS” list with the most recent positions for each cat. However, the conventional approach to achieve this involves extensive coding to oversee the creation, linkage, updates, and deletion of list data and their corresponding clones—a complexity unfitting for a tutorial designed to be straightforward.
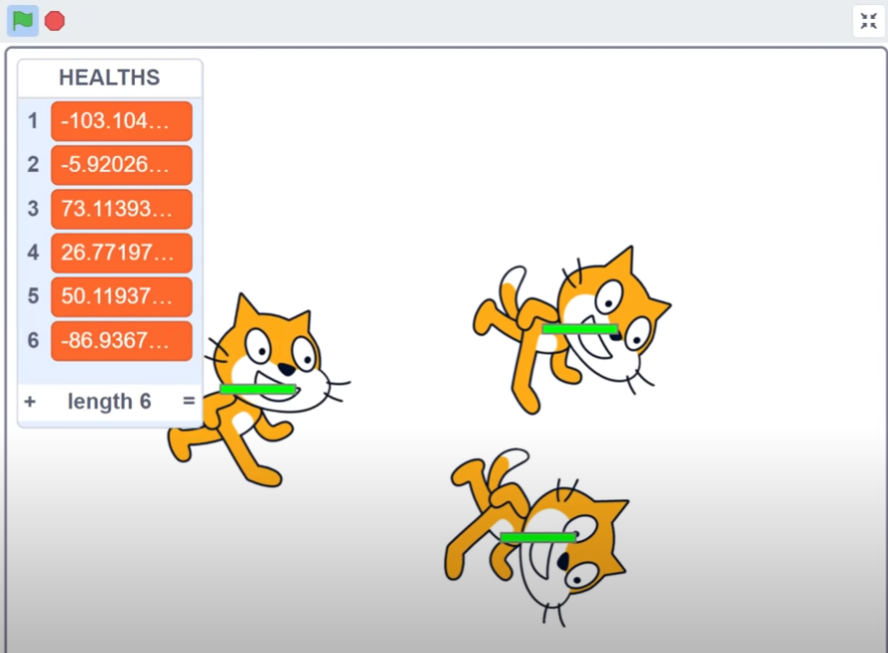
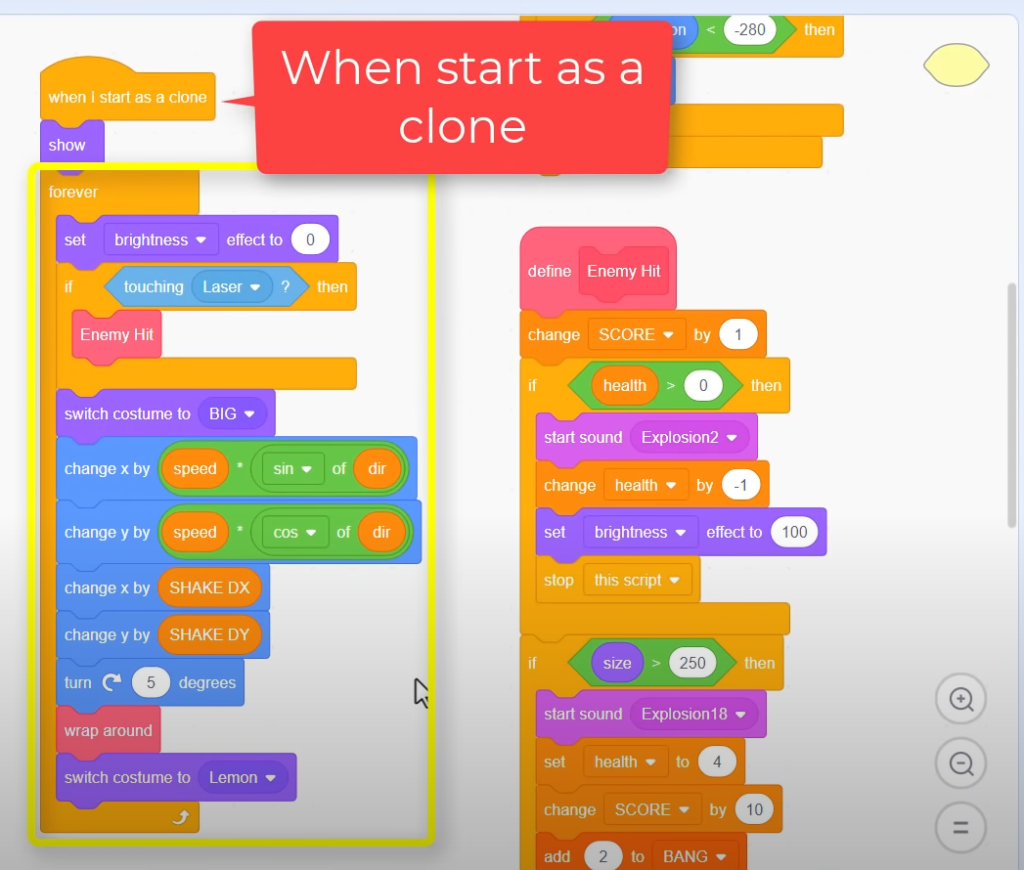
A novel alternative emerges: a subtle yet profound adjustment. By relocating the “Health Bar” block from its original placement above the forever loop to the final position inside the loop, a transformative shift occurs. Despite initial concerns of triggering a barrage of cloned health bars, the execution yields a surprising revelation upon project launch—it indeed generates multiple health bars, following the cats’ movements.
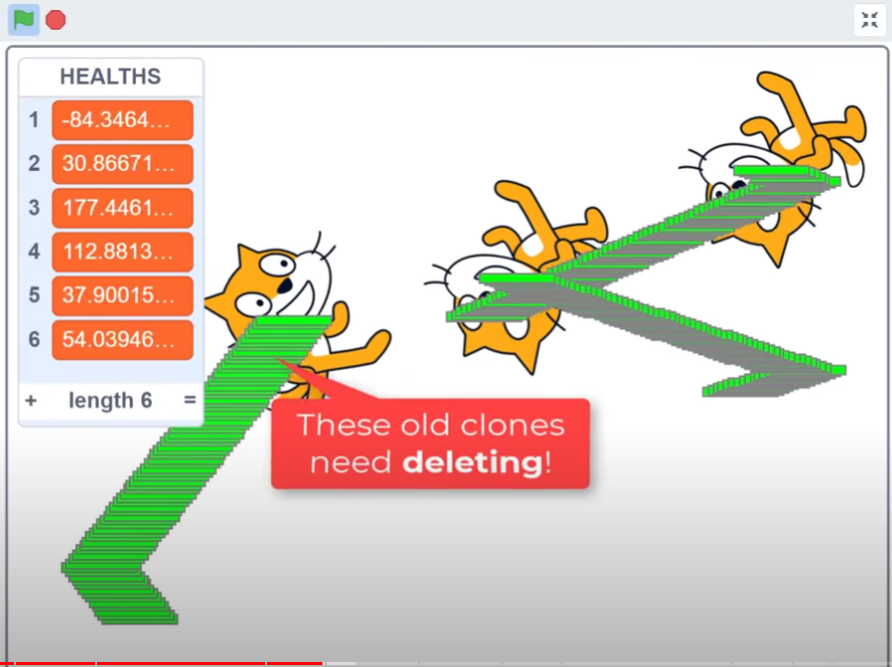
Yet, this achievement comes at a price. Each movement initiates the creation of a new clone, leaving a trail of obsolete clones in its wake—a whimsical sight, but impractical. With each new clone, the predecessor becomes redundant, demanding deletion.
The dynamic shift in positioning the “Health Bar” block within the loop orchestrates a visually captivating result—albeit at the expense of surplus clones. Resolving this entails implementing a mechanism to discard redundant clones promptly, ensuring the continuous alignment of health bars with their associated sprites without cluttering the canvas with superfluous elements.
 Short Lived Clones
In the realm of Scratch programming, the phenomenon of “Short Lived Clones” emerges as an intriguing method to manage the appearance and disappearance of cloned health bars. Initially, the challenge arises in swiftly deleting cloned health bars without rendering them invisible too quickly. Deleting them right after cloning would result in their instantaneous vanishing, depriving the viewer of even a glimpse.
To resolve this, a crafty maneuver is employed. Upon cloning the health bar sprite, a brief pause, strategically camouflaged as a “0-second wait,” is inserted. This clever technique manipulates Scratch’s behavior, allowing enough time for the screen to refresh, thereby displaying the cloned health bars fleetingly before their prompt deletion in preparation for the subsequent frame.
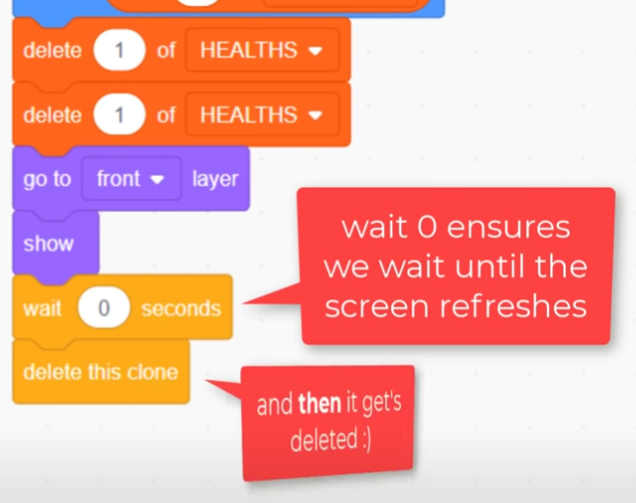
Upon running the project, a seamless illusion unfolds. The health bars, though stationary in reality, create an illusion of fluid motion through continuous cloning. This timing mastery crafts a flawless, singular tracking animation, indistinguishable from actual movement—a delightful triumph!
With the success of this animation technique, the focus shifts to imbuing functionality into these health bars. The goal now becomes aligning them with the sprites’ current health levels. Before delving into this functionality, a final tweak is added. While in the current 3-cat test game, it may not be applicable, provisions are made for scenarios where sprites move off-screen. In such instances, the health bars must cease display.
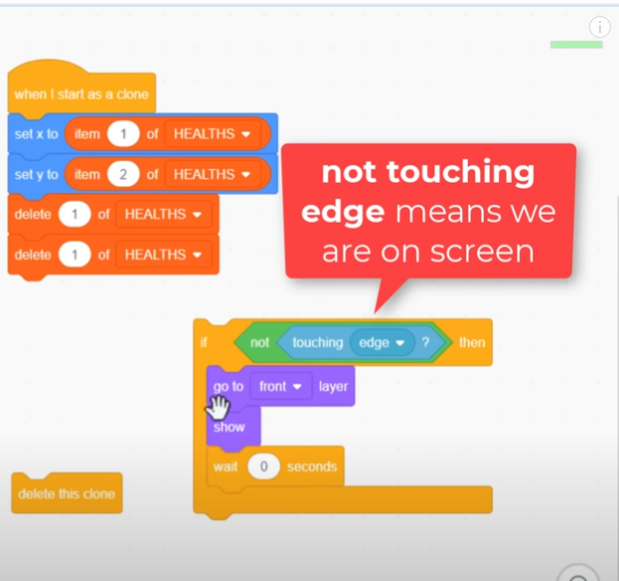
Thus, a conditional check is incorporated: “IF not touching edge.” This condition ensures that the health bar remains visible only when the sprite is on-screen. If the sprite moves beyond the screen’s boundary, the health bar is swiftly deleted. Testing confirms the seamless execution of this modification, maintaining the aesthetic and functional integrity of the health bar dynamics.
 Health Level Costumes
In creating the Health Level Costumes, the aim is to visually represent the changing health status of a sprite within a game. Currently, there’s only one costume reflecting full health. However, as the sprite takes damage, the health bar needs to show depletion. Let’s break down the steps involved in crafting these costumes.
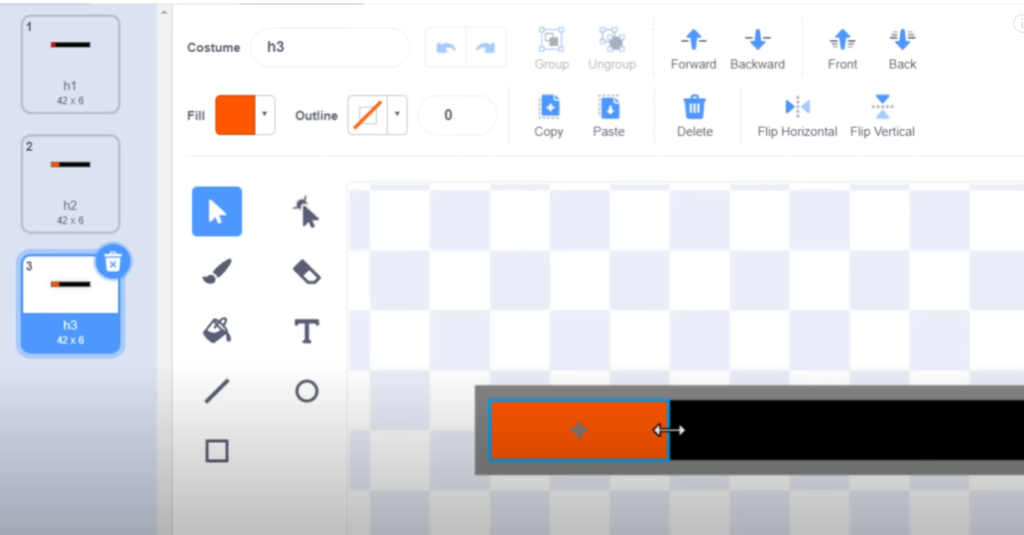
To begin, let’s prepare the initial costume by duplicating the inner green rectangle using the COPY button and then immediately pasting it. This action results in two rectangles. The first one will be modified by changing its fill color to black, representing depleted health. Next, position the original green rectangle back at the center of the canvas, perfectly fitting over the black one.
This initial costume signifies minimal health. Adjust the right-hand edge of the green bar to cover just one grid square, while also changing its color to red for better clarity.
Moving forward, duplicate this costume and expand the red rectangle by another grid square. Gradually shift the fill color towards the right, transitioning it back toward the green hue to signify increasing health.
Repeat this process by duplicating the costume, stretching it across by an additional grid square, and adjusting the color until it progresses towards a fully green bar, indicating full health. This transition typically completes at costume number 10.
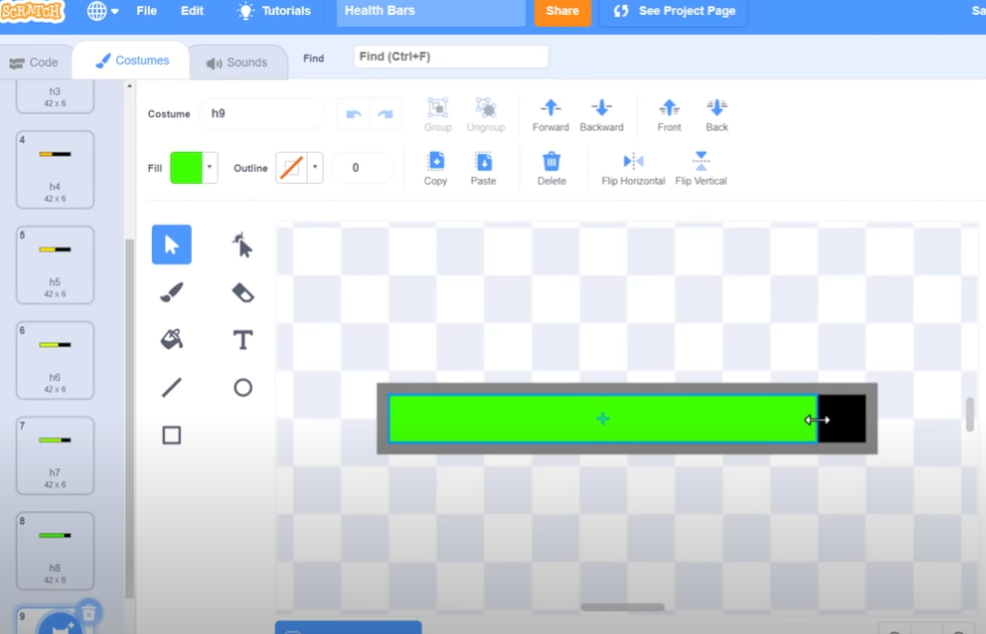
However, the process doesn’t halt there. There’s a need to continue this sequence to ensure the accurate representation of various health levels beyond full health.
 Optimizing Sprite Costumes for Efficiency in Scratch

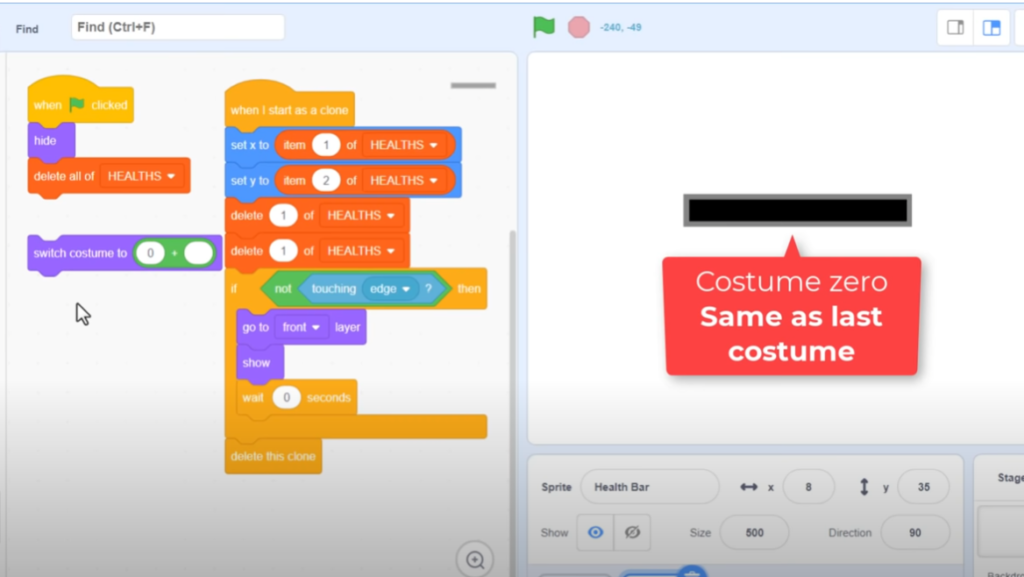
“We need an additional costume. [Costume 0?]
This particular costume, Costume 11, will serve as our entirely empty health bar. Simply select the green bar and delete it entirely. So, why did we place the empty costume at the bottom here? Wouldn’t it be more logical to have it at the top, organizing all the costumes in ascending order from empty to full? Yes, that could be done, but there’s a peculiar quirk in Scratch that makes this order more effective. As we all know, sprite costumes typically start at costume number 1. However, wouldn’t it be more sensible for an empty health bar to be recognized as costume 0?
Now, observe this interesting aspect: When we switch costumes—I’ll just insert an additional block here for numerical use—and move to costume number 1… There we go, the first costume appears. Yet, it so happens that when you switch costumes to a number less than 1, Scratch wraps around and begins cycling back from the last costume again. This implies that costume 0 actually becomes the last costume in our list of costumes. Hence, voila! By positioning the empty costume as the last one, we effectively also assign it the designation of costume 0, simplifying scripting significantly. Quite a clever trick, isn’t it?”
Setting Up the Health Bar

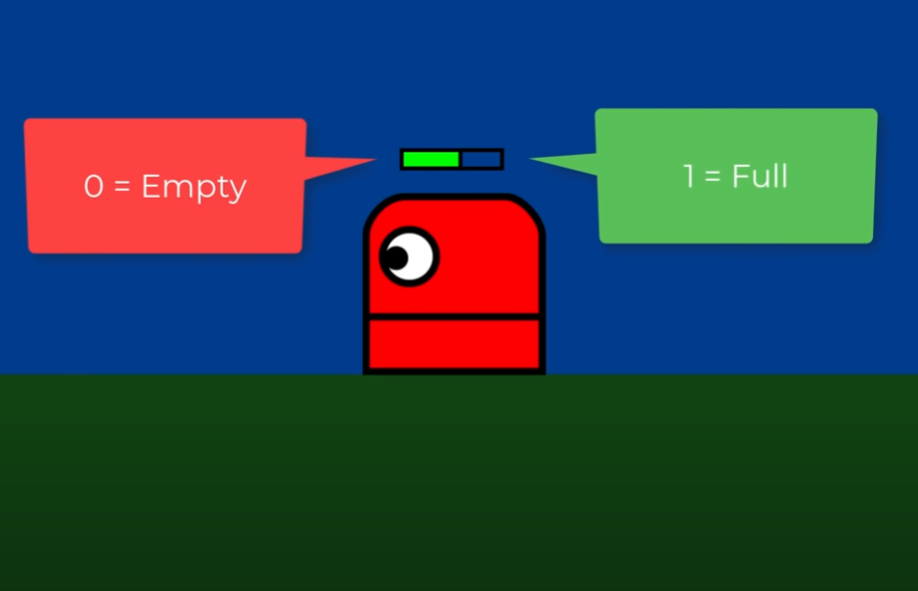
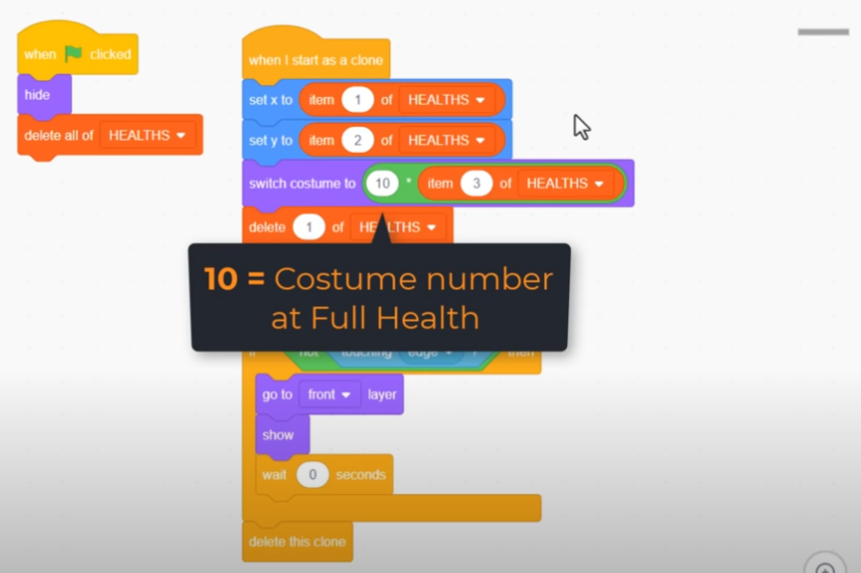
Let’s resize that back to its normal size and add the “switch costume” block right after positioning the health bar. We’ll inform this sprite about the cat sprite’s health, similar to how we relay its position, using the HEALTHS list. This will correspond to item 3 in HEALTHS. Another item implies the need for a 3rd delete block, although we’re still only deleting item 1. Before implementing this, let’s consider how health bars function. Take this small enemy, it’s at full health… That’s acceptable, but here comes a boss with significantly more health… Should we illustrate their health in the same way? No, we depict the health bar the same way for both enemies; however, the small enemy’s bar depletes much faster. Hence, health bars are essentially health percentage bars. At 100%, they’re full, and at 0, they’re empty. We can represent empty as 0 and full as 1.

What does this mean for our costume change here? It implies that a health value of 1 should display costume 10, representing full health. Therefore, we only need to multiply item 3 by 10. If you prefer using more or fewer costume levels for your health sprite, adjust this number accordingly. Excellent. Quickly, return to our Cat sprite; I’m eager to get this health system functioning!
Now, the ‘Define Show Health‘ script. Let’s incorporate the 3rd item, which will denote the cat’s health. However, currently, we don’t have a health value to set. Let’s plan ahead. Right-click on the define block and select Edit. We intend to display health at a given level, so add a new input named ‘health‘. Rather than each cat passing this in as a percentage, simplify by adding the label “of” and another input for “max,” representing the maximum or total health. While we’re here, let’s also introduce one more feature: the label “offset y” and an input for “y.” This will adjust the health bar’s vertical position relative to the cat sprite, avoiding the middle alignment, which never looked good.
Firstly, let’s handle the health. We require a divide block. To calculate this sprite’s health as a percentage, we simply divide the input ‘health‘ by the ‘max’ health. This calculation will yield 1 for full health and 0 for no health. For the y offset input, we’ll add this to the sprite’s y position accordingly.
Subsequently, let’s populate the “Show Health” block with some values. Initially, let’s assign each cat a health of 10 out of 10 and try an upward offset of 40 pixels. Ready? Click that green flag! Ah, now we see the health bars moved above each cat – neat. If you prefer the bars below, consider using an offset y of -40 instead. Adjust until the bar sits where you desire.
Next, let’s attempt halving the health to 5 out of 10. Oh, splendid! Or even 0 out of 10 – game over for these cats! It’s fantastic; we can input any health value, and the health bars adjust accordingly to reflect the cats’ health levels.

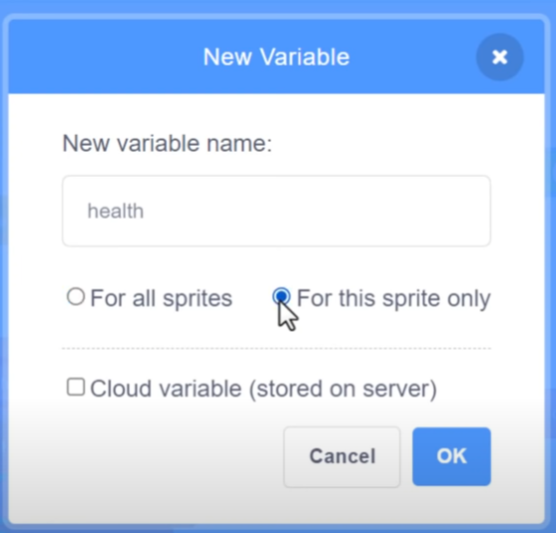
Sprite Health
We’re nearly there! Let me demonstrate how to use this in a game. First, create a health variable specific to this sprite. Each cat should possess its own health level. Upon cloning the cat, set its health to 3, allowing a maximum of 3 hits. Next, input the health variable as the first parameter for the “show health” block. Ensure to adjust the display to reflect the maximum health of 3. Thus, they’ll begin with a health display of “3 of 3”.
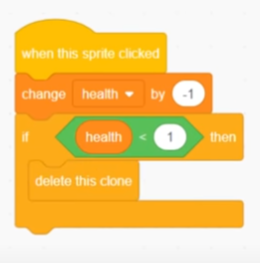
To simulate the cats taking damage, use the event “When this sprite is clicked” and decrease the health by 1. Shall we test this out?
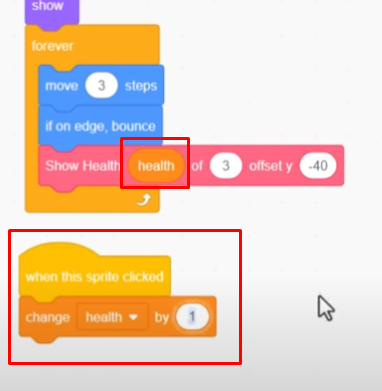
Get ready, cats! Click on you! Repeat, and again! Ha-ha! It’s working as intended—three clicks and they’re out of health. At this point, it makes sense to remove the clone. Therefore, IF the health is less than 1, delete this clone.
Backpack: Health Bar Sprite

We’ve developed a highly efficient health bar system. The goal was to create a versatile sprite that could seamlessly integrate into any game. We’re almost there, but there’s one issue: the “Show Health” script isn’t included in the Health Bar sprite. If we backpack it now, an essential part of the script will be missing.
No worries, simply drag a copy of the defined block into the Health Bar sprite. Now, when we examine the finalized health bar sprite, everything is contained and prepared for backpacking. Even though the Show Health Bar script isn’t utilized here, it’s now ready to be dragged out for use in any sprite that requires it.
To illustrate what I mean, let’s take this health bar, drag it into our backpack.
Making use of this is your own games (or Lemonoids)
Let’s enhance Lemonoids by adding health bars! If you haven’t followed the tutorial yet, it’s just three episodes, so you can quickly catch up. Otherwise, buckle in and enjoy this ride while we implement these features into your games!
Currently, the player lacks health, but our Lemons do have it! Let’s start by adding health bars to them.
Firstly, open your backpack and drag the “Health Bar sprite” into the game. Then, place the “define Show Health” block into the Lemon sprite. You can replicate this script across multiple sprites needing health bars, not just one.
Now, tidy up the new script in the Lemon sprite. Afterward, find the primary lemon movement scripts. Look for the “When I start as clone” script, which contains movement blocks. Scroll to the bottom and insert the “Show Health” block after the movement is completed.
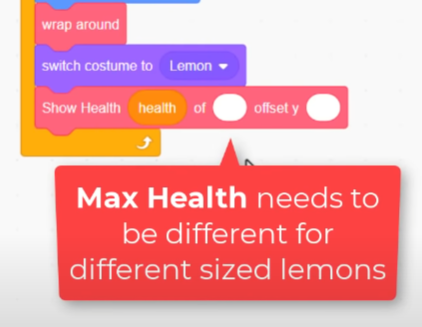
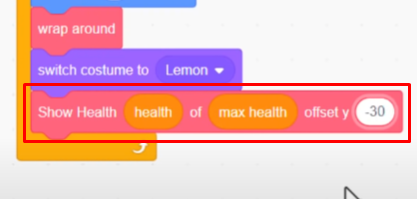
Regarding health, we have the ‘health‘ variable, but determining max health is more complex, especially for differently sized lemons. To address this, create a new variable named “max health” specific to this sprite. Set it to the right of the “of” in “Health of Max Health“. Remember to set max health and adjust the offset y to -30 for the health bar’s proper placement below the lemon.
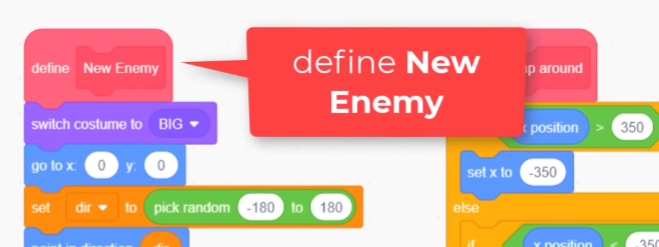
Next, locate the “define New Enemy” script where lemon clones are created. Set the health to 15 and immediately after, set max health to 15 or simply use the health variable.
Testing it out, you’ll see the lemon’s health bar and how shooting it affects its health. However, smaller lemons exhibit minimal health initially due to having the same max health as larger ones.

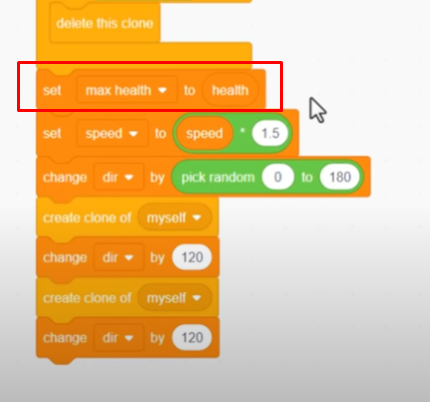
To address this, find the “define Enemy Hit” script where lemons split. After setting health to a reduced amount, update max health to the newly assigned health value. Now, after splitting, each lemon’s health resets, accurately representing their health.
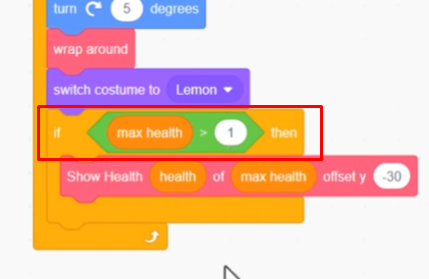
Consider hiding the health bar on lemons with full health. To do this, modify the “When I start as clone” script by wrapping the Show Health block in an IF block. Show the health bar only on enemies with a max health greater than 1, indicating more resilient enemies.
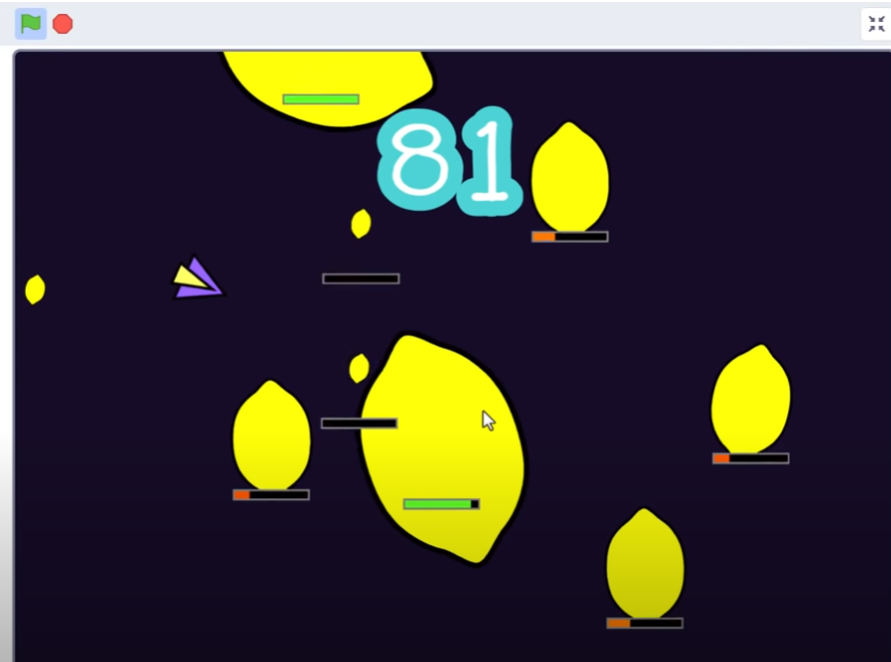
After playtesting, the larger lemons have health bars, while the smaller ones don’t, providing a balanced representation of lemon health.
Conclusion
Great! The only thing left to do is to add a health indicator below the player. However, I urge you not to stop there. I want to see health bars in other projects, and it’s pretty easy to do now. Don’t forget to submit your games so I can review them – that would be great. Share your successes in the comments, if this cloning method is effective for you, or if you encountered any problems. There are many ways to approach these tasks, and I’m prepared to explain alternative methods in future tutorials.
As we conclude this tutorial on Scratch programming examples for beginners, I hope you’ve found inspiration and insight into creating your own Scratch projects. Remember, Scratch for kids and beginners opens a door to endless possibilities. Keep experimenting, learning, and exploring how to make a game in Scratch. Your creative journey has just begun!
😃
Creating Health Bars in Scratch: Video Tutorial
LINK TO THE SCRATCH PROJECT: https://scratch.mit.edu/studios/31340119/
For more information on programming in Scratch and to explore a wide range of educational resources, please visit https://techclass4kids.com/. Dive deeper into the world of coding and unleash your creativity with TechClass4Kids!
Comments
One response to “Creating Health Bars in Scratch: A Step-by-Step Tutorial”
[…] Creating Health Bars in Scratch: A Step-by-Step Tutorial […]