 he first Super Mario Bros. game was introduced in 1985 and became Nintendo’s greatest video game franchise and one of the most influential games of all time. Because the game involves making a character run, jump, and hop from platform to platform, this game style is called a platformer (or platform game).
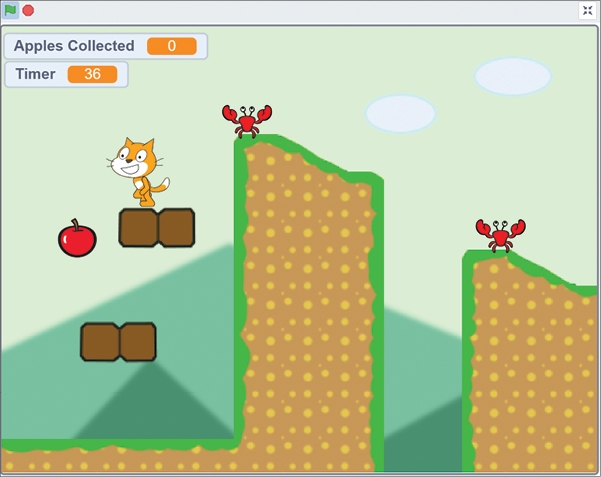
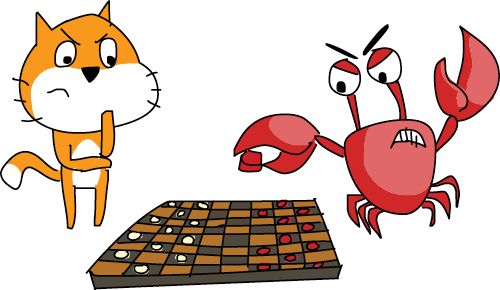
In the Scratch game in this chapter, the cat will play the part of Mario or Luigi. The player can make the cat jump around a single level to collect apples while avoiding the crabs who will try to steal them. The game is timed: the player has just 45 seconds to collect as many apples as possible while trying to avoid the crabs!
Get ready to program a more complicated game than those in previous chapters.
SKETCH OUT THE DESIGN CREATE GRAVITY, FALLING, AND LANDING AN ADVANCED PLATFORMER
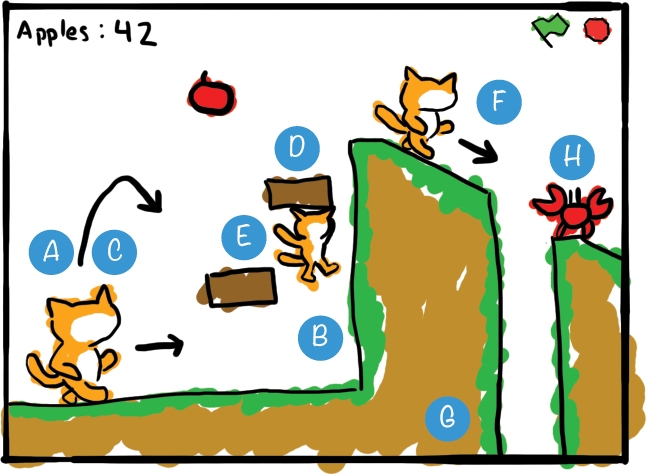
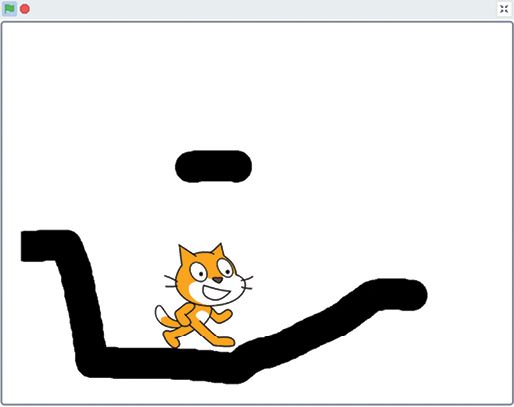
Let’s sketch out on paper what the game should look like. The player controls a cat that jumps around while apples appear randomly. The crabs walk and jump around the platforms randomly, too.
Here’s what we’ll do in each part:
- Create gravity, falling, and landing
- Handle steep slopes and walls
- Make the cat jump high and low
- Add ceiling detection
- Use a hitbox for the
Catsprite - Add a better walking animation
- Create the level
- Add crab enemies and apples
Let’s code each part one step at a time.
 CREATE GRAVITY, FALLING, AND LANDING AN ADVANCED PLATFORMER
In the first part, we’ll add gravity, falling, and landing code, Coding is a bit trickier, because we want the ground to have hills and eventually platforms!
To start, click the text field at the top left of the Scratch editor and rename the project from Untitled to Platformer.
1. CREATE THE GROUND SPRITE
Let’s use a simple shape for the ground in the first few scripts, just to explore how the code will work.
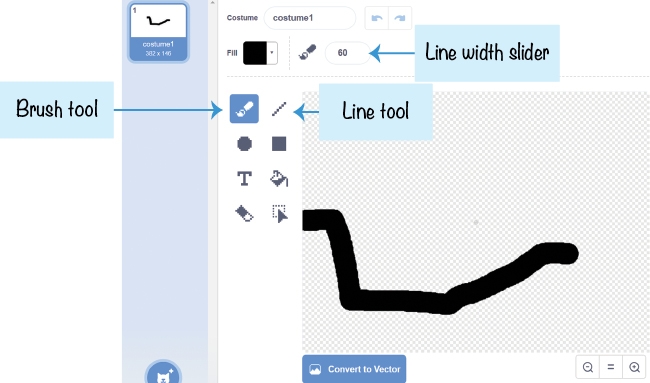
Hover over the Choose a Sprite button and click the Paint button to create a temporary ground sprite while you learn about platforming code. In the Paint Editor, use the Brush or Line tool to draw a shape for the ground. You can make the lines thicker by increasing the number in the line width text box at the top of the Paint Editor. Be sure to draw a gentle slope on the right and a steep slope on the left.
In the Sprite Pane, rename the sprite Ground. Also, rename the Sprite1 sprite Cat.
2. ADD THE GRAVITY AND LANDING CODE
Now that we have a sprite for the ground, we need the cat to fall and land on it.
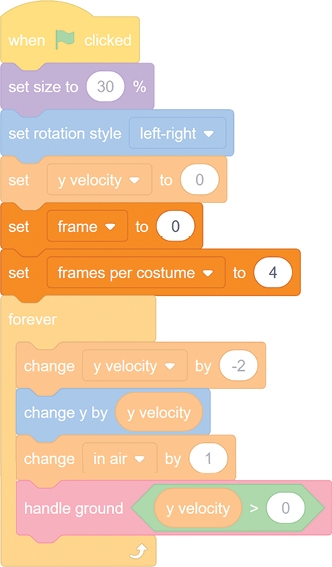
Select the Cat sprite. In the orange Variables category, click the Make a Variable button and create a For this sprite only variable named y velocity. Then add the following code to the Cat sprite:

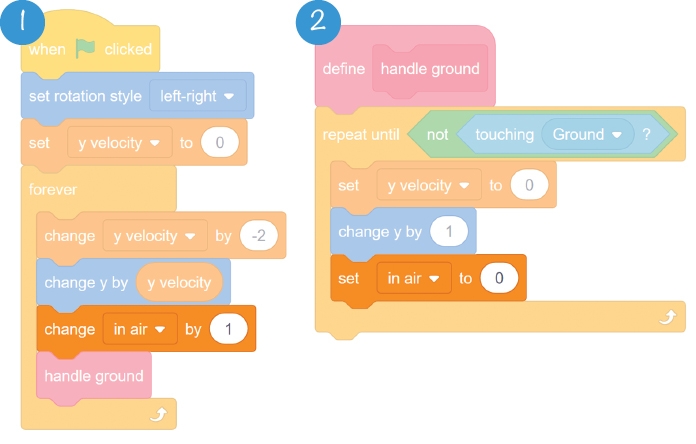
This code executes two actions within its perpetual loop: it allows the Cat sprite to descend until it comes into contact with the Ground sprite 1, then raises the Cat sprite if it has sunk into the ground 2.
By using these two segments of code, the cat will descend, make contact with the ground, and subsequently elevate if required, ultimately settling atop the Ground sprite.
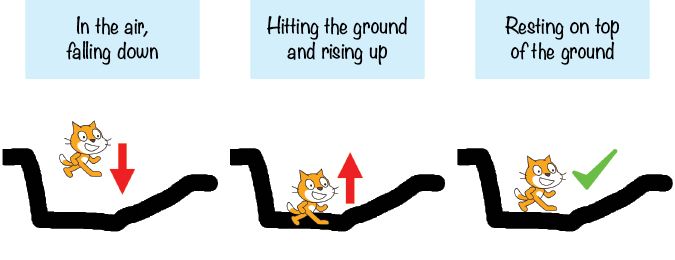

The falling code at 1 subtracts 2 from the y velocity variable and then moves the Cat sprite’s y position by y velocity, making the cat fall faster and faster.
But the repeat until block 2 will loop until the Cat sprite is no longer touching the Ground sprite. (If the cat is still in the air and falling, it will not be touching the ground, so the code in the loop is skipped.) Inside this loop, the y velocity value is set to 0 so that the Cat sprite stops falling any farther. The change y by 1 block will lift up the Cat sprite a little. The repeat until not touching Ground block continues lifting the sprite until it is no longer sunk into the Ground sprite. This is how the cat stays on top of the ground, no matter what the shape of the Ground sprite is.
SAVE POINT
Click the green flag to test the code so far. Drag the cat up with the mouse and let go. Make sure the cat falls and sinks into the ground a bit and then slowly lifts out of it. Then click the red stop sign and save your program.
3. MAKE THE CAT WALK AND WRAP AROUND THE STAGE
The cat also needs to walk left and right by use of the WASD keys, so add the following script to the Cat sprite:
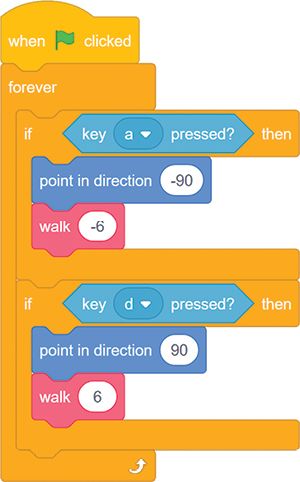
This code is straightforward: pressing A points the cat to the left (-90) and moves the x position by -6 (to the left); pressing D makes the cat point to the right and moves the x position by 6 (to the right).
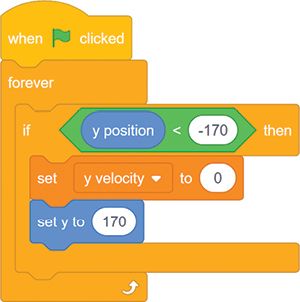
Next, add the following script to make the Cat sprite wrap around to the top if it falls to the bottom of the Stage:
SAVE POINT
Click the green flag to test the code so far. Press the A and D keys to make the cat walk up and down the slopes. If the Cat sprite walks off the edge of the Ground sprite and falls to the bottom of the Stage, the Cat sprite should reappear at the top. Then click the red stop sign and save your program.
4. REMOVE THE GROUND LIFT DELAY
The big problem with the code right now is that the Cat sprite is lifted from inside the ground to on top of it very slowly. This code needs to run so fast that the player sees the sprite only on top of the ground, not in it.
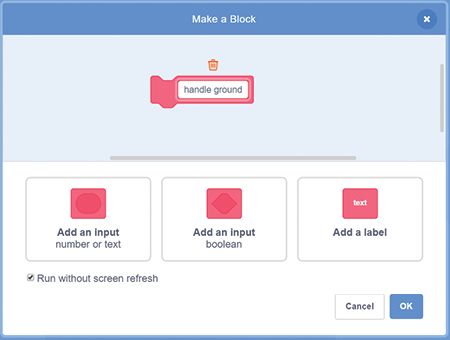
The pink custom blocks can help us do this. Go to the My Blocks category and click the Make a Block button. Name the block handle ground and then check the checkbox next to Run without screen refresh. With this box checked, Scratch will run the code in your custom pink block in Turbo Mode, even if the player didn’t enable Turbo Mode by shift-clicking the green flag. Otherwise, the ground-handling code would be too slow for this game.
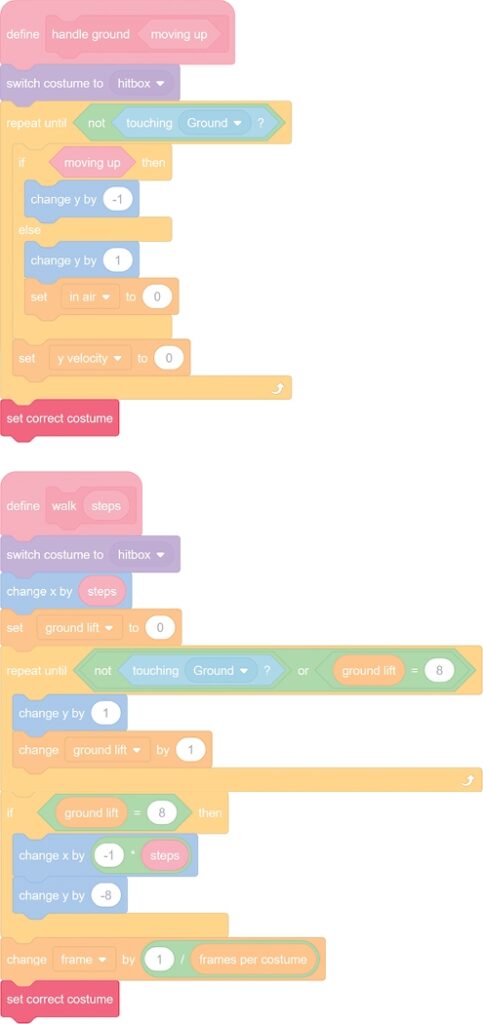
The define handle ground block should now appear in the Code Area. Change the code for the Cat sprite to make it use the handle ground block. The handle ground block goes where the repeat until not touching Ground blocks were, and that loop is moved under define handle ground.

This code works exactly as it did before, but now the handle ground block has Run without screen refresh checked, so the loop code runs in Turbo Mode. Lifting the cat now happens instantly, so it looks like the cat never sinks into the ground.
SAVE POINT
Click the green flag to test the code so far. Make the cat walk around or use the mouse to drop the cat from the top of the Stage as before. Now the Cat sprite should never sink into the ground. Then click the red stop sign and save your program.
 HANDLE STEEP SLOPES AND WALLS
The Ground sprite has hills and slopes that the cat can walk on, and you can change the Ground sprite to pretty much any shape in the Paint Editor. This is a big improvement for the player compared to just walking on the bottom of the Stage. But now the problem is that the Cat sprite can walk up the steep slope on the left as easily as it can walk up the gentle slope on the right. This isn’t very realistic. We want the steep slope to block the cat. To do this, we’ll make a small change to the walking code blocks.
At this point, the sprites are becoming overcrowded with lots of different scripts. So, right-click or long press the Code Area and select Clean up Blocks to reorganize the scripts into neat rows.
5. ADD THE STEEP SLOPE CODE

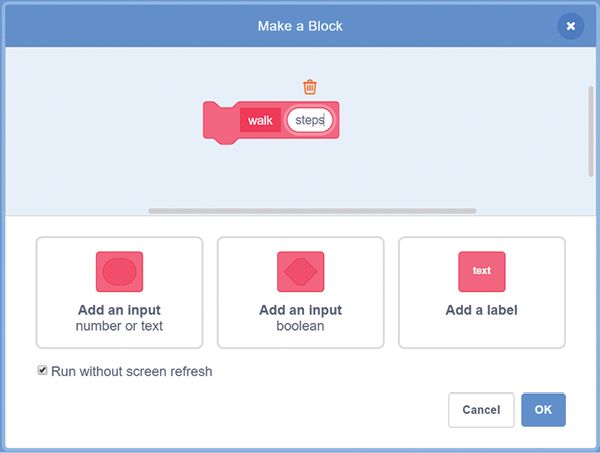
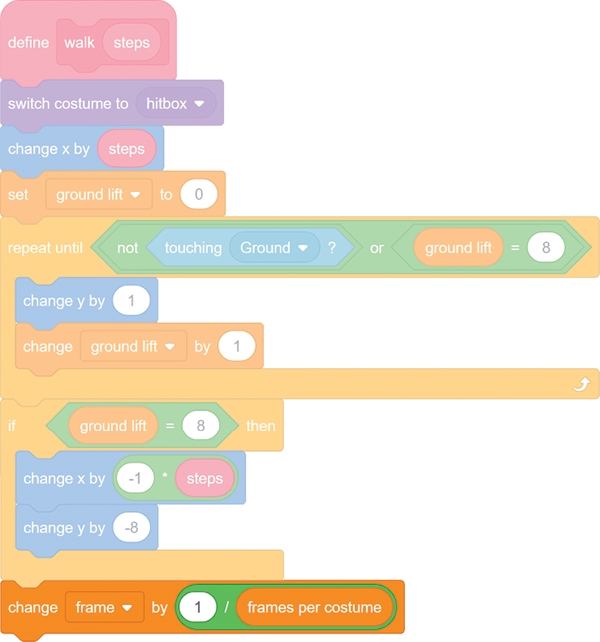
Currently, we’re required to modify the Cat sprite’s movement code and introduce additional code. Instead of directly altering the x position by a set value, we’ll implement a fresh custom block. This block, termed ‘walk,’ will contain an input named ‘steps.’ This input operates akin to a variable but remains confined within the define block of the custom block.
To create the ‘walk’ block, navigate to the ‘My Blocks’ section and click on the ‘Make a Block‘ button displayed in pink. Ensure to include the ‘steps’ input by clicking on ‘Add an input number or text.‘ Whenever we intend to execute the ‘walk‘ block, we’ll need to specify the number of ‘steps‘ to be taken as input. It’s crucial to select the ‘Run without screen refresh‘ checkbox for smooth execution.
This code also requires you to make a variable for the Cat sprite named ground lift (which should be For this sprite only). We’ll use this new variable to determine whether a slope is too steep for the cat to walk up. This code is a little complicated, but we’ll walk through it step-by-step. For now, make the Cat sprite’s code look like the following:
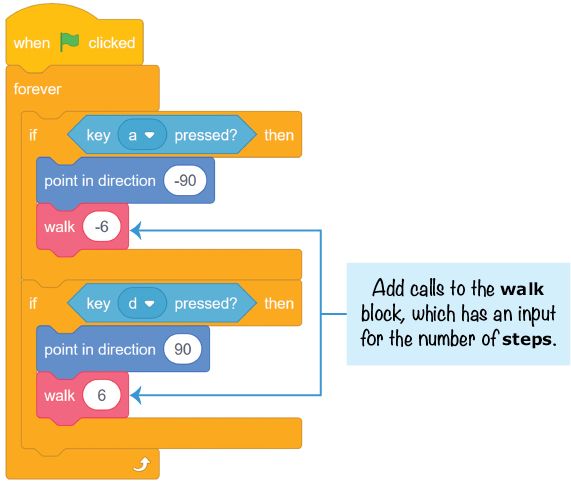
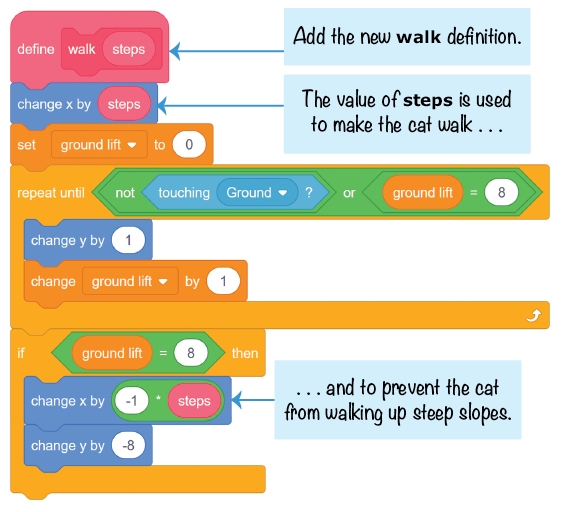
We aim to have the cat move six units, similar to our prior action. Thus, we employ -6 and 6 within the walk script when we invoke walk. Inside the define walk block, the steps input block is utilized in the change x by blocks, streamlining the code. This approach allows us to use the same script to shift the cat left (via the walk -6 block) or right (using the walk 6 block).
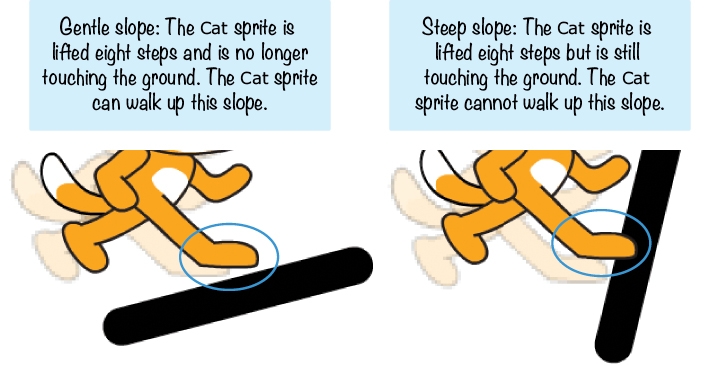
The code within the repeat until loop relies on the ground lift variable to ascertain whether the slope permits the Cat sprite to progress or if it’s an obstructing wall. Initially set at 0, ground lift increments by 1 each time the repeat until loop elevates the Cat sprite’s y position by 1. This loop persists until the sprite no longer touches the ground or ground lift equals 8.
When ground lift is below 8, signifying a less steep slope, the sprite can ascend the slope without further instructions in the define walk script.
However, if ground lift equals 8, the repeat until loop ceases. This condition signifies that “the sprite has ascended by 8, yet it’s still in contact with the Ground sprite, indicating a steep slope.” In such instances, we must revert both the elevation and the walking movement. Employing change y by -8 and change x by -1 * steps blocks undoes the Cat sprite’s movement. Multiplying the walk input by -1 generates the inverse number, aiding in reversing the input and variable actions.
This code is exactly like the code in the Maze Runner game in Chapter 3 that blocks the player from walking through walls.
SAVE POINT
Click the green flag to test the code so far. Use the A and D keys to make the cat walk around. The cat should be able to walk up the gentle slope on the right, but the steep slope on the left should stop the cat. Click the red stop sign and save your program.
 MAKE THE CAT JUMP HIGH AND LOW
We’ve figured out the walking code, so let’s add jumping. We can change the fall variable to a positive number. This means that the player will jump to a height equal to the value of this variable every time. But in many platform games, the player can make a short jump by quickly pressing the jump button, or they can jump higher by holding the jump button down. We want to use jumps in height and width in this platform game, so we have to come up with something more advanced than the code for regular jumps.
6. ADD THE JUMPING CODE
Let’s first create a For this sprite only variable named in air. This variable will be set to 0 whenever the Cat sprite is on the ground. But in air will start increasing when the Cat sprite is jumping or falling. The larger the in air value is, the longer the cat will have been off the ground and in the air.
Add this script to the Cat sprite:
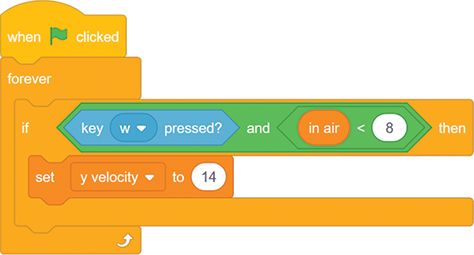
The forever loop keeps checking whether the W key is being held down. If it is, this will give the Cat sprite a velocity of 14—that is, the Cat sprite will be moving up. But note that there are two conditions for the cat to continue moving up—the player must hold down W and the in air variable must be less than 8.
Let’s edit two of the existing Cat sprite scripts to add the in air variable that limits how high the cat can jump.
When the player initiates the cat’s jump by holding down the W key, the y velocity variable is set to 14. Consequently, within the forever loop in script 1, the Cat sprite’s y position is incrementally altered by the positive y velocity, propelling it upwards. Initially, at the jump’s onset, the in air variable steadily increases but remains below 8. Continuously holding down the W key sustains the y velocity at 14, unaffected by the change y velocity by -2 block. Consequently, this prolonged elevation sustains the upward trajectory of the jump compared to a single key press iteration through the loop. However, once in air becomes equal to or greater than 8, the W key’s continuous pressing ceases to impact the outcome. It’s vital to note that for the code within the if-then block to execute, both conditions—key w pressed and in air < 8—must hold true.
Upon reaching this stage, the y velocity variable undergoes the expected decrease, prompting the eventual descent of the Cat sprite. In script 2, when the cat is back on the ground, the in air variable resets to 0.
SAVE POINT
Click the green flag to test the code so far. Press the W key to jump. Quickly pressing the key should cause a small jump. Holding down the W key should cause a higher jump. Make sure the cat can jump only while it’s on the ground and can’t do double jumps. Then click the red stop sign and save your program.
 ADD CEILING DETECTION
The cat can walk on the ground, and now walls will stop the cat from moving through them. But if the player bumps the Cat sprite’s head against a platform from below, the Cat sprite will float through it! To solve this problem, we need to make some adjustments to the lifting code to add ceiling detection.
7. ADD A LOW PLATFORM TO THE GROUND SPRITE
Add a short, low platform to the Ground sprite’s costume, as shown in the following figure. Make sure it is high enough for the cat to walk under but low enough that the cat can jump up and touch it.
This platform should be low enough that the cat could hit its head on it. If it can’t, then redraw the platform a bit lower.
SAVE POINT
Click the green flag to test the code so far. Make the cat jump under the low platform. Notice that when the Cat sprite touches the platform, it ends up above the platform. This is the bug we need to fix. Click the red stop sign.
8. ADD THE CEILING DETECTION CODE
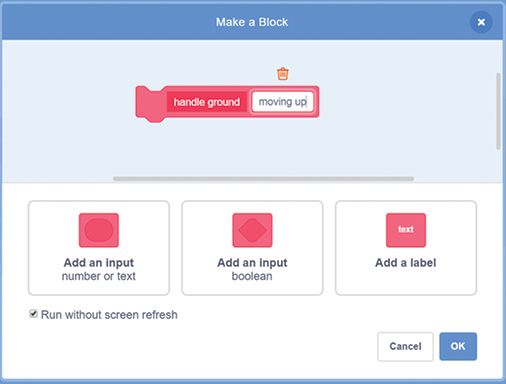
The issue with the existing code lies within the custom handle ground block, which assumes the Cat sprite always descends when touching the Ground sprite. However, the Ground sprite signifies any solid surface, including ceilings, where the Cat sprite should stop ascending if it’s moving upwards and touches it. To rectify this, we’ll modify the handle ground block by introducing a new Boolean input named moving up.
A Boolean represents a true or false value. Introducing this Boolean input is crucial as it helps determine whether the Cat sprite’s y velocity is greater than 0 when the handle ground block is initially called. This true or false value will be stored in the moving up input, akin to how a variable retains a value. Implementing y velocity > 0 within the if-then block instead of using moving up could inadvertently lead to the Cat sprite ascending above the ceiling, which is not the intended behavior.
To address this, right-click or long-press the define handle ground block and select Edit from the menu. This action will enable us to make the necessary modifications.
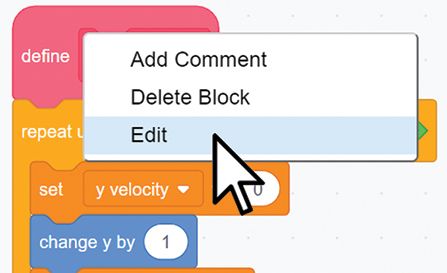
Click the Add an input boolean button. Name this new input field moving up and then click OK.
This will add a new moving up block that you can drag off the define handle ground block just like you do with blocks from the Block Palette. This moving up block will be used in a new if then else block. Modify the define handle ground block’s code to match this.
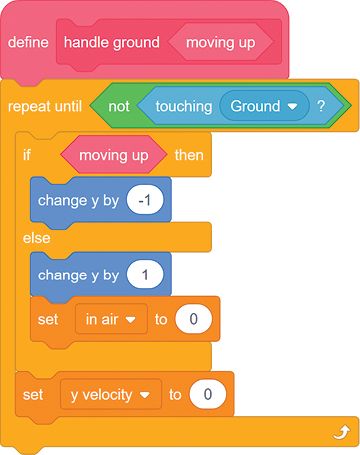
If the cat is moving up, the change y by -1 block makes the cat look like it’s bumping its head. Otherwise, the script behaves as it did previously, raising the cat so it sits above the ground.
Next, we have to edit the handle ground call in this script. We’ll add a Boolean condition to determine whether the sprite is moving up, which is y velocity > 0.
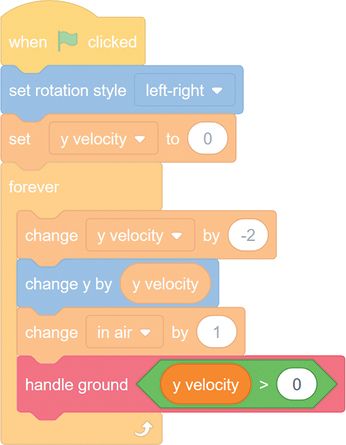
The handle ground y velocity > 0 block sets the moving up input to true if y velocity is greater than 0 (that is, if the sprite is jumping and moving up). If y velocity is not greater than 0, then the sprite either is falling down or is still, causing the moving up input to be set to false.
This is how the define handle ground block decides whether it should run change y by -1 (so the Cat sprite can’t go up through the ceiling) or run change y by 1 (so the Cat sprite is lifted up out of the ground). Either way, if the Cat sprite is touching the Ground sprite (which it is if the code inside the repeat until not touching Ground block is running), the y velocity variable should be set to 0 so that the Cat sprite stops falling or jumping.
SAVE POINT
Click the green flag to test the code so far. Make the cat walk under the low platform and jump. Make sure the cat bumps into the platform but does not go above it. Then click the red stop sign and save your program.
 USE A HITBOX FOR THE CAT SPRITE

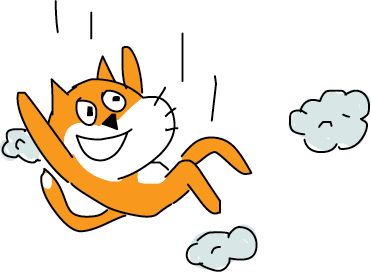
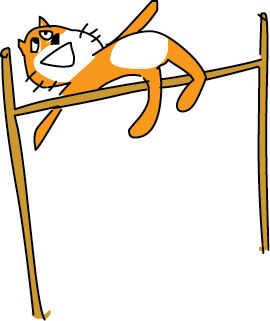
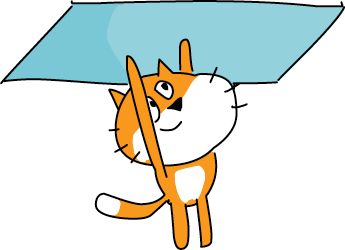
There’s another problem with the game. Because the code relies on the Cat sprite’s touching the Ground sprite, any part of the Cat sprite can be “standing” on the ground, even its whiskers or cheek! In this figure, the cat isn’t falling because its cheek has “landed” on the platform, which isn’t very realistic.
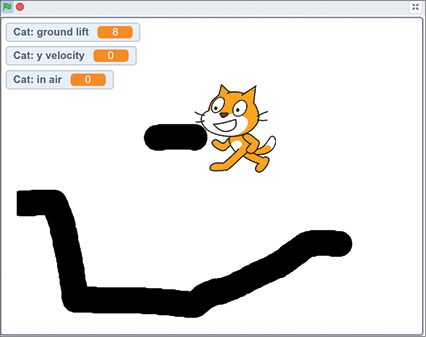
Fortunately, we can fix this problem by using the hitbox concept.
9. ADD A HITBOX COSTUME TO THE CAT SPRITE
Click the Cat sprite’s Costumes tab. Then hover over the Choose a Costume button and click the Paint button that appears. Draw a black rectangle that covers most (but not all) of the area of the other two costumes. The following figure shows a slightly transparent first costume in the same image so you can see how much area the black rectangle covers:

Name this particular costume ‘hitbox‘. Whenever the code in the ‘Platformer‘ program verifies whether the ‘Cat‘ sprite is in contact with the ‘Ground‘ sprite, we will change the costume to the black rectangle ‘hitbox’ before the assessment and then revert it to the regular costume afterward. This procedure will allow the ‘hitbox’ to ascertain if the cat is touching the ground.
These transitions between costumes will be managed using the pink custom blocks with the ‘Run without screen refresh’ option enabled. Consequently, the ‘hitbox’ costume will not be displayed on the screen at any point.
10. ADD THE HITBOX CODE
We’ll add switch costume to blocks to the start and end of both pink custom blocks. Modify the Cat sprite’s code to look like this:
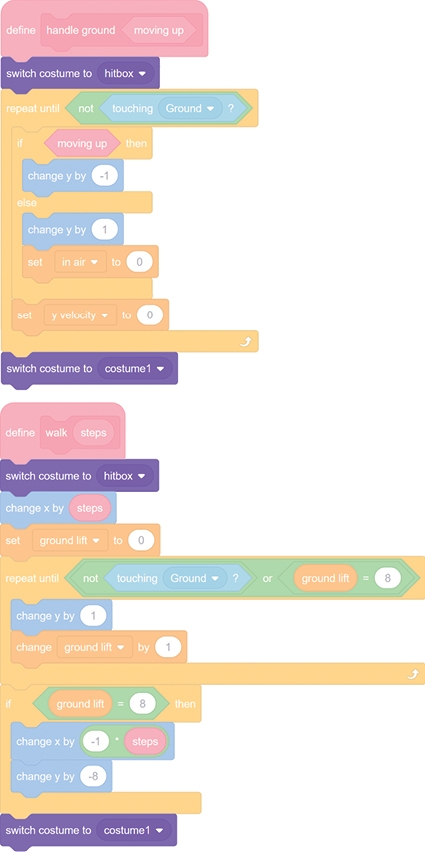
These blocks from the purple Looks category will change the costume to the hitbox. Because the hitbox is a simple rectangle that doesn’t have protruding parts that could “catch” on platforms, like the cat’s head and whiskers could, the game will behave in a more natural way.
SAVE POINT
Click the green flag to test the code so far. Make the cat jump around and make sure the cat can’t hang off the platform by its cheek or tail. Then click the red stop sign and save your program.
 ADD A BETTER WALKING ANIMATION
The Cat sprite that a Scratch project starts with has two costumes named costume1 and costume2.
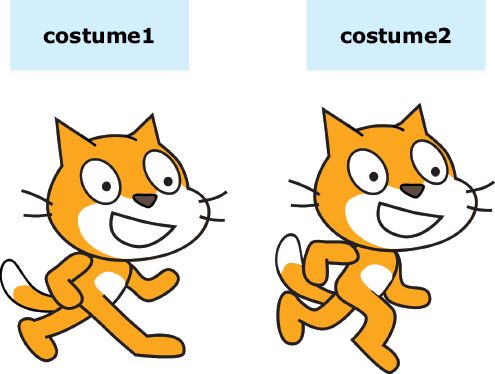
You can make a simple walking animation by switching back and forth between these two costumes. However, a Scratcher named griffpatch (whose profile is at https://scratch.mit.edu/users/griffpatch/) has created a series of walking costumes for the Scratch cat.

In addition, griffpatch has made costumes for standing, jumping, and falling.
Using these costumes will make the Platformer game look more polished than using the two simple costumes that the Cat sprite comes with. We just need to add some animation code that switches between these costumes at the right time.
11. ADD THE NEW COSTUMES TO THE CAT SPRITE
To add the new costumes, you must upload the costume files into your Scratch project.
Then, in the Scratch editor, click the Cat sprite’s Costumes tab. Hover over the Choose a Costume button in the lower left, click the Upload Costume button, and select to upload the file. This creates a new sprite with as its costume.
Delete the original costume1 and costume2 costumes, but keep the hitbox costume. Put the costumes in the following order (it’s important that you match this order exactly):
StandJumpFallWalk1Walk2Walk3Walk4Walk5Walk6Walk7Walk8hitbox
Each costume has not only a name (like Walk1, Jump, or Fall) but also a number. The costume number is based on the costume’s order in the Costumes tab. For example, the costume at the top is named Stand, but it is also known as costume 1. The costume beneath it is named Jump, but it is also known as costume 2. The code we add in the next step will refer to costumes by their names and numbers.
12. CREATE THE SET CORRECT COSTUME BLOCK
With all these different costumes, it will be a bit tricky to determine which frame we need to show and when. We’ll use the idea of animation frames: several frames shown together quickly make a moving image, just like a flip book.
To keep track of the frames, create two For this sprite only variables named frame and frames per costume. Then add two set blocks for these initial variables to the Cat sprite’s when green flag clicked script.
Now the setup is done.
As the player moves the Cat sprite left or right, we want the frame variable to increase. The frames per costume variable keeps track of how fast or slow the animation runs.
Let’s edit the code in the define walk custom block to increase the frame variable by an amount calculated from frames per costume.
When the cat is standing still (that is, not moving left or right), the frame variable should be reset to 0. Modify the Cat sprite’s existing when green flag clicked script to add a third if then block that resets the frame variable.

Now let’s write some code to determine which costume to show. We’ll use this code in a few places in the scripts we’ve written, so let’s make a custom block.
In the pink My Blocks category, click the Make a Block button and name this block set correct costume. Check the option Run without screen refresh and then click OK. Add the following blocks to the Cat sprite, starting with the new define set correct costume block.
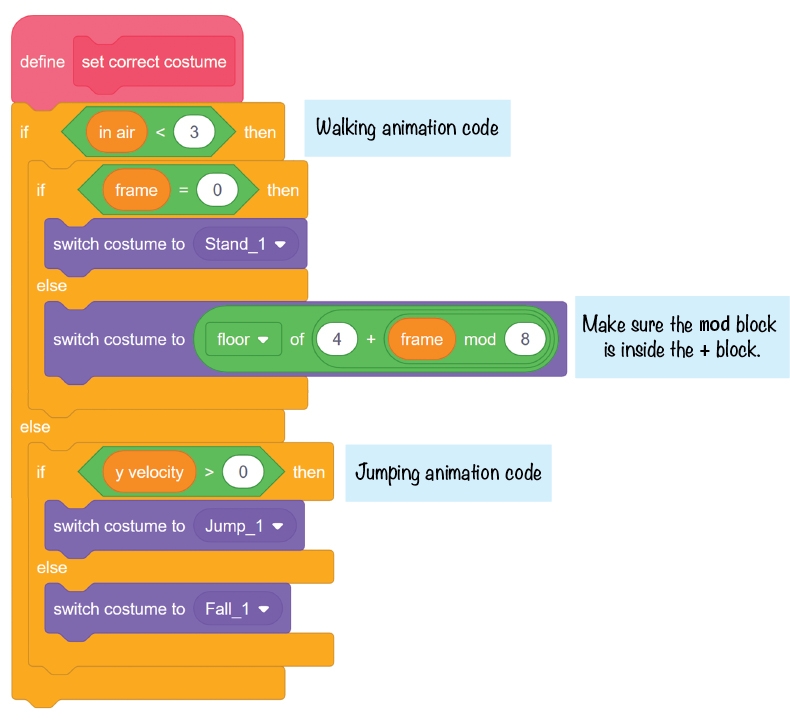
When the Cat sprite is on the ground (or has recently begun jumping or falling, with in air being less than 3), we aim to display either the standing costume or one of the walking costumes. The initial script upon green flag clicked sets frame to 0 unless the player is pressing the A or D keys. Consequently, when frame is at 0, the switch costume to Stand block exhibits the Stand costume. Alternatively, a calculation determines which of the eight walking costumes to showcase. These costumes are indexed based on their order in the Costumes tab.
The specific walking costume to display is determined by using the switch costume to floor of 4 + frame mod 8 blocks. Let’s break down this calculation for a better understanding.
The mod block performs a modulo operation in mathematics, which entails the remainder of a division. For instance, 7 / 3 = 2 remainder 1, hence 7 mod 3 = 1 (the remainder). Here, we employ mod to compute the costume number for display.
As the frame variable keeps increasing, despite having only eight walking costumes, we ensure that frame ranging from 0 to 7 corresponds to costumes 4 to 11. This is accomplished using the 4 + frame blocks. Yet, when frame reaches 8, the intention is to revert to costume 4, not costume 12.
To facilitate this wrap-around with costume numbers, the mod block becomes instrumental. Employing a mathematical approach: since 8 mod 8 = 0, a frame value of 8 will exhibit the first walking costume! Adding 4 to this number compensates for the first walking costume actually being costume 4. (Remember, costumes 1, 2, and 3 represent standing, jumping, and falling, respectively.) The sum is subsequently utilized in conjunction with the floor block. Floor denotes rounding down in programming terms. Occasionally, frame might be set as a decimal value like 4.25 or 4.5. Therefore, even if 4 + frame yields 8.25 or 8.5, we round down to display costume 8.
That’s the most comprehensive use of math in this context, but when broken down, it becomes more comprehensible.
The code in the else part of the if then else block handles what happens if in air is greater than or equal to 3. We check y velocity to see whether the cat is falling (that is, if y velocity is less than or equal to 0) or jumping (that is, if y velocity is greater than 0) and switch to the correct costume. Finally, the define set correct costume code finishes.
Replace the switch costume to costume1 blocks in the define handle ground and define walk blocks with the new set correct costume blocks. Also, add the change frame by 1 / frames per costume blocks so that the frame variable increases over time, as shown here:
SAVE POINT
Click the green flag to test the code so far. Move the cat around the Stage, making sure the walking animation displays correctly. Also, make sure the standing, jumping, and falling costumes are shown at the right times. Then click the red stop sign and save your program.
 CREATE THE LEVEL
The new walking animation makes the Platformer game look more appealing. Now let’s change the plain white background into a real level. What’s great about the code we’ve written for the Cat sprite to walk, jump, and fall is that it will work with a Ground sprite of any shape or color. So if we change the Ground sprite’s costume (say, for different levels), we don’t have to reprogram the Cat sprite!
13. DOWNLOAD AND ADD THE STAGE BACKDROP
Click the Ground sprite’s Costumes tab. Hover over the Choose a Costume button, click the Upload Costume button that appears, and select PlatformerBackdrop.png. After this costume has uploaded, you can delete the previous costume.
It’s not enough to add the file PlatformerBackdrop.png as a costume for the Ground sprite. You must also upload it as a Stage backdrop. Hover over the Choose a Sprite button, click the Upload Backdrop button that appears, and select PlatformerBackdrop.png to upload it. We need to upload the file to both places because we’ll be erasing all the “background parts” from the Ground sprite in the next step. We only need the Ground sprite to mark which parts the Cat sprite can walk on. The backdrop will be the image that is displayed on the Stage.
14. CREATE A HITBOX COSTUME FOR THE GROUND SPRITE
The Platformer game’s functioning relies on the interaction between the Cat sprite and the Ground sprite. The Ground sprite’s costume serves as a hitbox. If the Ground sprite’s costume represents a full rectangle covering the entire Stage, it signifies the entire Stage as solid ground. However, it’s essential to remove sections of the Ground sprite’s costume that belong to the background and are not considered as platforms.
To achieve this, follow these steps within the Paint Editor:
- Utilize the Select tool.
- Drag the Select tool over the section of the costume you wish to delete.
- Once the desired area is selected, press the ‘delete’ key to remove that specific piece from the costume.
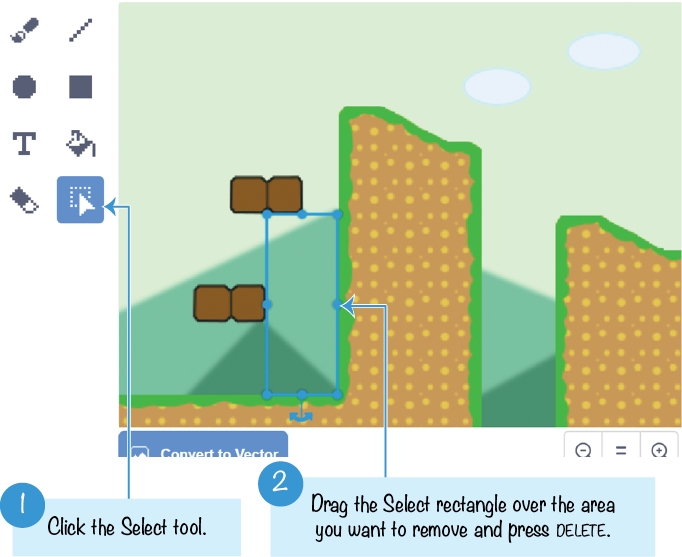
Use the Eraser tool to erase areas that aren’t rectangular. If you make a mistake, click the Undo button at the top of the Paint Editor to undo the deletion.
Keep removing the background parts of the costume until only the platform parts remain.
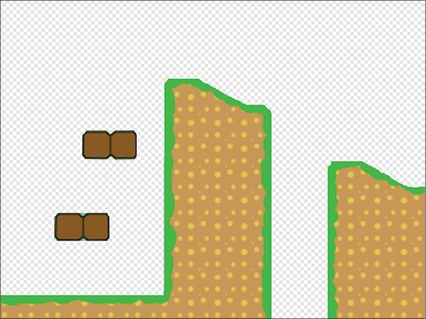
If you’re having trouble creating this costume, you can use the premade PlatformerBackdropHitbox.png image. The background parts of the image are already deleted, so you just need to click the Upload Costume button on the Costumes tab to add it.
15. ADD THE GROUND SPRITE’S CODE
The Stage backdrop is used to set the appearance of the platforms and background. The Ground sprite is used to identify which parts are solid ground that the Cat sprite can walk on. Add the following code to the Ground sprite’s Code Area:
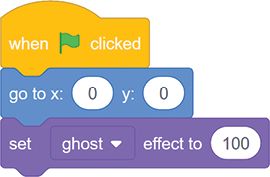
The alignment between the Ground sprite’s costume and the Stage’s backdrop is crucial to ensure seamless integration without noticeable differences. To achieve perfect alignment, adjust the Ground sprite’s position to coordinates (0, 0). This alignment becomes essential since both the Stage backdrop and the Ground sprite’s costume originate from the same image file. Failure to position the Ground sprite at coordinates (0, 0) might result in misalignment between the costume and the backdrop.
The detailed drawing of the Ground sprite’s costume matters less in this context compared to its shape. What’s imperative is that the Ground sprite precisely overlays the backdrop. Once the alignment is achieved, utilizing the ghost effect by setting it to 100 will further ensure seamless integration between the Ground costume and the backdrop. In essence, the backdrop represents the visual aspect of the level, while the Ground sprite serves as its functional hitbox.
SAVE POINT
Click the green flag to test the code so far. Make sure you can move the cat all around the Stage. Then click the red stop sign and save your program.
16. ADD MORE WRAP-AROUND CODE TO THE CAT SPRITE
Notice that the level has a couple of floating platforms and a hill with a pit in the middle. When the cat falls down the pit, it wraps around the Stage and reappears at the top. Let’s add wrap-around code for the left and right edges of the Stage as well. Add the following script to the Cat sprite:
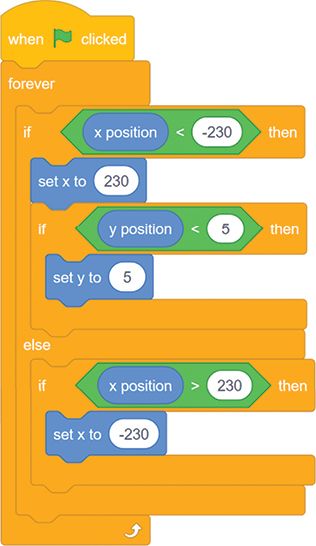
When the cat walks to the left edge of the Stage, its x position will be less than -230. In that case, we make it wrap around to the right edge by setting x position to 230.
Also, if the cat is moving from the left side of the Stage, its y position will be less than 5. This will put it inside the ground when moved to the right edge of the Stage, so an if then block checks for this condition and sets y position to 5.
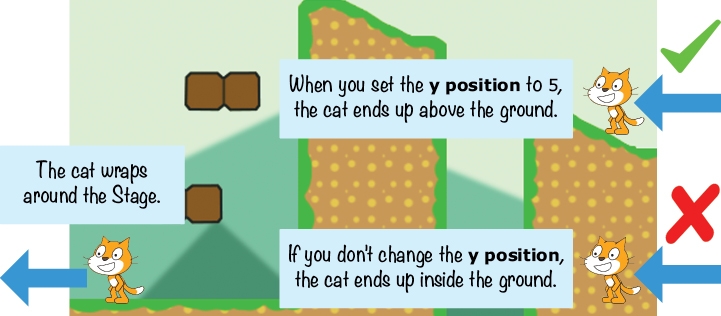
The other if then block wraps the Cat to the left edge of the Stage if it’s on the right edge (that is, its x position is greater than 230).
SAVE POINT
Click the green flag to test the code so far. Make sure the cat can walk off the left edge of the Stage and wrap around to the right, and vice versa. Then click the red stop sign and save your program.
 ADD CRAB ENEMIES AND APPLES
We have completed setting up the entire Platformer game! Players can control the Cat sprite to walk, jump, fall, and stand on platforms. The Cat sprite boasts captivating animations, while the backdrop creates a realistic video game environment.
The final step involves creating a game utilizing all the elements we’ve assembled. This includes introducing an apple that randomly appears across the Stage. Additionally, we’ll incorporate a few enemies tasked with attempting to reach the Cat sprite and pilfer the apples.
17. ADD THE APPLE SPRITE AND CODE
Click the Choose a Sprite button and select the Apple sprite from the Sprite Library window that appears; then click OK.
As in previous games, we’ll use a variable to track the game’s score. Click the orange Variables category and then click the Make a Variable button to create a For all sprites variable named Apples Collected. This variable will keep track of the player’s score.
In the Apple sprite’s Code Area, add the following code:
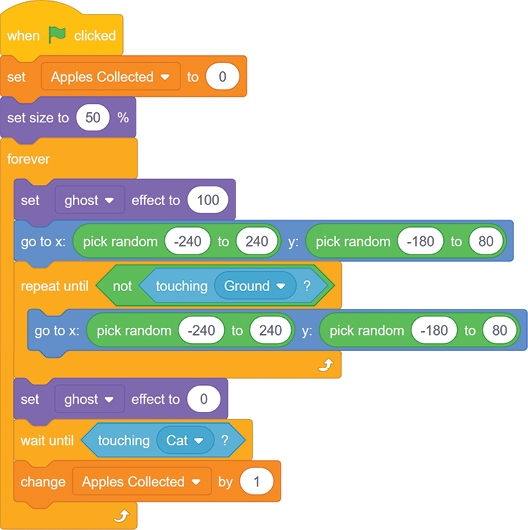
At the start of the game, when the player clicks on the green flag, the game initializes the Apples Collected score to 0. Furthermore, the size of the Apple sprite is adjusted by reducing it to 50 percent of its original size.
During gameplay, the Apple sprite’s appearance necessitates random placement on the Stage. To ensure flexibility, the Apple sprite is made invisible by setting its ghost effect to 100. It then relocates to a randomized position on the Stage.
However, this randomization must consider avoiding placement inside the Ground sprite, as this would render the apple unobtainable for the player. To prevent the Apple sprite from positioning itself within the boundaries of the Ground sprite, a loop iterates, attempting new random positions until the Apple sprite ceases to be in contact with the Ground sprite. This movement remains unseen by the player due to the continued ghost effect setting of 100. Once the Apple sprite discovers a location devoid of contact with the Ground sprite, it becomes visible again through set ghost effect to 0.
Subsequently, the Apple sprite remains in a waiting state until the Cat sprite touches it. Upon collision, the score in Apples Collected increments by 1, and the Apple sprite loops to locate a new random position on the Stage.
SAVE POINT
Click the green flag to test the code so far. Make sure the Apple sprite never appears inside the ground. When the cat touches the apple, the score in Apples Collected should increase by 1, and the Apple sprite should move to a new random place. Click the red stop sign and save your program.
18. CREATE THE CRAB SPRITE
The game wouldn’t be very challenging if all the player had to do was jump around and collect apples. Let’s add some enemies that the player must avoid.
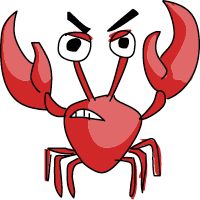
Right-click or long press the Cat sprite and select Duplicate. The enemies will use the same code as the Cat sprite so that they can jump and fall on the platforms. (We’ll remove the code that assigns the keyboard keys to control the sprite and replace it with code that moves the crabs around randomly.) Rename this duplicated sprite Crab. Then, on the Costumes tab, click the Choose Costume button and select the crab-a costume. Then open the Costume Library again and select the crab-b costume.
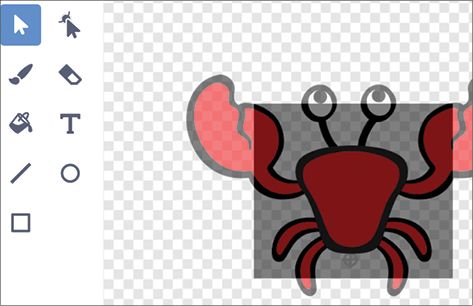
The Crab sprite will still have all the Cat sprite costumes (Stand, Fall, Walk1, and so on). Delete these Cat sprite costumes, including the hitbox costume. Create a new hitbox costume that is the right size for the crab. Here’s what the hitbox costume should look like (the crab-a costume has been placed over it so you can see the relative size, but the costume is just the black rectangle):
19. CREATE THE ENEMY ARTIFICIAL INTELLIGENCE
In games, artificial intelligence (AI) refers to the code that controls the enemies’ movements and how the enemies react to the player. In the platform game, the AI for the crabs is actually pretty unintelligent: the crabs will just move around randomly.
Make a Variable
In the orange Variables category, click the Make a Variable button and create a For this sprite only variable named movement. The movement variable will store a number representing the Crab sprite’s movements.
- Walk left
- Walk right
- Jump up straight
- Jump to the left
- Jump to the right
- Stay still
The Crab sprite’s movements will be randomly decided and will frequently change. Add the following code to the Crab sprite:
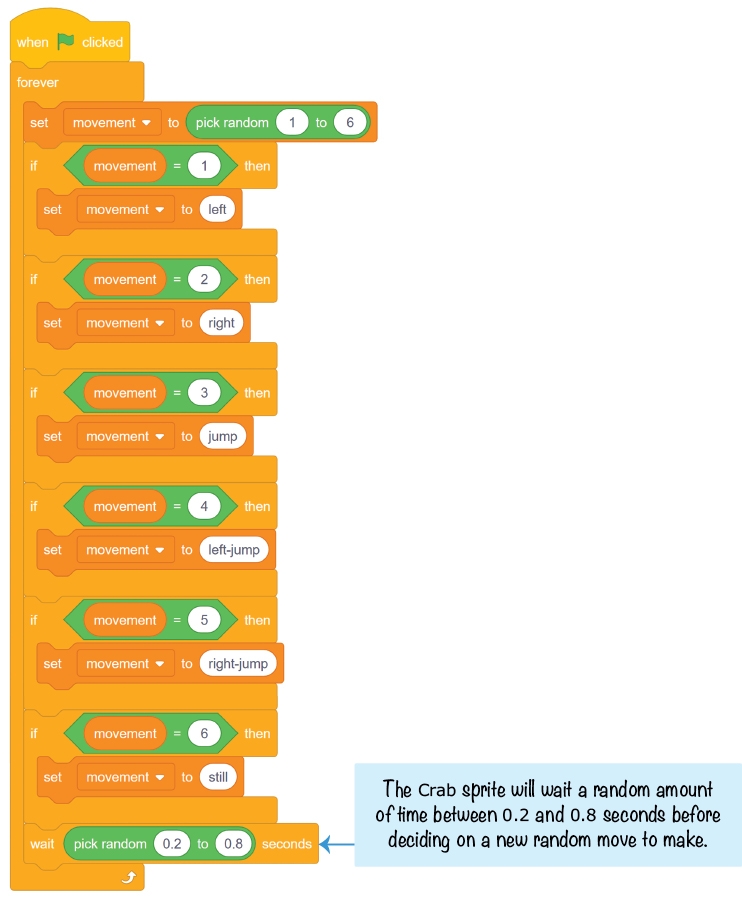
At first, the movement variable is set to a random number between 1 and 6 that decides which movement the crab will make.
The rest of the Crab sprite’s code defines these movements. Find any code from the Cat sprite code that uses the when key pressed blocks and replace those blocks with ones that check the movement variable. (If you ran the program right now, the keyboard keys would control the Cat and Crab sprites, because they have the same code!)
Modify the Crab sprite script that checks whether the player is pressing the A key or the D key to match the following code:
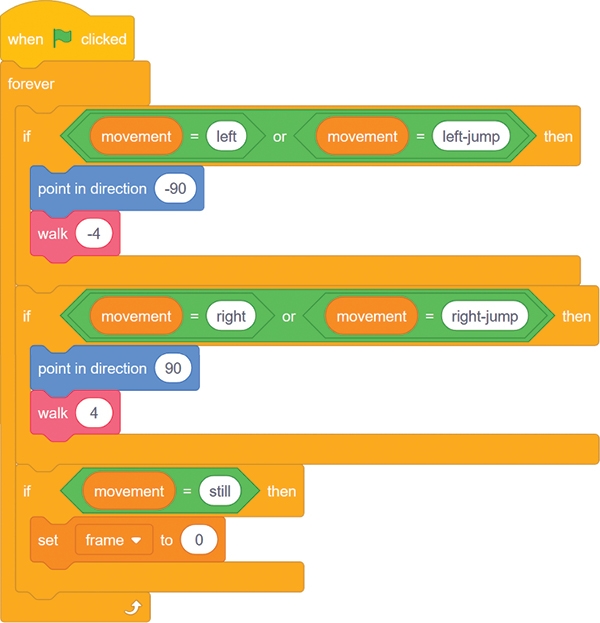
As with the Cat sprite, this code lets the Crab sprite walk left and right. Change the values in the walk blocks to -4 and 4 to make the crab move slower than the player.
Then change the script that handles the player pressing the W key to jump to match the following code:
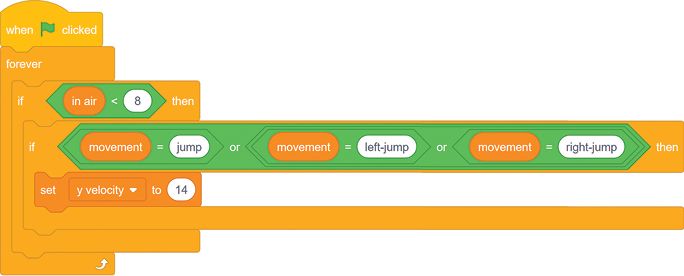
This code lets the Crab sprite jump up, left, and right.
Now let’s animate the crab’s movements. The Crab sprite has only two costumes, crab-a and crab-b. We’ll switch between these two costumes to make it look like the crab is walking. We can simplify the set correct costume block for the Crab sprite a bit.
Modify the set correct costume code to look like the following:
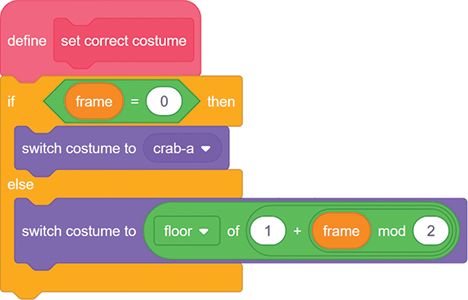
Notice that the numbers in the floor of 1 + frame mod 2 blocks have also changed. The first costume is costume 1, and the Crab has only two costumes, so the numbers in these blocks have been changed to 1 and 2.
Finally, we need to create a new script so that the crabs can steal apples from the player. Add this code to the Crab sprite:
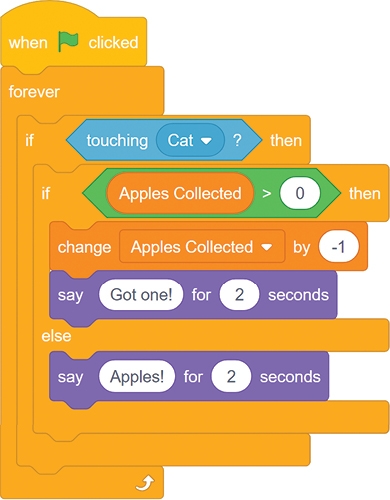
The Crab sprites subtract 1 from Apples Collected and say “Got one!” when they touch the player. If the player has 0 apples, the Crab sprites will say “Apples!” but will not subtract 1 from Apples Collected.
The game will be a bit more exciting with two crabs, so right-click or long press the Crab sprite in the Sprite List and select Duplicate from the menu.
SAVE POINT
Click the green flag to test the code so far. Make sure the two crabs are jumping around. When they touch the cat, they should steal an apple and say “Got one!” If the cat doesn’t have any apples, the crabs should just say “Apples!” Then click the red stop sign and save your program.
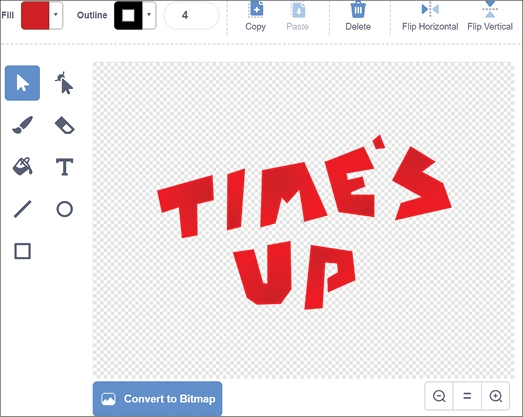
20. ADD THE TIME’S UP SPRITE
The last thing we need to add to the game is a timer. Now the player will be under pressure to grab apples as quickly as possible instead of playing it safe. Hover over the Choose a Sprite button, click the Paint button, and draw the text Time’s Up in the Paint Editor. Mine looks like this:
Rename the sprite Time's Up. Then create a For all sprites variable named Timer and add the following code:
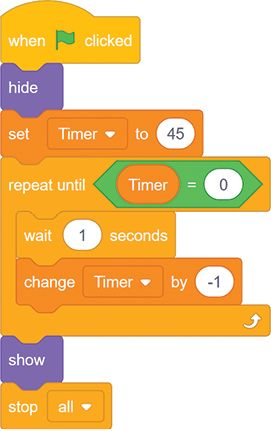
This code gives the player 45 seconds to collect as many apples as possible while trying to avoid the crabs who will steal one. When the Timer variable reaches 0, the Time's Up sprite will appear, and the game will end.
Now the Platformer game is ready for final testing!
SAVE POINT
Click the green flag to test the code so far. Walk and jump around, collecting apples while trying to avoid the crabs. Make sure that when the timer reaches 0, the game ends. Then click the red stop sign and save your program.
SUMMARY
You with the tools and concepts to create diverse and complex projects like the advanced Platformer game you’ve developed. Here’s a summary of what you’ve accomplished in this chapter:
- Utilized a ground sprite to establish the player’s foothold.
- Employed pink custom blocks with the ‘Run without screen refresh’ option enabled for smoother execution.
- Implemented mechanics allowing the player to navigate slopes seamlessly.
- Integrated ceiling detection to prevent the player from passing through low platforms.
- Developed intricate animations for walking, jumping, and falling actions.
- Introduced AI for enemies, enabling autonomous movement.
Completing this article is just the beginning of your programming journey. Scratch offers a plethora of possibilities, and exploring other Scratchers’ programs can inspire new ideas. Try replicating games you admire or venture into creating your unique projects from scratch.
Remember, Scratch provides a creative space equipped with the tools and concepts necessary for crafting diverse and engaging creations. Keep experimenting, learning, and pushing the boundaries of your imagination!
By delving into these techniques, you’ll unlock a world of creative possibilities in Scratch programming examples, making it an ideal starting point for beginners eager to explore game development.
There you have it! Have fun creating your own project. If you’ve got ideas for additions or improvements, drop them in the comments. I might even consider making a part two. Until then, happy coding in Scratch!
Creating AN ADVANCED PLATFORMER in Scratche: Video Tutorial
LINK TO THE SCRATCH PROJECT: https://scratch.mit.edu/projects/925259846/
For more information on programming in Scratch and to explore a wide range of educational resources, please visit https://techclass4kids.com/. Dive deeper into the world of coding and unleash your creativity with TechClass4Kids!
Comments
One response to “MAKING AN ADVANCED PLATFORMER”
[…] to the world of Scratch programming! Whether you’re exploring scratch programming examples for beginners or searching for scratch […]